
User guide


Hardware and Software Installation
Rev 2.0 Mar.10 31
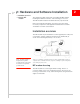
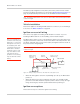
You can also use a ground screw on the connector panel of the MP modem. Use
a 16-gauge wire if you choose to use a ground screw. A ground screw is not
required as long as the power harness is properly grounded.
Figure 2-4: The ground screw connector on the connector panel.
Note: Tighten cables
connected to the MP
modem by hand. Do not
use tools.
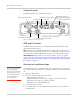
Step 2—Mount the antennas and install the
cables
The MP597 modem has two Main RF antenna connectors and one GPS antenna
connector. The MP WiFi has an additional RF antenna connector for an AP
antenna. The MP modem requires an RF antenna to connect to the wireless
network. The second RF connector is optional and allows for receive diversity.
The built-in GPS module requires a dedicated GPS antenna or a combination
antenna with cables to both the Main RF and GPS antenna connectors on the MP
modem.
If you already have an MP modem combination GPS antenna, you can re-use it
with your new MP modem. This antenna has two leads—one for Main RF (TNC
connector) and one for GPS (SMA connector).
Main RF antenna
Use an approved Main RF antenna to connect to the wireless network. The
antenna must have 50 ohms impedance and a cable with a TNC connector (or
SMA connector if the antenna is being used for receive diversity), as well as the
following characteristics:
• The total maximum gain, including cable loss, must not exceed 4.15 dBi (if
the antenna operates on the PCS band) or 5.1 dBi(if the antenna operates
only on the Cellular band).
• The antenna must transmit and receive on the necessary frequency bands in
your coverage area. The MP modem supports the following RF bands.
· CDMA Networks:
· 1900 MHz(PCS)
· 800 MHz(Cellular)
You can use a dual-band antenna that supports both frequencies.
If your MP modem will only be connected to networks that use one of the
bands, an appropriate single-band antenna is sufficient. Contact your service
provider for information about radio bands used in your area.
If you are using a ground screw,
Power
I/O
insert it here.