EZYPRO ECG Recorder INSTRUCTIONS FOR USE SKU: UG02U0R Copyright notice Intellectual property rights arising out of any content in this document is owned by Sigknow Biomedical or has been licensed to it by the owners of the intellectual property rights. Please read this manual carefully before using the device. Dear Customer, thank you very much for choosing EZYPRO. This manual is written and edited by Sigknow Biomedical Co., Ltd.; all rights reserved.
Table of Content About this device ............................................................................................................................. 3 Caution ..................................................................................................................................... 3 Important information .............................................................................................................. 3 Product introduction .................................................
About this device Model: UG02 SKU: UG02U0R Intended Use EZYPRO ECG Recorder is a prescription-only, single-patient-use, continuously recording cardiac rhythm recorder that can be worn up to 14 days each time through recharge. It is indicated for use on patients who are 18 years old or older and those who might suffer from transient symptoms such as palpitations, shortness of breath, dizziness, light-headedness, pre-syncope, syncope, fatigue or anxiety. Caution 1.
. The recording from the device can only be used as a reference for the physician to make further diagnoses based on the medical condition of the patient. It should not be used directly as a factor in clinical decision. 5. This device shouldn’t be worn when bathing or exercising, due to the water and sweat that can cause the patch to peel off. Underwater activities are not allowed when wearing this device. 6. There are temperature and humidity limitations for this device.
Product introduction EZYPRO ECG Recorder is a single-lead ECG recorder that can transfer the recorded ECG signal to another device powered by Android device through Bluetooth while wearing it. The duration and other basic operational parameters of the recorder are allowed to prescribe for varied needs.
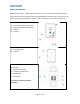
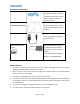
Accessories introduction Waterproof plug The waterproof plug is a rubber plug of Micro USB port to avoid liquids flowing into the recorder. Need to attach or detach the plug by a tweezer. Overlay tape The overlay tape is a medical (Exclude in this product) nonwoven tape to paste on the patch for improving the floating situation. Micro USB cable The Micro USB cable is a onemeter long cable to contact the recorder and PC.
Measuring principles ECG recorder is to measure every tiny waveform derived from electrical pulse of cardiac cells by using electrodes on patient’s body surface. The electrical currents can be detected from multiple surfaces of the patient’s chest and limbs, and the signals will be obtained based on relative positions of the electrodes on the skin. (Reference: Berbari, E. J. “Principles of Electrocardiography.” The Biomedical Engineering Handbook: Second Edition, Edited by Joseph D.
13. The device is waterproof. It allows shower during the duration, but not bathing, steam bathing, swimming, diving and other underwater activities. 13.1. Shorten the shower time and the water should not be too hot. 13.2. Avoid flushing the device directly with water and keep soaps away from it. When wiping the chest, please dry the water by pressing; when wiping other body places, use one hand to fix the device. 13.3. If the patch surface gets wet, let it dry naturally. Do not remove them directly.
𝑅𝑅 Where 𝑅𝑅 , 𝑅𝑅 19.4. ,…, 𝑅𝑅 + ⋯ + 𝑅𝑅 8 60 𝑠𝑒𝑐 𝐻𝑒𝑎𝑟𝑡 𝑟𝑎𝑡𝑒 = 𝑅𝑅 = 𝑅𝑅 + 𝑅𝑅 (𝑠𝑒𝑐) were previous 8 RRI. Do not use Bluetooth bracelets or other Bluetooth-enabled electronic products at the same time, it might cause signal interference or transmission delay. 20. The program “UG02 setting tool” is used to set up operational parameters of the device, such like recording time, UTC time & patient ID. It is only for the medical institution.
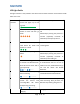
LED Light Guide The light indication is only related to the status of the recorder and does not involve the health status of the user. General While Power On successfully, Power on successfully. Situation Green LED lights up for 30 seconds. While Power On, Orange LED Device doesn’t power on due to lead flashes 5 times and then go off. down. Please keeps pressing the patch for 2 minutes (especially frontside of electrodes) and repeat power on.
Green LED lights up Charging complete indicator. continuously while charging. Abnormal In Power On stage, Red LED Hardware failure detected. Please Situatoin lights up for 10 seconds and consult with your local distributor. then goes off. In Power On stage, Green and Device detects that there is already an Red LEDs light up together for ECG recording inside. User interruption 10 seconds, then go off. to erase the existing file is required.
Applying Steps PROCESS FLOW CHART Follow these steps to use EZYPRO ECG recorder. Start from setting the device. HOW TO SET UP DEVICE? STEP1 Install software Please accessed this URL: https://tinyurl.com/y67u4ywp to install the program “UG02 setting tool” in PC.
STEP2 Set up Please use the Micro USB connector to connect the device and the PC. If the waterproof plug is already attached on the device, please remove it first by the tweezer. After setup, put the waterproof back to the device. During setup, please maintain the device connecting to the PC. Click the “UG02 setting tool” icon and active. Main screen as shown. If it’s shown the low battery on “Device Statues”, please charge first.
item function Functional instruction (1) Language Click the drop-down menu to choose language. (2) Set recording Set recording days from 1 day to 14 days. days (3) Set device time Set the recorder internal time in UTC (Coordinated Universal Time). When recording ECG signal, it will be based on this time. (4) Set patient S/N Set the patient S/N for tracking, it’s also shown as filename of ECG data. Patient S/N is up to 11 yards composed of numbers, letters and allowed some special characters.
HOW TO ASSEMBLE ACCESSORIES? Assemble accessories to the recorder, follow this sequence: (1) Waterproof plug and (2) Patch. STEP1 Assemble Waterproof plug Assemble the waterproof plug to the recorder USB slot. Be aware that the direction of arrow on the plug must be upward (directing to the blue button). STEP2 Assemble Patch Assemble the patch to the recorder. Check the direction of the patch must aim to the recorder. (1) Align the recorder base to the BIGGER boarded latch of the patch.
Note that there should be no gap between the patch and the recorder, especially the MIDDLE latch. HOW TO ATTACH DEVICE? STEP 1 Confirm position Hold the device as shown, aim the front to the meeting place of the sternum and the one-finger below left collarbone. (Device is attached inclinedly.) The rectangle is the area that should be cleaned before adhering. STEP 2 Shave Use the razor to shave hairs in the rectangle area carefully. (Skip this step if no chest hair.
STEP 3 Abrade Use the abrader to cross stroke the skin in the rectangle area for 10 times. STEP 4 Clean Use the alcohol pad to wipe the abraded skin. Let dry for 2 minutes. STEP 5 Remove the paper covering of Patch Remove the white paper covering on the bottom of the patch and prepare to attach on the chest. Be aware not to touch electrodes.
STEP 6 Apply Hold the device as shown, inhale and straighten the chest slightly. Attach the device central part first on the chest, then the surrounding area. (Device is attached inclinedly.) Press the patch with fingers to make sure the it is tight to the skin. STEP 7 Continuously press the whole patch against the chest Press the entire surface area for 2 minutes to smooth out any wrinkles especially around the patch.
STEP8 Boot Press the blue button, the green light keeps showing for 30 seconds to indicate startup. Heartbeat rhythm will be recorded starting from this moment. If the orange light instead flashes 5 times then turning off, it means the patch does not adhere completely. Press the patch especially electrodes area for 2 minutes and repeat startup. If electrodes contact well, it will activate the device successfully.
HOW TO USE OVERLAY TAPE? Use the overlay tape when the patch becomes not sticky or already adhering over 7 days. First, remove the one side white paper coverings of the tape, then horizontally attach on the electrode (this method is like using band-aid.) Second, remove the other side covering and let the tape totally cover on electrodes. HOW TO REMOVE? To avoid pain sensation and gel residues, remove the device parallelly to the skin surface as shown.
HOW TO REVIEW LIVE ECG SIGNAL? STEP1 Download APP “EZY iSee” Access to “EZY iSee” download resource on SIGKNOW website and install it on a Bluetooth enabled device such as the tablet PC. Basic requirement of the hardware: Android 4.3 or above CPU quad cores 1.3GHz 2GB RAM or above 2GB free space or above STEP2 Connect to device Click “EZY iSee” icon to active. Main screen as shown.
APP offers two methods to connect the device, choose one to operate. Module 1 “QR cord mode” Follow the “EZY iSee” instruction, aim the tablet to the recorder QR cord and scan. Press the blue button for 3 seconds to turn on Bluetooth, then the recorder will connect to “EZY iSee”. During connecting, do no remove the recorder from the body. Module 2 “Detection mode” Click the “Find Surrounding” button on the main screen and press the recorder blue button for 3 seconds to turn on Bluetooth.
STEP3 REVIEW When connection is successful, the recorder will automatically transmit live ECG signal to “EZY iSee”. Live signal screen as shown and is able to slide at will. Total transmitting time is restricted to 30 minutes and the single transmission time will show on live signal screen.
EZYiSee general indicator Disconnect indicator: Connect indicator: Recorder unconnected Recorder connected. Click to disconnect and turn off Bluetooth. Gray fixate indicator: Red fixate indicator: Screen is unlocked and Screen is locked. allow to slide wantonly. Research indicator: Click it to research the surrounding recorder under Module 2 “Detection mode”. STEP4 STOP TRANSMITTION/ DISCONNECT At the end of review, click the “Stop” button on the screen to stop transferring.
STEP5 HISTORY SIGNAL Click the “History” button to review multiple transferred ECG signals. The screen can be slide and fixated by clicking the “Red fixate indicator” button. HOW TO DOWNLOAD/ ERASE DATA? Remove the device form the chest first, please refer to the “HOW TO REMOVE” section. STEP1 Remove accessories Please follow this sequence: (1) Patch and (2) Waterproof plug.
(1) Push the patch bigger boarded latch down first. Then pull the device from the patch. The removed patch shall be no longer used again, please discard it directly. (2) Use the tweezer to clamp the cylinder on the waterproof plug and move it out. Waterproof plug are designed to reuse before it goes broken. Note to keep away from children and avoid them swallowing. STEP2 Download/ Erase data Connect the device to the PC, then active “UG02 setting tool” program.
HOW TO MAINTAN? STEP1 Clean Use alcohol pad or wet cotton to swipe the recorder surface. Note to keep the USB slot dry. STEP2 Charge Check if the USB slot is wet or watery before charging. Only use the adapter supplied with this product. Do not charge the recorder while wearing, to avoid leakage or excessive the recorder temperature resulting in skin burns. The green light will continuously flash until full battery or use “UG02 setting tool” program to check the battery status.
Q&A Q 01. What is the EZYPRO doing? A 01. The device can record and store every heartbeat for the physician as a diagnostic reference. Q 02. How to boot? A 02. After attaching the EZYPRO, press the blue button to boot. The green light keeps showing for 30 seconds to indicate startup. Heartbeat rhythm will be recorded starting from this moment. If the orange light instead flashes 5 times then turning off, it means the patch does not adhere completely.
Q 12. Can I travel while wearing the device? A 12. Yes. Show the security check statement in this manual while passing airport security gate for metal detector or other concerns. Q 13. What if the patch moves slightly from its original position? A 13. That’s okay. The ECG signal may be smaller, but the recorder is still working normally. Q 14. There is bleeding on the skin under the patch. A 14. It is likely due to a small shaving cut. Do not apply this device on the wound. Q 15.
Specifications 01. Channels: 1, Single lead 02. Sampling rate: 256Hz 03. Resolution: 18bit 04. Input impedance: >10M Ω 05. Common-mode rejection ratio: >60dB 06. Heart beat: 30-250bpm (beats per minute) 07. Frequency response: 0.67Hz to 40Hz 08. Dynamic input range: ±5mV 09. Recording duration: Adjustable to 1~14 days. 10. Power supply: 360 mAh lithium polymer battery(typical) 11. Storage: MicroSD card 12. Power consumption: max. 400mW 13. Dimensions (without patch): 47(L)x32(W)x12(H)mm (+/-1mm) 14.
EMC Declaration Manufacturer’s declaration-electromagnetic emissions The UG02 including AC-adapter is intended for use in the electromagnetic environment (for professional healthcare) specified below. The customer or the user of the UG02 including AC-adapter should assure that it is used in such an environment. Emission test Compliance Electromagnetic environment-guidance RF emissions CISPR 11 Group 2 The UG02 including AC-adapter uses RF energy only for its internal function.
Voltage Dips, Voltage dips: Voltage dips: Mains power quality should be that of a typical short 0 % UT; 0.5 cycle 0% UT; 0.5 cycle commercial and/or hospital environment.
NOTE1 At 80 MHz and 800 MHz, the higher frequency range applies. NOTE2 These guidelines may not apply in all situations. Electromagnetic propagation is affected by absorption and reflection from structures, objects and people. a b Field strengths from fixed transmitters, such as base stations for radio (cellular/cordless) telephones and land mobile radios, amateur radio, AM and FM radio broadcast and TV broadcast cannot be predicted theoretically with accuracy.
Symbol Explanation Caution Consult instructions for use Refer to instruction manual/ booklet Serial number Date of manufacture Manufacturer Authorized representative in the European Community Discarded ECG recorder shall be disposed in the container labeled with WEEE. Please dispose all wastes with appropriate protections according to local laws and regulations. Type BF equipment Keep away from sunlight IP24 Ingress Protection / 2: Protected against a solid object greater than 12.
FCC Compliance Statement This device complies with Part 15 of the FCC Rules. Operation is subject to the following two conditions: (1) this device may not cause harmful interference, and (2) this device must accept any interference received, including interference that may cause undesired operation. FCC Caution: Changes or modifications to this unit not expressly approved by the party responsible for compliance could void the user authority to operate the equipment.