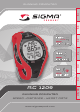
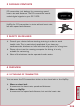
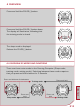
RC 1209 RUNNING COMPUTER SPEED – DISTANCE – HEART RATE www.sigmasport.
CONTENTS 206 1 Foreword 208 2 Package contents 208 3 Safety guidelines 209 4 4.1 4.1.1 4.1.2 4.2 4.3 4.4 4.4.1 4.4.2 4.4.3 Overview Attaching R3 transmitter Chest belt application HipClip application Before the first training Pressing the button briefly and holding Overview of modes and functions Sleep mode Training mode Setting mode 209 209 210 210 211 212 213 214 214 215 5 5.1 5.2 5.3 5.4 5.5 5.5.1 5.5.2 5.5.3 5.5.4 5.5.5 5.5.6 5.5.7 5.5.8 5.5.9 5.5.10 5.5.11 5.5.12 5.5.
5.5.14 5.5.15 5.5.16 5.5.17 5.5.18 5.5.19 Setting the total distance Setting the total running time Setting total calories Setting the contrast Setting the button tones Turning the zone alarm on and off 224 225 225 225 225 225 6 6.1 6.2 6.3 6.4 6.4.1 6.4.2 6.5 Calibration and correction factor Why calibrate? Calibration function Activating calibration Calibrating Preparing for calibration Carrying out calibration runs Correction factor 226 226 226 227 227 228 228 229 7 7.1 7.2 7.3 7.4 7.5 7.6 7.7 7.
1 FOREWORD Congratulations and thank you for purchasing a SIGMA SPORT® Running Computer. Your new running computer will be a faithful training partner for many years to come. You can use your running computer for: kk kk kk kk Running Walking and Nordic Walking Hiking Swimming (HR only) The running computer RC 1209 is a technically advanced instrument that measures speed, distance, and heart rate. Please read these instructions carefully to become familiar with the functions and features of this product.
2 PACKAGE CONTENTS R3 transmitter incl. battery for measuring speed, heart rate and distance. The R3 transmitter sends coded digital signals to your RC 1209. HipClip for R3 transmitter to train without heart rate, but with speed and distance. 3 SAFETY GUIDELINES kk Consult your doctor before starting training in order to avoid health risks. This is particularly applicable if you have any cardiovascular diseases or have not done any sport for a long time.
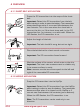
4 OVERVIEW 4.1.1 Chest belt application Press the R3 transmitter into the snaps of the chest belt. Important: Detach the R3 transmitter from the belt after training in order to save the battery. The transmitter always becomes active if a current flows between the two contacts. This is the case when the chest belt is worn on the skin, or if the chest strap and/or the R3 transmitter lies, for instance, on a wet towel. When the LED flashes, the R3 transmitter is on. Adjust the length of the belt.
4 OVERVIEW Attach the HipClip centered on your pants. Important: Speed and distance are measured correctly only if you wear the HipClip on the front center. 4.2 Before the first training Before you can start with the first training, you need to prepare the running computer in the following manner: 1. Set the battery compartment cover to ON with the appropriate tool. 2. The device automatically switches to the setting mode. Scroll through the basic settings with the buttons SPEED (+) and PULSE (-).
4 OVERVIEW 4. Calibrating For the running computer to display the optimal results, you need to calibrate it (for details see section 6 “Calibration”. In the setting mode scroll to “Calibration & Correction Factor”. Press the SET button. The running computer guides you through the calibration. After calibration, you can leave the setting mode by pressing and holding the SET button. 5. Starting the training. Start your first training with the START/STOP button. 6.
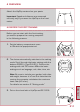
4 OVERVIEW Press and hold the PULSE (-) button. Press and hold the PULSE (-) button down. The display will flash twice, indicating that the training mode is closed. The sleep mode is displayed. Release the PULSE (-) button. 4.4 Overview of modes and functions There are three main modes to the Running Computer. (Sleep mode, training mode, setting mode). Switching between these modes requires that you press and hold a button for 3 seconds.
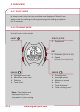
4 OVERVIEW 4.4.1 Sleep mode In sleep mode, only the time and date are displayed. Switch from sleep mode to training mode by pressing and holding any button for 3 seconds. 4.4.2 Training mode You will train in this mode. LIGHT START/STOP kk Stopwatch SET kk Distance (in km or mi) kk Speed (in km/h or min/km) PULSE SPEED kk kk kk kk kk kk kk kk kk kk Average heart rate Maximum heart rate Calories Total Kcal* *Note: Total values are displayed only if the stopwatch is not running. 214 www.sigmasport.
4 OVERVIEW 4.4.3 Setting mode In this mode you can adjust the device settings. kk With the SPEED (+) button you can scroll forward, from language to zone alarm. kk With the PULSE (-) button you can scroll backward, from zone alarm to language.
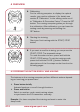
5 SETTING MODE 5.1 Opening the setting mode Prerequisite: your running computer must first be in training mode (see section 4.3 “Overview of modes and functions”). Press and hold the SET button for 3 seconds. When the display flashes twice, the setting mode is open. 5.2 Display setup 1st line SET indicates that the setting mode is open. 3rd line/ 4th line Submenu or the setting to be changed. 5.
5 SETTING MODE 5.4 Brief guide to device settings Your device settings such as language, unit, correction factor, gender, birth date, weight, HR max., contrast, button tones and zone alarm are all set in the same manner: Select the device setting, change the value and save the modified setting. Prerequisite: Your running computer must be in the setting mode (to enter the setting mode, press and hold the set button for 3 sec.).
5 SETTING MODE 5.5.5 Setting date Prerequisite: Your running computer is in the setting mode. Press SPEED (+) button repeatedly until “Date” appears on the display. Press SET button. “Year” is displayed, below it the preset year flashes. Now you can set the year with the SPEED (+) or PULSE (-) key. Press SET button. “Month” is displayed. Now you can set the month with the SPEED (+) or PULSE (-) button. Press SET button. “Day” is displayed. Now you can set the day with the SPEED (+) or PULSE (-) button.
5 SETTING MODE 5.5.6 Setting time Prerequisite: Your running computer is in the setting mode. Press SPEED (+) button repeatedly until “Clock” appears on the display. Press SET button. “24H” appears and flashes. With the SPEED (+) or PULSE (-) button choose between a 12-hour or 24-hour display. Press SET button. The time is displayed. The hours entry flashes. Press SPEED (+) or PULSE (-) to change the hour.
5 SETTING MODE 5.5.7 Setting gender Follow steps 1-4 as described in section 5.4 “Brief guide to device settings” This device setting is included in the calculation of the maximum heart rate and the calories. So, set the value correctly. 5.5.8 Setting birth date Follow steps 1-4 as described in section 5.4 “Brief guide to device settings” This device setting is included in the calculation of the maximum heart rate and the calories. So, set the value correctly. 5.5.
5 SETTING MODE 5.5.11 Setting training zone You can choose from three training zones. The upper and lower limits for the zone alarm are determined by the zone that you select. Example: You want to lose weight. Select the “Fat Burning” zone. Prerequisite: Your running computer is in the setting mode. Press PULSE (-) button repeatedly until “Train. Zone” appears on the display. Press SET button. The selected training zone is displayed. Scroll with the SPEED (+) button to “Fat Burn”. Press SET button.
5 SETTING MODE 5.5.12 Training with training zones Your running computer has three training zones. The preset training zones “Fat Burning” and “Fit Zone” are calculated from the maximum heart rate. Each training zone has an upper heart rate limit and a lower heart rate limit. kk Fat Burning This training is for aerobic energy metabolism. For long duration and low intensity more fat than carbohydrates are burned or converted into energy. The training in this zone will help you lose weight.
5 SETTING MODE Press SET button. The selected training zone is displayed. Scroll with the SPEED (+) button to “Individual”. Press SET button. “Lower Limit” is displayed. The registered value flashes. Press the PULSE (-) button repeatedly till the value is 120. Press SET button. “Upper Limit” is displayed. The registered value flashes. US/GB Press the SPEED (+) button repeatedly until the value is 160 Press SET button. The upper and lower limits are set.
5 SETTING MODE 5.5.14 Setting the total distance Example: You bought a running computer and want to take the total distance of 560 kilometers from your training diary. Prerequisite: Your running computer displays the setting mode. Scroll with the SPEED (+) button until “Total Dist.” appears on the display. Press SET button. You will see zeros below the total distance. The first digit flashes. Press the SET button twice. The digit for the hundreds flashes.
5 SETTING MODE 5.5.14 Setting the total distance Press the PULSE (-) button repeatedly till 6 displayed. Press SET button. The 6 is set and the digit flashes. Press SET button. The setting is saved. 5.5.15 Setting total running time Follow steps 1-4 as described in section 5.5.14 “Setting total distance”. 5.5.16 Setting total calories Follow steps 1-4 as described in section 5.5.14 “Setting total distance”. 5.5.17 Setting contrast As described in section 5.5 “Making device settings”.
6 CALIBRATION & CORRECTION FACTOR 6.1 Why calibrate? Everyone has a different walking and running style, which affects the measurement. Therefore, you should set up (calibrate) the R3 transmitter for your running and walking style. If you use the factory presets, the running computer may or may not provide you with accurate data. Calibrating the sensor makes the measuring much more precise. 6.2 Calibration function The running computer has a calibration function.
6 CALIBRATION & CORRECTION FACTOR 6.3 Activating calibration Prerequisite: The device is in training mode. You are wearing both the R3 transmitter and the running computer. Press and hold the SET button until the setting mode is open. Press the SPEED (+) button repeatedly until the function “Calibration” appears. Press the SET button. The RC 1209 determines the position of the R3 sensor (chest or hips) and starts the calibration function. The RC 1209 guides you through the calibration. 6.
6 CALIBRATION & CORRECTION FACTOR 6.4.1 Preparing for calibration 1 Put on the chest belt or attach the HipClip. 2 Go to a measured distance of at least 800 meters long. Tip: The inside lane of a track is 400 meters. 3 Select “calibration” in the setting mode. 4 Press the SET button. The running computer detects whether you carry the HipClip or the chest belt. The function “Running” is displayed.
6 CALIBRATION & CORRECTION FACTOR 6.5 Correction factor If you get good values with or without calibration, which vary only minimally in one direction, you have the option to manually correct these values by the correction factor. Example: You know that you have run exactly 2000 m, but the running computer always shows a little more, e.g. 2037 m. The factory setting of the correction factor is 1.000 and does not effect a change.
7 TRAINING MODE 7.1 Opening the training mode To go into training mode: kk From sleep mode Press and hold any button for 3 seconds. kk From setting mode Press and hold SET button for 3 seconds. 7.2 Display setup kk Current heart rate kk Speed or distance kk Shows functions of SPEED (+) or PULSE (-) - ex.
7 TRAINING MODE kk Stopwatch stopped - correct sync The stopwatch icon is gone. If the function is highlighted in grey, the R3 transmitter and RC 1209 are synchronized and the stopwatch has stopped. kk Stopwatch stopped – no sync with RC 1209 The stopwatch icon is gone. If the function has a light background, the R3 transmitter and RC 1209 are not synchronized anymore. Please synchronize by pressing and holding the SPEED (+) button long. 7.
7 TRAINING MODE 7.4 Functions during the training The Running Computer measures many different training statistics, but it cannot display them all at once. You can view any function with just a press of a button. With the SET button you can switch between speed and distance in the middle line. With the PULSE (-) or SPEED (+) button you can choose the function you want to see in the lower display area.
7 TRAINING MODE Synchronization Start the training mode, reset the RC1209 to zero, your R3 transmitter will synchronize. During synchronization the word “SYNC” is displayed. The synchronization is complete, when “SYNC” is no longer seen in the display. Message “Too many signals” This message appears when there are too many transmitters in the vicinity.
7 TRAINING MODE 7.7 Interrupting the training You can stop the training any time and continue afterward. Press START/STOP button. The stopwatch icon disappears. The stopwatch has stopped. Press START/STOP button again. The stopwatch icon is displayed again. The stopwatch continues to run. 7.8 Exiting the training You have finished your training run and want to end the training in the running computer. Press START/STOP button immediately.
7 TRAINING MODE 7.9 Training values after the training Prerequisite: You are in the training mode. After training, you can view the measured values in the training mode in peace. With the SET, PULSE (-) and SPEED (+) buttons you can scroll between each values. In addition to the current training values, the running computer also shows summed values such as: kk Total running time kk Total distance kk Total calories Note: Total values are available only when the stopwatch is stopped. 7.
8 MAINTENANCE AND CLEANING 8.1 Changing the battery The battery CR2032 (Ref. No. 00342) is used in the running computer and battery CR2450 (Ref. No. 20316) in the R3 transmitter. Prerequisite: You have a new battery and the battery compartment cover tool. 1 Turn the cover of the battery compartment with the tool counterclockwise till the arrow points to OPEN. Alternatively, you can also use a ballpoint pen 2 Remove the cover. 3 Remove the battery. 4 Insert the new battery. The plus sign facing up.
8 MAINTENANCE AND CLEANING 8.2 Washing the Comfortex+ textile chest belt The Comfortex+ textile chest belt can be washed in the washing machine at +40°C/104°F hand wash. Standard detergents may be used, but please do not use bleaching agents or detergents with bleach additives. kk kk kk kk Do not use soap or fabric softener. Do not dry clean Do not put in dryer Lay flat, do not wring out, stretch, or hang when wet. kk The Comfortex+ must not be ironed! 8.
8 MAINTENANCE AND CLEANING 8.4 Disposal LI = Lithium Ionen Batteries must not be disposed of with the household waste (Battery Law). Please give the batteries to a designated delivery station for the disposal. Electronic devices must not be disposed of with household waste. Please give the device to a designated disposal agency. 9 TECHNICAL DATA RC kk kk kk 1209 Battery type: CR2032 Battery life: Average of 1 year Accuracy of the clock: Higher than ± 1 second/day at an ambient temperature of 20°C.
US/GB Notes 239
running COMPUTER RC 1209 SIGMA Elektro GmbH Dr. - Julius - Leber - Straße 15 D - 67433 Neustadt /Weinstraße Tel. + 49 (0) 63 21- 9120 - 0 Fax. + 49 (0) 63 21- 9120 - 34 E - mail: info@sigmasport.com SIGMA SPORT USA North America 1067 Kingsland Drive Batavia, IL 60510, U.S.A. Tel. +1 630 - 761 - 1106 Fax. +1 630 - 761 - 1107 Service-Tel. 888-744-6277 SIGMA SPORT ASIA Asia, Australia, South America, Africa 10F, No.192, Zhonggong 2 nd Rd., Xitun Dist., Taichung City 407, Taiwan Tel. +886-4- 2358 3070 Fax.