
User's Manual


17
TTL AUTO FLASH
In the TTL AUTO Mode, the camera will control the amount of flash lighting, to get the appropriate
exposure for the subject.
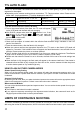
◆ Depending on the camera model and lens combination, TTL Flash procedure varies. Please see the
below chart. (In all combinations, TTL will be displayed on the LCD)
D-SLR / Maxxum 70, 50, 7, 5, 4, 3
D
y
nax 7D, 60, 40, 7, 5, 4, 3L
Maxxum 9
D
y
nax 9
Other Camera Models
D type Lens ADI metering Pre-flash metering Ordinary TTL metering
Non-D type lens
Pre-flash metering Pre-flash metering Ordinary TTL metering
1. Set the camera’s exposure mode to
P
Mode.
2. Turn on the power switch of the flash, the TTL mark will appear
on the LCD panel and the flash will start charging.
◆ With D-SLRs, please make sure that indicator is on. If the
indicator is off, press the
+
or
–
button and make the
indicate indicator appear on the LCD panel, otherwise
exposure will not be correct.
3. Focus on your subject.
4. Check that the subject is located within the effective flash distance range, indicated on the LCD
panel of the flash unit.
5. Press the shutter button, after the flash is fully charged.
◆ When the camera receives the appropriate exposure, the TTL mark on the flash’s LCD panel will
appear for 5 seconds. If this indication does not appear, the flash illumination is not sufficient for that
situation. Please re-take the picture, at a closer distance.
◆ The AF Auxiliary Light will turn on automatically if you focus on a subject in a dark area. The effective
range of the AF Auxiliary Light is up to about 0.7meter to 9meter (2.3-29.5 feet).
◆ Please note that when the camera is set to M mode, the flash will be set to the mode settings last
used.
◆ When the flash is fully charged, the flash mark will appear in the camera viewfinder. If the shutter is
released before the flash is fully charged, the flash will not fire, and the camera will take the picture
at a slow shutter speed as if by ambient light only.
USING FLASH IN OTHER CAMERA MODES
Shutter Speed Priority Setting
When you set the desired shutter speed, the camera will select the appropriate aperture value. You
cannot choose shutter a speed faster than the camera’s sync speed. Fill flash is used when this mode
is selected.
Aperture Priority Setting
By selecting the A mode, after you select the desired aperture the camera will set the appropriate shutter
speed for the background exposure. Fill flash is used when this mode is selected.
When used with M Mode
You can set the desired shutter speed and aperture value. You can set the shutter speed from top sync
speed to bulb.
◆ The fill flash is used when this mode is selected.
◆ If you adjust the exposure according to the exposure meter indication, the camera will work as for
Daylight synchronization flash or slow synchronization.
LIMITS OF CONTINUOUS SHOOTING
To prevent overheating of the flash’s circuitry, please do not use your Flash unit for at least 10minutes
after using the number of flash exposures, shown in the below table have been made in quick succession.