SIGMA Photo Pro User Guide Companion Processing Software for SIGMA Digital Cameras Version 2.
I M P O R T A N T : Please Read Before You Start Thank you very much for purchasing this SIGMA product. To receive maximum performance and enjoyment, and to not cause any injury or damage, please read this instruction manual carefully before using this product. Notices • Do not reproduce this manual in any form in whole or in part without prior permission. • The contents of this manual may be changed without notice.
T A B L E O F C O N T E N T S IMPORTANT:Please Read Before You Start i TABLE OF CONTENTS ii 1 1 INTRODUCTION 1.1 About SIGMA Photo Pro ..................................................................................... 2 What you can do in SIGMA Photo Pro; A quick visual tour................................... 2 Main Window elements.......................................................................................... 3 Review Window elements ..................................................
T A B L E C O N T E N T S 4.4 Renaming images .............................................................................................. 15 Renaming images outside of SIGMA Photo Pro ................................................. 15 4.5 Selecting images ............................................................................................... 15 Selecting one image ............................................................................................ 15 Selecting multiple images .....
T A B L E O F C O N T E N T S 6.1 Main Window Processing ................................................................................. 24 Processing groups of images simultaneously ..................................................... 24 6.2 Review Window Processing ............................................................................. 25 Processing individual images .............................................................................. 25 Choosing a destination ....................
T A B L E O F C O N T E N T S Image information in the Thumbnail Pane........................................................... 36 Image information in the Camera and Computer Panes ..................................... 36 8.2 Accessing the Image Information Window ..................................................... 37 The Image Info Button ......................................................................................... 37 The Image Information Window.........................................
1 I N T R O D U C T I O N In this section you will learn… • The main features of SIGMA Photo Pro • How this manual works SIGMA Photo Pro User Guide 1
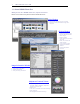
1 I N T R O D U C T I O N 1.1 About SIGMA Photo Pro What you can do in SIGMA Photo Pro; A quick visual tour Below are the windows and palettes found in SIGMA Photo Pro.
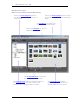
1 I N T R O D U C T I O N Main Window elements Below are the key elements found in the Main Window.
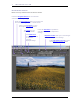
1 I N T R O D U C T I O N Review Window elements Below are the key elements found in the Review Window.
1 I N T R O D U C T I O N 1.2 About this manual This manual provides information on the installation and use of SIGMA Photo Pro, the companion processing software for your SIGMA digital camera.
2 C O M P U T E R S E T - U P In this section you will learn… • How to install SIGMA Photo Pro on your computer • How to set up your monitor SIGMA Photo Pro User Guide 6
2 C O M P U T E R S E T - U P 2.1 Installing the software Windows system requirements If you are using your SIGMA digital camera with a PC, the following minimum requirements are necessary to run SIGMA Photo Pro: • • • • • • • • Windows 2000, Windows XP, Windows Vista* Pentium III 750MHz 256MB or higher RAM (512MB recommended) 1GB of available hard disk space 16-bit display card (24-bit recommended) 800x600 monitor resolution (1024x768 recommended) USB connection (USB 2.
2 C O M P U T E R S E T - U P 2.2 Setting up your monitor Verifying monitor brightness, gamma, and color Making adjustments to your images on screen works best with a monitor that displays color consistently. Over time the characteristics of your monitor change, so check your monitor’s performance periodically. Consult your monitor documentation and perform calibration adjustments as recommended by the manufacturer.
3 T R A N S F E R R I N G I M A G E S In this section you will learn… • How to connect your camera to your computer SIGMA Photo Pro User Guide 9
3 3.1 T R A N S F E R R I N G I M A G E S Transferring images from the camera to your computer Transferring images from the camera to a folder on your computer assures that X3F or JPEG files will be saved for future use. Note: It is not possible to save images to a read-only media like CD-ROM The SD9/SD10 can not be connected to a computer for data transfer. Please use the CF card reader only. Connecting the SD14 or DP1 to your computer.
4 M A N A G I N G I M A G E S In this section you will learn… • How to display, view, and sort images • How to select and move images • How to rename images • How to mark, lock, and rotate images • How to delete images SIGMA Photo Pro User Guide 11
4 M A N A G I N G I M A G E S 4.
4 M A N A G I N G I M A G E S Changing the size of the Main Window Use the buttons in the title bar to maximize, minimize, and restore the size of your Main Window. You can drag the tab in the lower right hand corner of the window to any desired size. Changing the size of the Navigation and Thumbnail Panes To change the relative size of the Navigation and Thumbnail Panes, click and drag the splitter-bar located between the two panes.
4 M A N A G I N G I M A G E S 4.3 Different ways to view thumbnails Changing the size and style of thumbnails Click on the Thumbnail buttons at the bottom of the Main Window to view thumbnails with or without text, and at different sizes. Small thumbnails Click on the button or select View > Small Thumbnails in the Main Window menu. Medium thumbnails Click on the button or select View > Medium Thumbnails in the Main Window menu.
4 M A N A G I N G I M A G E S 4.4 Renaming images Renaming images outside of SIGMA Photo Pro Changing the filename format (IMG##### / DCIM####) of an X3F file on a CF/SD Card will make the file unreadable on the camera. Once copied to your computer, however, file names can be changed. On a PC, if you rename your files outside of the application, the file extension (.X3F) must be retained in order for the file to be recognized by SIGMA Photo Pro as the original.
4 M A N A G I N G I M A G E S 4.6 Marking, Locking, & Rotating images in Main and Review Windows Rotating images Use the Rotate buttons to change the vertical or horizontal orientation of thumbnails. Images rotated on the camera will remain rotated after transferring to your computer. • • • Select images and click on the left Rotate button to rotate images to the left. Click on the right Rotate button to rotate images to the right. Only X3F images can be rotated.
5 R E V I E W I N G I M A G E S In this section you will learn… • How to open a Review Window • How to view different images in the Review Window • How to view details using the loupe • How to check shadows and highlights with the warning mask • How to use adjustment modes • How to display multiple Review Windows • How to update settings in X3F files SIGMA Photo Pro User Guide 17
5 R E V I E W I N G I M A G E S 5.1 The Review Window Opening a Review Window You can display a Review Window on your desktop by double-clicking a thumbnail, or clicking on the Review Image button after selecting an image in the Main Window.
5 R E V I E W I N G I M A G E S 5.2 Navigating through a folder using the Review Window Choosing which image is displayed in the Review Window When you open a Review Window, the first currently selected thumbnail is displayed. Double clicking on any thumbnail or selecting a thumbnail and clicking the Review Images button replaces the image in the open Review Window.
5 R E V I E W I N G I M A G E S Activating the loupe Activate the loupe by clicking on the Magnification Loupe button in the Review Window. To restore the Magnification Loupe if the Color Adjustment Eyedropper is present, click on the Eyedropper button in the Adjustment Controls Palette. The indicator will be restored to its last state, either the loupe or a pointer.
5 R E V I E W I N G I M A G E S 5.5 Using the Adjustment Mode Settings Use the Adjustment Modes switch to control how X3F images are processed. When an X3F image is first displayed in the Review Window, a preview image is displayed. The indicator in the upper right corner of the Review Window animates while the image is processing. When the animation stops, the display will update to a higher resolution reflecting the current adjustment mode.
5 R E V I E W I N G I M A G E S You can save the setting as an application setting by clicking the Save Setting button in the Adjustment Mode section of the Adjustment Controls Palette. Saving a setting as an application setting allows you to apply the setting to any other X3F image displayed in Photo Pro. You can also save a setting within an X3F file if you wish to replace the original capture settings with settings you’ve created.
6 P R O C E S S I N G & S A V I N G In this section you will learn… • How to process and save images • How to apply adjustments • How to choose resolution, file type, and color space for your processed image SIGMA Photo Pro User Guide 23
6 P R O C E S S I N G & S A V I N G I M A G E S 6.1 Main Window Processing Processing groups of images simultaneously Processing groups of images in batches is a great way to quickly process X3F files which do not require individual attention. You will not be able to individually name the files, and all files must be processed using the same settings. However, if you select the Auto Adjustment Setting, SIGMA Photo Pro will optimize each image during processing.
6 P R O C E S S I N G 6.
6 P R O C E S S I N G & S A V I N G I M A G E S 6.3 Processing options Use the pop-down menus and radio buttons to choose the processing settings to be applied to your image. Adjustment Mode • X3F • Auto • Any other user defined setting Check option if you wish to update stored adjustment settings in the X3F file.
7 A D J U S T I N G I M A G E S In this section you will learn… • How to use the Adjustment Controls palette • How to make tonal adjustments • How to make color adjustments • How to use the Histogram • How to set the Warning Masks • How to save settings • How to delete saved settings SIGMA Photo Pro User Guide 27
7 A D J U S T I N G I M A G E S 7.1 Using Adjustment Controls to manually adjust images Adjustment Controls allow you to manually adjust the settings applied to images in the Review Window. Changing any control or slider places the current Review Window in Custom Mode. The pop-down menu will show “CurrentUnsaved Setting” indicating that a control has been manually adjusted.
7 A D J U S T I N G I M A G E S 7.2 Making Tonal Adjustments Use the sliders to control exposure compensation, contrast, shadow, highlight, and saturation. To view the sliders, display the Adjustment Controls Palette on your screen, and maximize the panel titled Tonal Adjustments. In Auto Mode, all tonal adjustment sliders, with the exception of Sharpness, may apply when you select Auto Mode. In the case of X3 Fill Light, only a very small amount of adjustment is built into the Auto adjustment.
7 A D J U S T I N G I M A G E S 7.3 Making Color Adjustments Use Color Adjustment to change the overall color of your image. For example, if your image has an overall yellow tone caused by indoor lighting, adding cyan and magenta will remove the yellow color cast.
7 A D J U S T I N G I M A G E S Using the Color Wheel to manually adjust color To manually neutralize a color cast, such as a yellow scene caused by indoor lighting, use the loupe in the Review Window to sample a color that represents a neutral gray. Based on the RGB values in the loupe, drag the target ring in the color wheel to set the CMY values so that the RGB values will equalize. Since the sampled color was known to be neutral, this generally balances the overall color of the image.
7 A D J U S T I N G I M A G E S 7.4 Using the Histogram and Warning Masks Reading the Histogram To view the Histogram, display the Adjustment Controls Palette on your screen, and open the panel titled Histogram. Click the button to open and close the Histogram Panel Turn the warning masks on and off by clicking on the checkmark box Click on arrows to set the shadow and highlight values for the warning masks The Histogram graphically displays the distribution of brightness values in your image.
7 A D J U S T I N G I M A G E S 7.5 Changing White Balance Changing the White Balance setting in an X3F file White Balance can be adjusted during processing. If you wish to change the lighting type for a particular image, you can match any of the lighting types featured on your SIGMA camera. To change White Balance, first select the image you wish to change in a Review Window. Next select Edit > White Balance from the Review Window menu.
7 A D J U S T I N G I M A G E S 7.6 Saving and applying custom settings Applying settings from the Adjustment Controls Palette To view the Adjustment Mode, display the Adjustment Controls Palette on your screen, and open the panel titled Adjustment Mode. The Adjustment Mode settings in the Adjustment Control Palette reflect the same information as the Adjustment Mode settings found in the active Review Window. See Page 18 for a review of this information.
8 G E T T I N G I M A G E I N F O In this section you will learn… • How to find image info in the Main and Review Windows • How to open an Image Info Window for additional information SIGMA Photo Pro User Guide 35
8 G E T T I N G I M A G E I N F O 8.1 Image information Image information in the Main and Review Windows When a single image is selected in the Main Window, basic information about the image appears above the Thumbnail Pane in an information field. When multiple images are selected, the Main Window information field will be blank.
8 G E T T I N G I M A G E I N F O 8.2 Accessing the Image Information Window The Image Info Button You can view additional information about individual images or groups of selected images by clicking the Image Info button in the Main or Review Window. The Image Information Window The Image Information Window describes the selected image(s) in the Main or Review Window. To get information for a different image, click on the Review Window containing the new image or on a new thumbnail in the Main Window.