
Operating instructions


1. If the inside of the diaphragm rupture sensor has become damp or
dirt has penetrated it: replace.
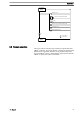
7 6 5 4 3
21
P_SI_0020_SW
Fig. 44: Section through the Sigma diaphragm rupture warning system
("Visual break indicator" version)
1 Working layer (≙ operating diaphragm)
2 Safety layer (≙ safety diaphragm)
3 Flap
4 Piston
5 Diaphragm rupture sensor
6 Cylinder, red
7 Cover, transparent
2. If the piston of the diaphragm rupture sensor - see Fig. 44
, item 4 -
should have become dirty or damp, clean both it and the hole in
which it runs.
3. Check whether it can move freely in the hole.
4. Refit the clean diaphragm rupture sensor with the clean piston.
5. Test the diaphragm rupture sensor.
Optical diaphragm rupture sensor
1. Unscrew the transparent cover from the diaphragm rupture sensor.
2. Press the red cylinder into the diaphragm rupture sensor until it
engages.
3. Press the piston on the other side of the diaphragm rupture sensor
with a blunt, smooth object into the dosing head (approximately 4
mm) until it triggers.
CAUTION!
Feed chemical may escape
If the expandable flap of the diaphragm is damaged,
then feed chemical can escape when there is a dia‐
phragm rupture.
The piston must not be scratched, it must remain com‐
pletely smooth so that during operation it does not
damage the expandable flap of the diaphragm.
4. Press the red cylinder into the diaphragm rupture sensor again and
repeat the test.
5. If it does not trigger both times, replace the membrane rupture
sensor.
Checking the condition of the diaphragm
rupture sensor
Repairs
59