
User's Manual


8
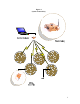
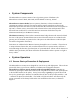
Figure 3 Node Turn On/Off
• To turn on the sensor, push and firmly hold the button for three (3) seconds. The
LED light will illuminate a constant color.
• As a visual check to see if the unit is on, pushing the ON/OFF button for less than one
(1) second will result in a steady LED indicator.
• To turn off the sensor, hold the button down for three (3) seconds. The LED indicator
will display a steady light until the button is released.
• As a visual check to see if the unit is off, pushing the ON/OFF button for less than
one (1) second will flash a single light.
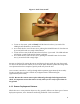
Sensors are deployed by turning the unit on and placing the unit, spike first, into the ground.
To achieve the best detection results, the bevel of the spike should be pushed into the ground.
Once placement has been completed, quickly walk away from the unit.
Once a sensor is turned on, it will go through GPS acquisition (approximately 60 seconds).
Twenty seconds after a sensor is turned on, background noise calibration begins
(approximately 90 seconds).
NOTE: Because the sensors must acquire GPS and go through the background noise
check, it is important to turn the sensors on only when you are ready to place them in
the ground.
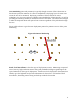
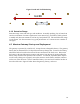
4.1.1 Sensor Deployment Patterns
While there are a variety mission objectives, they generally fall into two basic types of sensor
deployment patterns, Area / Perimeter monitoring and Road / Trail Surveillance.