
Owners Manual


CLEANING A FAUCET CARTRIDGE
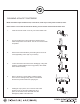
7. Place the cartridge(s) individually in a bucket of clean
water and move each cartridge back and forth
while cycling the stem through the operational settings.
The handle may need to be temporarily placed
on the stem to do this.
8. Reinsert the cartridge(s) in the correct position, then
reassemble the trim and handle. Turn on the faucet
to test water flow and check for leaks.
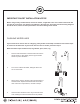
1. Close the shut-off valves or turn off your home's water main.
2. Turn on the faucet's hot and cold taps to release excess
water and pressure on the fixture. Turn off once excess water
is expelled.
3. Remove the faucet handles by unscrewing the screw or set
screw (depending on the style of your faucet).
4. Loosen the locknuts and remove the cartridge(s), noting their
positions (if reassembled in the wrong position, their handle
action will be reversed).
5. Place a small cup or other plastic container upside
down over the cartridge cavity. Place a towel behind
the faucet to prevent water from spraying out.
6. Holding the cup in place, turn on the hot water valve
and let run for 3-5 seconds. Holding the cup in
place, do the same for the cold water. This will
dislodge any debris in the water line.
What You'll Need: Open-ended wrench, screw driver, small cup or other plastic container, towel.
Note: If there is not a shut-off valve at the faucet, you will need an assistant at the water main.