
Installation Sheet


3Ballantine Wall-Mount Faucet Installation Instructions
BALANTINE WALL-MOUNT FAUCET INSTALLATION
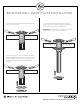
5. Attach the handle escutcheons to the installed valve
body. Thread each escutcheon onto each stem until
hand-tight. Ensure that the rubber washers remain
seated in the escutcheons.
6. Attach the hot and cold handles to the valve stems,
as shown. Ensure that the hot handle is on the left, and
the cold is on the right.
7. When your installation is complete, turn on the main
water supply. Remove the aerator from the spout. Turn
the water on to allow any dust or loose sediment to
clear the system. Allow the water to flow through the
spout for approximately 60 seconds, and verify that hot
and cold water are running properly. Reattach the
aerator once testing is complete.
60 sec
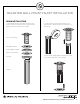
4. Once your finished wall has been completed, slide the
decorative ring onto the base of the spout. Attach the
spout to the installed valve body. Once in place, tighten
the set screw underneath to secure.
Decorative
Ring
Hot
Handle
Cold
Handle