
Installation Sheet

1Shower Basket Installation Instructions
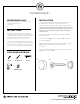
A B C
INSTRUCTIONS
Unpack and inspect the product for any shipping
damages. If you find damages, do not install. Contact
Customer Service at 1-866-855-2284. If you need
assistance or have questions while installing your
shower basket, contact Customer Service.
We recommend consulting a professional if you are
unfamiliar with installing bathroom fixtures. Signature
Hardware accepts no liability for any damage to the
floor or walls, or for personal injury during installation.
Read entire Shower Basket Installation Instructions.
Observe all local building and
safety codes.
TOOLS AND MATERIALS:
Pencil
BEFORE INSTALLING INSTALLATION
SHOWER BASKET
1. Determine the installation location and mark the location of
the pilot holes using the mounting holes in the shower
basket. Use a level to verify that your basket is properly aligned.
Tip: Place a piece of masking tape in the installation location when marking
the location of the mounting holes. This will enable you to clearly see the
outlines you are creating and help to keep your drill from damaging the
mounting surface.
2. Drill the pilot holes with the appropriate drill bit for the wall
surface or material.
3. Insert the screws (B) into the screw jackets (C), and place in
the mounting bracket.
4. Attach the shower basket to the wall by inserting the screws
(B) into the pilot holes and securing with your drill or
screwdriver.
5. Once your shower basket is installed, screw the button covers
(A) onto the screw jackets (C).
Level
Screwdriver
Drill
Masking Tape