
Installation Sheet

1Glass Shelf Installation Instructions
INSTRUCTIONS
Unpack and inspect the product for any shipping
damages and ensure that none of the required
pieces are missing. If you find damages, do not
install. Contact Customer Service at
1.866.855.2284. If you need assistance or have
questions while installing your glass shelf, contact
Customer Service.
We recommend consulting a professional if you are
unfamiliar with installing bathroom fixtures.
Signature Hardware accepts no liability for any
damage to the shelf or wall, or for personal injury
during installation.
Read the installation instructions below. Observe
all local building and safety codes.
TOOLS AND MATERIALS:
Pencil
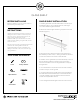
BEFORE INSTALLING SINGLE SHELF INSTALLATION
1. Hold the glass shelf up to the wall to determine where you
would like to place it. Using a level and pencil, draw a light
line on the wall the length of the shelf.
2. Attach the rail to the glass shelf using supplied screws and
washers. (Figure 1)
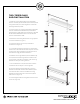
3. Mark the positions of the escutcheons along the line on
the wall that you drew in step 1, making sure the escutcheons
are the same distance from each end of the shelf.
4. Hold the mounting brackets up to the wall directly on top of
the escutcheon guidelines created in the previous step.
Use the screw holes in the mounting brackets to mark your
drilling location.
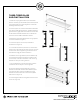
5. Use a drill bit that corresponds to the size of the included
screws to drill your mounting holes.
6. Use the supplied screws to affix the mounting brackets to
the walls. Place the assembled support rail and escutcheon
onto the installed mounting brackets and secure the set
screws with supplied Allen wrench.
7. Insert the glass shelf and tighten the set screws to secure.
Tape Measure
GLASS SHELF
Level
Screwdriver
Drill
Safety Glasses