
Installation Sheet
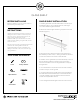

3Glass Shelf Installation Instructions
THREE-TIERED GLASS
SHELF INSTALLATION
1. Hold one of your glass shelves up to the wall to
determine where you would like to place the top shelf.
Using a level and pencil, draw a light line on the wall
the length of the top shelf.
2. On the support rail, measure the distance between
the notches that will hold the top, middle and bottom
glass shelves. Lightly draw horizontal lines on the wall
at that distances below the first line to indicate the
positions of the middle and bottom shelves.
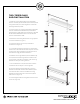
3. Attach the rails to the glass shelves using supplied
screws and washers. (Figure 1)
4. Insert the support rails into top and bottom
escutcheons. (Figure 2)
5. To mark the escutcheon placement, measure the
distance from the closed end of the support rail notch
to the center of the neighboring escutcheon. Mark
the wall accordingly for each escutcheon.
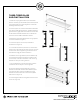
6. Hold the mounting brackets up to the wall directly
on top of the escutcheon guidelines created in the
previous step. Use the screw holes in the mounting
brackets to mark your drilling location.
7. Use a drill bit that corresponds to the size of the
included screws to drill your mounting holes.
8. Use the supplied screws to affix the mounting
brackets to the walls. Place the assembled support
rail and escutcheon onto the installed mounting
brackets and secure the set screws with supplied
Allen wrench. (Figure 3)
9. Insert the glass shelves and tighten the set screws
to secure. (Figure 4)