
Installation Sheet

3Dummy, Passage and Privacy Set Installation Instructions
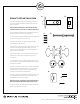
1. Insert the latch bolt (A) into the edge of the
door. The curved edge should touch the frame
when the door is closed.
Note: If the latch bolt plate is not flush with the door,
carefully chisel out, or mortise, a small part of the
door.
2. Use the latch bolt plate as a template to mark
and drill pilot holes for the mounting hardware.
3. Insert the latch bolt (A) and decorative
faceplate (B) and secure with two wood screws
(C).
4. Push the latch bolt in and thread the passage
spindle (D) through the door.
5. With the spindle centered, thread the exterior
door knob (E) onto the latch bolt assembly. Insert
the interior door knob (F), fitting it over the spindle
and aligning the screws holes.
6. Hand thread the mounting hardware (H)
through the exterior door knob and tighten firmly
with a screwdriver.
7. Place a small amount of paint or chalk on the
end of the latch bolt (A). Close the door and turn
the knob several times to transfer the paint onto
the door frame to mark the strike plate location.
8. Position the strike plate (G) on the door frame.
The curved edge should touch the curved edge of
the latch bolt when the door is closed.
Note: If necessary, mortise the area around the hole
so that the strike plate will lie flush with the door
frame.
9. Secure the strike plate (G) to the door frame
with the remaining wood screws (C).
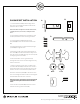
PASSAGE SET INSTALLATION
G
Front Back
H
B
D
C
A
E F