
Installation Sheet


2Levi Kitchen Faucet Installation Instructions
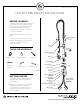
LEVI KITCHEN FAUCET INSTALLATION
INSTALLATION
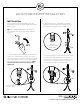
1. Ensure that the water supply below your sink is
completely shut off by turning the shutoff valves all the
way to the right.
Tip: Place a small bucket below your workspace to
catch any water that may drip during the installation
process.
2. If not already attached, attach the provided braided
water lines to the faucet body. Use the red and blue
marks on the faucet as indicators, and match the hoses
accordingly. Apply a small amount of thread sealant to
the threading on the hoses before attaching. If lines
are already attached, ensure that they are fully
tightenend.
3. Remove the lock nut, metal washer, and rubber
gasket from the faucet body. Insert the faucet body
through the mounting hole in your counter top.
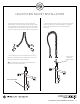
4. From beneath the sink, slide the rubber gasket back
onto the faucet body, followed by the metal washer.
Thread the lock nut back onto the faucet body using a
basin wrench. Finish tightening by turning the two
screws attached to the lock nut to the right.
OFF
Apply thread sealant
or plumber’s tape
REMOVE
lock nut, metal washer,
rubber gasket