
Installation Sheet


1Vanity Installation Guide
1. Determine your vanity placement and mark the area on the wall
where it will be installed.
2. Locate and mark the location of the studs to which you will fasten
your vanity. You can nd studs by listening for a solid sound as you
knock on the wall or by using a stud nder.
Tip: If the studs in your bathroom do not line up to the mounting
location for your vanity, wood blocking can be installed between the
studs using standard 2 x 4’s. If wood blocking needs to be installed
behind the nished wall, we recommend consulting a professional
if you are unfamiliar with this type of installation.
3. If your vanity cabinet has a solid back, mark and drill holes to
accommodate drain pipes and supply pipes as necessary.
VANITY INSTALLATION GUIDE
Unpack the vanity and inspect product for any shipping damages. If you nd damages, do not install. Contact Customer
Service at 1.866.855.2284.
We recommend consulting professional help if you are unfamiliar with installing bathroom vanities and/or plumbing.
Signature Hardware accepts no liability for any damage to the vanity, counter top, faucet, wall, plumbing or for personal
injury during installation.
TOOLS AND MATERIALS:
VANITY INSTALLATION
Pencil Stud Finder Tape Measure
Drill Screwdriver Level
Silicone Sealant Wooden Shims
Damp Cloth
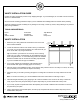
wall studs
mounting
rail
screws screws
4. Place the vanity in the installation location. Verify that the vanity cabinet is level. If the vanity is not level, use vanity
feet (if included) or wooden shims to adjust as necessary.
5. Attach the vanity to the wall by screwing through the mounting rail in the back of the vanity cabinet into the wall
studs.
Note: For under-mount sinks, go to “Sink Installation Instructions” below before continuing to step 6.
6. Install the integral sink/vanity top by applying a dot of silicone sealant on the corners of the vanity. Position the
vanity top onto the vanity and press rmly into place. Wipe away any excess sealant with a damp cloth.
7. If your vanity top has a separate side and/or back-splash, place a bead of adhesive silicone sealant on the back
and press rmly into place.
8. Fill any gaps between the wall and splash, and vanity top and splash with silicone sealant. Wipe away excess
sealant with a damp cloth.