
Installation Sheet


2Door Handle and Lockset Installation Instructions
DOOR KNOB OR HANDLE INSTALLATION
1. Adjust hardware for the backset if necessary. The
backset is the distance from the edge of the door to the cen-
ter of the bore hole. If your new latch bolt hardware
accommodates different backsets, adjust it to t your door.
2. Fit the latch bolt into the door. Insert the latch bolt of the
handle into the edge of the door. Insert the faceplate on the
latch bolt if it is not already attached. If the faceplate is not
ush with the door, carefully chisel out (mortise) some of the
door. The mortise in the edge of the door allows the attached
faceplate to lie ush with the door.
3. Secure the latch bolt faceplate. Mark the positions for
the faceplate pilot holes. Drill pilot holes, if necessary. Secure
the faceplate to the door with screws.
4. Install the handles. Push the latch bolt in, then insert the
spindle through the door. (In some cases the spindle is
attached to the door knob.) Fit the outside door knob
hardware into the latch bolt assembly. Insert the inside door
knob hardware, tting the inside knob over the spindle and
aligning the screws holes. Hand-thread the mounting screws,
and then tighten them rmly with a screwdriver.
5. Install the strike plate. Mark the end of the bolt with
lipstick or paint. Close the door, and turn the handle
several times to mark the door frame. If necessary, mortise
the area around the hole so the strike plate will t ush with
the door frame. Secure the strike plate to the door frame with
screws.
5. Install the strike plate. Mark the end of the bolt with
lipstick or paint. Close the door, and turn the deadbolt several
times to mark the door frame. If necessary, mortise the area
around the hole so the strike plate will t ush with the door
frame. Secure the strike plate to the door frame with screws.
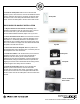
Interior and Exterior
Door Knobs
Latchbolt
Strike plate
Spindle
Faceplate
Strike plate