
Installation Sheet


3
1.800.221.3379
INSTALLATION
INSTALACIÓN
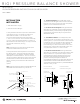
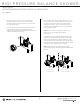
3a. Thin Wall Installation: Are usually built up with
materials such as fiberglass tub surrounds and will be
the main source of support for the valve. The plaster
guard (1) remains attached to the valve.
3a. Instalación En Muro Delgado: Están generalmente
fabricados con materiales como los bordes de fibra de
vidrio de la bañera y será la fuente principal de soporte
para la válvula. La protección de yeso (1) permanece
adherida a la válvula.
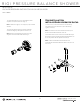
3b. Thick Wall Installation: Are usually built up with
materials such as cement board, drywall, tile, etc. The
plaster guard (1) is positioned so that it is flush with the
finished wall. This ensures that the valve will be at the
correct position to accept the trim. The depth for
the valve body (2) in wall is measured from the center
of the shower outlet to the finished wall surface. The
accepted depth distance is 1-3/4" to 2-3/8".
3b. Instalación En Muro Grueso: Están generalmente
fabricados con materiales como placa de cemento, placa
de yeso, baldosa, etc. La protección de yeso (1) está
colocada de forma tal que queda a nivel con el muro
terminado. Esto garantiza que la válvula estará en la
posición correcta para aceptar la moldura. La
profundidad de la pared para el cuerpo de la válvula (2) se
mide desde el centro de la salida de la ducha hasta la
superficie de la pared terminada. La profundidad debería
ser entre 1-3/4" y 2-3/8".
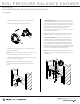
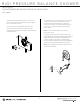
1. Shut o� the water supply.
1. Cierra el suministro de agua.
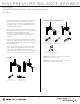
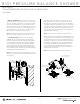
2. Verify that the hole sizes and positions of the holes
in the wall are correct. The shower and tub spout
outlet holes should be 1-1/4” diameter. The
recommended valve depth to the finished wall is
1-3/4” min. to 2-3/8" max. Ensure that the valve body
(1) cover is flush with the finished exterior surface of
the wall. Position the valve body (1) correctly in the wall
with the side marked "UP" pointing
upward.
Note: The distance from the valve to the tub spout
stub out should be between 8” and 18”.
2. Verify that the hole si
zes and positions of the holes in
the wall are correct. The shower and tub spout outlet
holes should be 1-1/4” diameter. The recommended
valve depth to the finished wall is 1-3/4” min. to 2-9/25”
max. Ensure that the valve body (1) cover is flush with the
finished exterior surface of the wall. Position the valve
body (1) correctly in the wall with the side marked "UP"
pointing
upward.
Nota: La distancia entre la válvula y la boquilla del tubo de
salida debe ser de entre 8" (20 cm) y 18" (45 cm).
RIGI PRESSURE BALANCE SHOWER
WITH VALVE
DUCHA DE PRESION BALANCEADA CON VALVULA REGULADORA
SKU: 948895
1 1/4" 3.2 cm
30" shower only
76.2 cm ducha solamente
1-3/4" to 2-3/8"
4.4 cm a 6 cm
finished wall
pared acabada
finished wall
pared acabada
48" shower only
1.22 cm ducha solamente
48" tub and shower
1.22 cm bañera y ducha
1 1/4" 3.2 cm
8" min. - 18” max.
20.3 cm mín. - 45.7 cm max.
30" tub and shower
76.2 cm bañera y ducha
3-3/8”-6”
6” 15.2 cm
8.6 cm-15.2 cm
1
1
1
2
2
thin wall installation
instalación en muro delgado
thick wall installation
instalación en muro grueso