
Installation Sheet


3Granite Composite Sink Installation Instructions
INSTRUCTIONS
For this installation it is assumed that the
counter-top has been cut to the dimensions
of the sink. We recommend consulting a
professional if you are unfamiliar with this
type of installation. Signature Hardware
accepts no liability for any damages to the
floor, walls, plumbing or for personal injury
during installation.
Unpack and inspect the product for any
shipping damages. If you find damages, do
not install. Contact Customer Service at
1-866-855-2284. If you need assistance or
have questions while installing your sink,
contact Customer Service.
TOOLS AND MATERIALS:
Read entire installation instructions.
Observe all local building and safety codes.
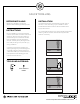
BEFORE INSTALLING INSTALLATION
1. Lower the sink into the sink cutout on the counter to
confirm the sink will fit properly. The perimeter of the sink rim
should connect with the counter while the sink bowl should sit
completely inside the counter.
Tip: For easier installation, install the drain and faucet before attaching the
sink to the counter.
2. Remove the sink and place the special seal strips (if
included) around the perimeter of the cutout. If seal strips are
not included run a bead of silicone sealant around the sink
rim.
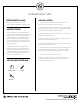
3. Carefully lower the sink back into the cutout and press the
sink firmly into the seal. Make sure that the sink is level
and properly aligned.
4. Wipe away any excess sealant with a damp cloth.
5. With the sink in place, tighten the mounting brackets on
the underside of the sink.
DROP-IN SINK
Damp Cloth
Pencil
Silicone