
Installation Sheet


4Granite Composite Sink Installation Instructions
INSTRUCTIONS
For this installation it is assumed that the
counter-top has been cut to the dimensions
of the sink. We recommend consulting a
professional if you are unfamiliar with this
type of installation. Signature Hardware
accepts no liability for any damages to the
floor, walls, plumbing or for personal injury
during installation.
Unpack and inspect the product for any
shipping damages. If you find damages, do
not install. Contact Customer Service at
1-866-855-2284. If you need assistance or
have questions while installing your sink,
contact Customer Service.
TOOLS AND MATERIALS:
Read entire installation instructions.
Observe all local building and safety codes.
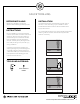
BEFORE INSTALLING INSTALLATION
1. Carefully turn the counter-top over so that it rests
upside-down on a stable, cushioned surface.
2. Position the undermount sink over the sink cutout on the
counter. Make sure the sink is centered with the faucet hole
and is evenly spaced between the bolt holes.
3. Draw an outline of the sink on the counter-top, once the
ideal position is determined.
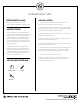
4. Remove the sink from the counter-top. Apply a generous
bead of silicone around the sink rim.
5. Carefully place the sink upside down on the counter-top,
positioning it within the outline.
6. Attach the sink clips (if included) by placing the long end of
the bracket flat against the sink lip. Screw the wing bolts
through the brackets and bolt holes and tighten snugly.
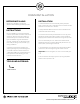
7. Carefully turn the counter and sink over.
8. Remove any excess silicone with a cloth moistened with
water or mineral spirits. Let silicone dry according to
manufacturer’s instructions.
UNDERMOUNT SINK
Damp Cloth
Pencil
Silicone