
Installation Sheet
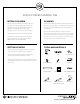

2Acrylic Freestanding Tub Installation
ACRYLIC FREESTANDING TUB
INSTALLATION
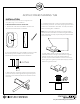
TUB AND DRAIN WITHOUT OVERFLOW
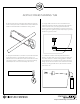
1. Set the tub in the desired installation location and
mark the drain hole location on the floor.
2. Move the tub away from the installation location so that
the plumbing can be installed. The drain pipe should
extend approximately 6” above the finished floor.
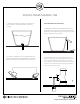
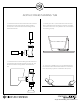
4. Carefully set the tub in position and adjust the tub feet
as necessary until level. Once level, apply a generous bead
of silicone on the bottom of the feet. This will prevent the
tub from shifting after installation.
Tip: Plan for the bottom of the tub to sit approximately
1/8" above the finished floor so that the weight of the tub,
water, and bather are fully supported by the tub feet rather
than the tub walls.
3. When the floor is finished, measure and cut the drain
pipe to the appropriate length depending onthe type of
drain being used, and the distance from the floor to the
drain hole.
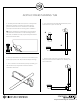
5. Apply 100% neutral cure silicone sealant to the
underside of the drain flange and thread it through the
tub and into the drain pipe. Apply thread sealant or
plumber’s tape to the threaded connection to ensure a
water-tight seal. Tighten by hand. Wipe away any excess
sealant using a damp cloth.
6 inches
Proceed to the appropriate drain configuration to
complete rough-in and installation.