
Installation Sheet

5
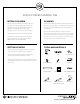
Acrylic Freestanding Tub Installation
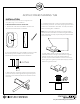
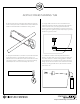
8. Remove the drain and overflow assembly from the tub,
and trim the pipes at the marked locations with a hacksaw.
Make sure that the blade is suitable for cutting metal.
ACRYLIC FREESTANDING TUB
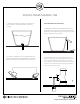
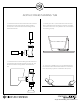
9. Apply thread sealant or plumber’s tape to the threaded
ends of all pipes prior to assembly. If two pipes arrive
attached, be sure to take them apart and do the same. Do
not apply any tape or sealant to any compression fittings.
Follow steps 10-13 for drain assembly instructions.
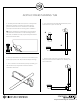
10. Apply 100% neutral cure silicone sealant to the
underside of the drain flange and thread it through the
tub and into the drain pipe. Apply thread sealant or
plumber’s tape to the threaded connection to ensure a
water-tight seal. Tighten by hand. Wipe away any excess
sealant using a damp cloth.
11. Install the overflow assembly with the beveled
washer, overflow plate, mounting screw (provided) and
any other washers or rubber sealing gaskets included.
Apply a bead of silicone sealant to the underside of the
flange. If your tub came with a ‘Press and Seal’ overflow,
the pop-up flange will be used in place of the overflow
plate and screw.