
Installation Sheet

www.mirabelleproducts.com
© 2017 Ferguson Enterprises, Inc. 253537 01/18
2
INSTALLATION
1. Shut off water supply.
INSTALLATION
1. Fermer l'alimentation en eau.
INSTALACIÓN
1. Corte el agua.
INSTALLATION
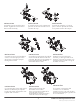
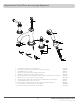
2. Place the body through holes.
Drill a 1/4" hole behind the spout
hole. The 1/4" hole is to accom-
modate the spout pin which keeps
the spout from rotating after
installation. Please refer to the
illustration above.
INSTALLATION
2. Mettre le corps dans l'orifice du
lavabo. Percer un trou de 1/4 po
(Ø6 mm) dans le lavabo. Le petit
trou correspond à la tige de
positionnement du bec de lavabo.
La tige empêche le bec de robi-
net de pivoter après l'installation.
Référer à l'illustration ci-dessus.
INSTALACIÓN
Ponga el cuerpo el orificio
derecha. Haga un orificio de 1/4”
(Ø6 mm) en la cavidad. El orificio
pequeño utiliza la clavija de
posicionamiento del vertedor de la
bañera. Esta clavija impide que el
vertedor de la bañera rote después
de la instalación. Consulte a la
ilustración de arriba.
A B
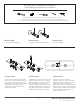
(A) Adjustable wrench (B) Pipe tape (C) Phillips screwdriver (D) Hex wrench (E) Drill
(A) Llave ajustable (B) Cinta selladora para rosca (C) Destornillador cruciforme (D) Llave hexagonal (E) Taladro
C D E
You may need / Usted puede necesitar /
Aticles dont vous pouvez avoir besion
(A) Clé à molette (B) Ruban pour tuyau (C) Tournevis Phillips (D) Clé hexagonale (E) Perceuse
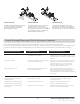
28±0.2
Ø6