DP Wireless-N PCI Express Wi-Fi Adapter Quick Installation Guide Introduction The DP Wireless-N PCI Express Wi-Fi Adapter is designed to add a wireless connection to your PCI Express equipped desktop computer. Key Features and Benefits • • • • • • 04-0835A Complies with 2.4GHz IEEE 802.
System Requirements • • Desktop PC with an available PCIe slot Windows® 8 (32-/64-bit) / 7 (32-/64-bit) / Vista (32-/64-bit) / XP (32-/64-bit) / Server 2003 & 2008 (32-/64-bit) / Server 2008 R2 Package Contents • • • • • 2 DP Wireless-N PCI Express Wi-Fi Adapter Spare low profile bracket Antennas (2) Software CD Quick installation guide
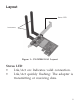
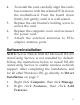
Layout Status LED Anttennas Figure 1: CN-WR0811-S1 Layout Status LED • Lnk/Act on: Indicates valid connection. • Lnk/Act quickly flashing: The adapter is transmitting or receiving data.
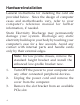
Hardware Installation General instructions for installing the card are provided below. Since the design of computer cases and motherboards vary, refer to your computer’s reference manual for further information, if needed. Static Electricity Discharge may permanently damage your system. Discharge any static electricity build up in your body by touching your computer’s case for a few seconds. Avoid any contact with internal parts and handle cards only by their external edges.
4. 5. 6. 7. To install the card, carefully align the card's bus connector with the selected PCIe slot on the motherboard. Push the board down firmly, but gently, until it is well seated. Replace the slot bracket's holding screw to secure the card. Replace the computer cover and reconnect the power cord. Attach the external antennas to PCIe adapter antenna ports. Software Installation NOTE: Server 2008 & 2008 R2 Microsoft WLAN AutoConfig Service is not installed by default.
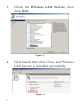
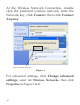
3. Check the Wireless LAN Service, then click Next. Figure 2 4. Click Install then click Close, and Wireless LAN Service is installed successfully.
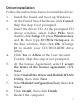
Driver Installation Follow the instructions below to install the driver. 1. Install the board and boot up Windows. 2. At the Found New Hardware, click Cancel. Skip this step if not prompted. 3. Insert the driver CD. At the prompted CD driver window, select folder PCIe, then double click Setup. Or press Windows key and R, then type D:\PCIe\Setup.exe in the Run window, then click OK. (Change D: to match your CD/DVD-ROM drive letter) 4. Click Yes or Allow at the User Account Control.
To Verify Windows Installation 1. 2. Go to Device Manager to verify installation. For Window 8 / Windows 7 / Windows XP / Server 2003 / 2008 R2: Right click Computer or My Computer, click Manage, then click Device Manager. For Windows Vista: Right click Computer, click Manage, click Continue, then click Device Manager. For Server 2008: Right click Computer, click Manage, double click Diagnostics, then click Device Manager. Double click Network adapters. A 802.11n Wireless LAN Card should be displayed.
Right click the RaUI icon in the taskbar, then select Use Zero Configuration as Configuration Utility to configure by WZC, or select Use RaConfig as Configuration Utility to configure by RaUI. For Window 8, Windows 7, Vista, WZC and RaUI can be used together and no need to do the selection. Figure 4 WZC (recommended) WZC is the recommended tool to use. Right click the wireless network icon in the taskbar, then select View Available Wireless Networks.
At the Wireless Network Connection, double click the preferred wireless network, enter the Network key, click Connect, then click Connect Anyway. Click Continue Anyway Figure 6 For advanced settings, click Change advanced settings, select tab Wireless Networks, then click Properties (as Figure 7 & 8).
Click Change advanced settings Figure 7 Click Properties Figure 8 11
Select the type of Network Authentication and Data Encryption, click OK to save the settings.
Ralink UI Note: If you configured your wireless network using WZC utility on page 9, this utility is not needed. Double click the Ralink icon in the task bar. Click the icon to bring up the AP list. Click the icon to bring up the network AP list Figure 10 Double click the the preferred AP from the AP list, and the Profile Settings section is displayed. Select the Authentication and Encryption type, then click the arrow to go to the next step. See Figure 11 on the next page.
Select the Authentication and Encryption type, then click the arrow to the next step. Figure 11 Enter the WPA Preshared Key, then click the arrow icon . Figure 12 Once the wireless network is successfully connected, the RaUI icon turns to green ,and the Windows network shows connected .
Technical Support and Warranty QUESTIONS? SIIG’s Online Support has answers! Simply visit our web site at www.siig.com and click Support. Our online support database is updated daily with new drivers and solutions. Answers to your questions could be just a few clicks away. You can also submit questions online and a technical support analyst will promptly respond. SIIG offers a 5-year manufacturer warranty with this product.
About SIIG, Inc. Founded in 1985, SIIG, Inc. is a leading manufacturer of IT connectivity solutions (including Serial ATA and Ultra ATA Controllers, FireWire, USB, and legacy I/O adapters) that bridge the connection between Desktop/ Notebook systems and external peripherals. SIIG continues to grow by adding A/V and Digital Signage connectivity solutions to our extensive portfolio.