
Installation guide


7
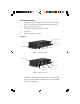
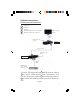
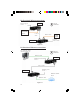
Hardware Installation
1. Power off all devices, including the source HDMI
device and display.
2. Connect your HDMI source (such as a Blu-ray player)
to the transmitter's HDMI IN connector.
3. Connect your HDMI display (such as a LCD TV) to
the receiver's HDMI OUT connector.
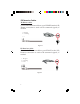
4. Connect your RS-232 ports on the Transmitter and
Receiver to the serial port devices separately if you
want to extend serial signal transmission. Please
adjust the DIP switch to the right position.
Skip this step if RS-232 device connection is not
needed.
5. Connect your Ethernet ports on the Transmitter to a
router or switch on your Ethernet network, and
connect the Receiver to your computer by using an
Ethernet cable.
Skip this step if network extension is not needed.
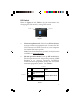
6. Connect the IR extension cables to the IR blaster and
IR receiver connector on the Transmitter and
Receiver separately.
Skip this step if IR transmission is not needed.
7. Connect your CAT5/6 LAN cable between the
transmitter and receiver. Make sure your CAT5/6
LAN cable is securely connected and not loose.
8. Plug one of the included power adapters into the
+24V DC power jack of the transmitter, plug the
second power adapter into the +24V DC power jack
of the receiver, then plug both power adapters into
reliable power sources.
9. After the transmitter and receiver are connected, the
HDMI extender is ready for use.