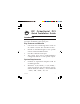
DP CyberSerial PCI Quick Installation Guide Introduction The DP CyberSerial PCI high-speed serial card provides one RS232 9-pin serial port. Key Features and Benefits • • • • Universal PCI card design that works in 32-/64-bit 3.
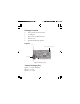
Package Contents • • • • • DP CyberSerial PCI board 1x Jumper Spare low profile bracket Driver CD Quick installation guide Layout Power connector (optional) Serial port JP1 Figure 1: Board Layout Jumper Settings (JP1) Open = 0 volts (default) Short 1-2 = 5V Short 2-3 = 12V 2
Power Connector (optional) Connects to the system's power supply. This connection is required when the serial port is configured for 5V or 12V power output. Note: Most serial devices do not require additional power through the serial port. Refer to your serial device's manual for more information. Hardware Installation General instructions for installing the card are provided below.
Note: For low profile systems, replace the currently mounted bracket with the spare low profile bracket now. 1. 2. 3. 4. 5. 6. 7. 4 Turn OFF the power to your computer and any other connected peripheral devices. Unplug the power cord from the computer. Remove the computer cover. Remove the slot bracket from an available PCI slot. To install the card, carefully align the card's bus connector with the selected PCI slot on the motherboard. Push the board down firmly, but gently, until it is well seated.
Driver Installation Please make sure the board is installed before proceeding with driver installation. Windows 8 (32-/64-bit) / 7 (32-/64-bit) / Server 2008 R2 1. 2. 3. 4. 5. 6. 7. 8. 9. Install the board and boot up Windows. Right click Computer, click Manage, click Device Manager. Right click PCI Device, click Update Driver Software. Insert the driver CD. Click Browse my computer for driver software. Type D:, then click Next.
10. Repeat steps 4-6 to complete the installation. Windows Vista (32-/64-bit) 1. 2. 3. 4. 5. 6. 7. 8. 9. 6 Install the board and boot up Windows. At the Found New Hardware window, click Locate and install driver software (recommended), then click Continue. Insert the driver CD. Click Don't search online. (Skip this step if not prompted) Click I don't have the disc. Show me other options. Click Browse my computer for driver software (advanced). Type D:, then click Next.
Windows XP (32-/64-bit) / Server 2003 (32-/64-bit) 1. 2. 3. 4. 5. 6. Install the board and boot up Windows. Insert the driver CD. Select No, not this time, click Next. (Skip this step if not prompted) Select Install the software automatically (Recommended), then click Next. (Skip this step if not prompted) Click Finish. It may take several minutes for this step to appear. Do not interrupt the process during this time. Repeat steps 3-5 two times to complete the installation.
5. 6. 7. 8. 9. Click I don't have the disc. Show me other options. (Skip this step if not prompted) Click Browse my computer for driver software (advanced). (Skip this step if not prompted) Type D:, then click Next. (Change D: to match your CD/DVD-ROM drive letter) At The sofware for this device has been successfully installed, click Close. Repeat steps 4-8 to complete the installation. Windows 2000 1. 2. 3. 4. 5. 6. 7. 8 At the Found New Hardware Wizard, click Next. Insert the driver CD.
Windows ME 1. 2. 3. 4. 5. At the Add New Hardware Wizard, choose Specify the location of the driver (Advanced), click Next. Check Specify a location, uncheck the other box, insert the driver CD, type in D:\9x, then click Next. (Change D: to match your CD-ROM drive letter) Click Next and Finish. Repeat steps 1-3. Restart Windows to complete the installation. Windows 98SE / 98 1. 2. 3. 4. At the Add New Hardware Wizard, click Next.
5. 6. Repeat steps 1-4. Restart Windows installation. to complete the Windows 95 1. 2. 3. 4. 5. 10 At the Update Device Driver Wizard, click Next. Insert the driver CD, and click Other Locations. Type in D:\9x, click OK, then Finish. (Change D: to match your CD-ROM drive letter) From the Insert Disk window, click OK. When the Copying Files dialog box appears, type in D:\9x, then click OK. (Change D: to match your CD-ROM drive letter) Repeat steps 1-3. Restart to complete the installation.
To Verify Windows 8 / 7 / Vista / XP / Server 2003 & 2008 / 2008 R2 / 2000 Installation 1. 2. 3. Check in Device Manager to verify installation. For Windows 8 / 7 / Server 2008 R2: Right click Computer, click Manage, then click Device Manager. For Windows Vista: Right click Computer, click Manage, click Continue, then click Device Manager. For XP / Server 2003 / 2000: Right click My Computer, click Manage, click Device Manager.
To Verify Windows ME / 98SE / 98 / 95 Installation 1. 2. 3. From the main desktop, right click My Computer, click Properties, then click Device Manager. Double click Ports (COM & LPT), CyberSerial... 16Cxxx... should be displayed. Double click Multi-function adapters, SIIG CyberPro 1S PCI board should be displayed. Changing COM Port Address Some serial devices need a specific COM port in order to work. If your serial device works properly, do not change this setting.
3. 4. Click the down arrow next to the COM Port number box, select a COM port that is not in use. Click OK. Click OK, then close Device Manager to save the changes. Windows ME / 98SE / 98 / 95 1. 2. 3. From the Device Manager window double click Ports (COM & LPT), then double click the CyberSerial PCI serial port. Click Settings tab, click the down arrow next to Port Name, select a COM address not currently in use. Click OK, then close Device Manager to save the changes.
Blank Page 14
Technical Support and Warranty QUESTIONS? SIIG’ s Online Support has answers! Simply visit our web site at www.siig.com and click Support. Our online support database is updated daily with new drivers and solutions. Answers to your questions could be just a few clicks away. You can also submit questions online and a technical support analyst will promptly respond. SIIG offers a lifetime manufacturer warranty with this product.
About SIIG, Inc. Founded in 1985, SIIG, Inc. is a leading manufacturer of IT connectivity solutions (including Serial ATA and Ultra ATA Controllers, FireWire, USB, and legacy I/O adapters) that bridge the connection between Desktop/ Notebook systems and external peripherals. SIIG continues to grow by adding A/V and Digital Signage connectivity solutions to our extensive portfolio.