DP SoundWave 7.1 PCIe Quick Installation Guide Introduction The DP SoundWave 7.1 PCIe transforms your computer into a high-definition 7.1 channel surround sound home theater system. Key Features and Benefits • • • • • Audio output via optical S/PDIF and/or 3.5mm stereo connectors Supports 7.
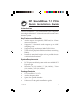
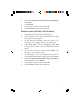
Layout Line In Digital In Digital Out Center (yellow) Front MIC (green) (red) Back surround (grey) Surround (black) Front panel audio connector Figure 1: Layout • • • • • • • 2 LINE In: This connector provides analog stereo line-in function Digital In: This connector provides digital input function Digital Out: Connect to digital input of an external audio device via Digital S/PDIF optical cable (cable not included) Center Out (yellow): This connector provides center audio output Front Out (green):
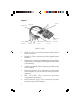
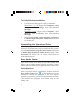
• • Surround (black): This connector provides surround sound output Front panel audio connector: Connects to your system's front panel audio connector (optional). Refer to the next section for pin assignment Pin Assignment NC AGND MIC2* NC MICPWR Line out_R NC NC Line out_L * Refer to the position of Pin 1. Figure 2 Hardware Installation Note: For low profile systems, replace the currently mounted bracket with the included low profile bracket.
1. 2. 3. 4. 5. 6. 7. 8. Turn OFF the power to your computer. Unplug the power cord and remove the computer cover. Remove the slot bracket from an available PCIe slot. Carefully align the card to the selected PCIe slot, push the board down firmly, but gently, until it is well seated. Replace the slot bracket holding screw to secure the card. Connect one end of the audio cable from your CD/DVD-ROM to the CD-In on the soundcard. Replace the computer cover and reconnect the power cord.
6. 7. 8. 9. Select I accept the terms of the license agreement, click Next. Click Install. At the Xear Audio Center, click OK. Click Finish to restart the computer. Windows Vista (32-/64-bit) / XP (32-/64-bit) 1. 2. 3. 4. 5. 6. 7. 8. 9. Install the board and boot up Windows. Click Cancel at the Found New Hardware. Skip this step if not prompted. At the Windows desktop, insert the driver CD. Close the CD autoplay window if prompted. Click Start, Run. Type D:\setup.exe, click OK.
To Verify Windows Installation 1. 2. Check Device Manager to verify installation. Windows 8 / 7 / XP: Right click Computer or My Computer, click Manage, then click Device Manager. Windows Vista: Right click Computer, click Manage, click Continue, then click Device Manager. Double click Sound, video and game controllers, C-Media High Definition Audio Device should be displayed.
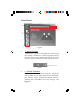
Control Panel 3 1 2 4 Figure 3 • 1 - Master Volume Adjusts the volume of all output device through this master volume bar. Click the speaker icon on the right side to mute all the output devices. Click the icon again to unmute all the output devices. Mute/unmute Figure 4 • 2 - ASIO & EX button ASIO (Audio Stream Input Output). Click the ASIO button on the main menu to see Bit-Depth and Latency value. Change the default value, if needed, then click OK to save the change. See Figure 5.
Bit-Depth Latency Figure 5 EX (Xear 3D EX): C-Media Xear3D EX technology provides a complete and fully backward compatible 3D audio interface. Click EX button to enable the Xear 3D EX function. Click EX button again to disable it. NOTE: This function is not available in Windows XP. • 3 - Function Panel / Profile Panel Click the switch button to change between Function Panel and Profile Panel. Refer to Figure 6 and Table 1 for the descriptions of each abbreviation.
Table 1 Profile Panel: Select the preset profile modes by clicking on the button. Once the mode is selected, there will be a green check on the right-down corner. See Figure 7. Click + to create a new profile by yourself. Click to delete a profile. NOTE: Not all the modes are available under different output types.
+ - Figure 7 • 4 - Audio Output / Input Selections Audio Output Selection: Select Speakers or S/PDIF Out in the left side bar of the main menu. For analog audio output, click Speakers, for digital S/PDIF audio output, click S/PDIF Out. Speaker Headphone S/PDIF Out NOTE: Only when a device is connected to the front panel audio connector will the Headphone selection button be available.
2. Right click on the Speakers icon and select a function from the list. See Figure 8 and Table 2 for more information. Figure 8 Function Function Description Volume Control Volume settings for all audio channels Speaker Settings Select one speaker setting: Stereo, Quadraphonic, 5.1 Surround or 7.1 Surround Sample Rate Select one sample rate from 44.
Flex Bass II Click "Flex Bass II", and check the " Enable Flex Bass II" box to select cut off frequency & Bass level. Xear SingFX Click "Xear SingFX", and check the "Enable Key shifting" box for pitch up or pitch down; check the "Enable Vocal Fading" box for voice or no voice. Table 2 Continued Headphone / S/PDIF Output Audio Selection 1. 2. Click Headphone or S/PDIF Out icon in the left side bar of the main menu.
Enable Digital CD Playback Windows XP 1. 2. 3. 4. Right click My Computer, click Manage, then click Device Manager. Double-click DVD/CD-ROM drives, then double click your DVD or CD-ROM drive, then click the Properties tab. Check Enable digital CD Audio for this CD-ROM device, then click OK. If prompted, restart Windows. Otherwise, your drive is ready for use.
Set Default Figure 9 Q: A: 14 Why can't I open C-Media Xear Audio Center software? Please go to Control Panel, double click Sound or Sound and Multimedia. At the prompted window, check Enable Windows Audio. Click OK, then restart the computer. After enabling Windows Audio Support through this process, there shouldn't be any problem opening the software.
Technical Support and Warranty QUESTIONS? SIIG’ s Online Support has answers! Simply visit our web site at www.siig.com and click Support. Our online support database is updated daily with new drivers and solutions. Answers to your questions could be just a few clicks away. You can also submit questions online and a technical support analyst will promptly respond. SIIG offers a 3-year manufacturer warranty with this product.
About SIIG, Inc. Founded in 1985, SIIG, Inc. is a leading manufacturer of IT connectivity solutions (including Serial ATA and Ultra ATA Controllers, FireWire, USB, and legacy I/O adapters) that bridge the connection between Desktop/ Notebook systems and external peripherals. SIIG continues to grow by adding A/V and Digital Signage connectivity solutions to our extensive portfolio.