
Installation guide


4
1. Turn OFF the power to your computer.
2. Unplug the power cord and remove the computer
cover.
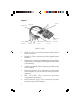
3. Remove the slot bracket from an available PCIe
slot.
4. Carefully align the card to the selected PCIe slot,
push the board down firmly, but gently, until it is
well seated.
5. Replace the slot bracket holding screw to secure
the card.
6. Connect one end of the audio cable from your
CD/DVD-ROM to the CD-In on the soundcard.
7. Replace the computer cover and reconnect the
power cord.
8. Make your speaker and device connections, then
complete the driver installation on the next pages.
Driver Installation
Windows 8 (32-/64-bit) / Windows 7 (32-/64-bit)
1. Install the board and boot up Windows.
2. At the Windows desktop, insert the driver CD.
Close the CD autoplay window if prompted.
3. For Windows 8: Click Windows key and R, type
D:\setup.exe, click OK. (Change D: to match your
CD/DVD-ROM drive letter)
For Windows 7: Click Start. At the Search programs
and files, type D:\setup.exe, press Enter. (Change
D: to match your CD/DVD-ROM drive letter)
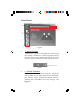
4. At the User Account Control, click Yes.
5. At Welcome to the InstallShield Wizard for
C-Media High Definition Audio Device, click Next.