2-Port RS-232/422/485 Serial over IP Ethernet Device Server Installation Guide Introduction The 2-Port RS-232/422/485 Serial over IP Ethernet Device Server is designed to operate serial ports over 10/100 Mbps Ethernet networks, transmitting via TCP/IP protocol. Features and Benefits • • • • • • • ARM Cortex-M3 32-bit high performance CPU Auto reset on Idle detection Easy to use Web Server Management 115.2Kbps data throughput Power output: 12V, 500mA Built-in 1.
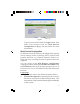
Package Contents • • • 2-Port RS-232/422/485 Serial over IP Ethernet Device Server Power adapter Software CD and installation guide Layout DC-In (power) RS-232/422/ 485 (Port 2) LAN RS-232 (Port 1) LED Indicators (SYS, Port-2, Port-1) Reset Button Figure 1: Layout • • • • Sys: LED flashes every second when the Serial over IP Ethernet Device Server is operating normally DI/DO: Function not available Port-2: Activity LED indicator for RS-232/422/485 Port 2 Port-1: Activity LED indicator for RS-232 Port
Device Server Configuration Follow the instructions below to configure your Serial over IP Ethernet Device Server, if needed. The default IP address of the Serial over IP Ethernet Device Server is 192.168.0.100. Before you configure the IP of your Serial Device Server, make sure the IP of your PC/NB is in the same network domain as the Serial over IP Ethernet Device Server. If not, assign an IP address 192.168.0.X.(* X is a random number between 0-254, except 100).
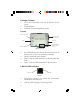
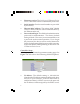
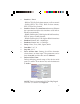
1. 2. Double click IP Search Utility in the included software CD, then double click CVBrowser... to enable the tool. Click the Refresh button on the upper panel, then it will detect the existence of the installed device server and the device server's latest display status, such as IP address, subnet mask, MAC address, etc. Figure 4 3. Click the Modify IP button and change the IP address and subnet mask from the prompted Dialog Frame window, if needed. Figure 5 4. 5.
Figure 6 Login Type in password and click the Login button, then make your changes from the Web Browser Configuration webpage. See the section for more information. Web Console Configuration In addition to basic IP address and subnet mask, specific device settings can be set through HTTP protocol with popular browsers, e.g. Internet Explorer, Firefox, etc. Setup is as easy as surfing the web, no special software is required.
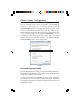
• • • • Firmware version: The Serial over IP Ethernet Device Server's firmware version is identified by date code. Serial number: Product serial number as provided by the factory Ethernet MAC address: The unique MAC (Media Access Control) address used for identification by the Ethernet network Password and Login: This field is the administration password for authentication. The factory default setting is blank. However, it is recommended to set a password under normal operation.
• • • • • Subnet mask: Subnet mask of 255.255.255.0 is usually used for small networks, 255.255.0.0 for larger networks. If your IP address is provided by an ISP or network administrator, please obtain that information and enter it correctly. If DHCP client mode is enabled and there's a DHCP server on the network, this field will be assigned by the DHCP server automatically Gateway IP: Gateway or Router IP address. "Gateway" is a device which connects local network to external network.
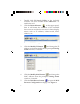
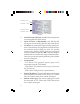
Interface- Port 1 Baudrate - Port 1 Interface- Port 2 Baudrate- Port 2 Figure 8 • • • • • • 8 Serial I/O Port 1 (RS-232): One RS-232 serial port for connecting RS-232 serial device Serial I/O Port 1 (RS-422/485): One RS-422/485 serial port for connecting RS-422/485 serial device Local Port: A socket port assigned to the serial port. It's a 16-bit number, ranging from 1 to 65535. Because the numbers below 1000 are used for specific purposes (e.g.
• • • • • • • • • Interface - Port 1 - RS232 GTxD, RxD for data stream, no flow control - RS232 (RTS/CTS) GTxD, RxD for data stream, RTS/CTS for flow control Interface - Port 2: TheAuto Detect feature will detect the connected serial device's interface as RS-422 or RS-485 automatically - RS485 (Half duplex): Half duplex RS-485 interface, RTS for driver enable/disable - RS422 (Full duplex): Full duplex RS-422 interface Baudrate- Port 1: 300 ~ 460800 bps Baudrate- Port 2: 300 ~ 115200 bps Parity: None, Eve
Device Server Updated Press the Update button after you complete your changes. The Serial over IP Ethernet Device Server will save all setting into internal non-volatile memory and then reboot. The Web Console webpage will refresh in around 5 seconds. NOTE: If Controller Updated/Now restarting doesn't show up after clicking the update button, this means the configuration page may be left idling too long and it timed out, so no update was performed.
COM Port Setup IMPORTANT: Copy the VirtualCOM folder from your driver CD to your PC's hard drive, then follow the instructions below to add the virtual COM port. 1. 2. Open the VirtualCOM folder, double click 32-bit or 64-bit folder ( based on your system), then double click VSerPortConsole. Enter the VSerPortConsole main menu, right click on it, then click Add Port. Add Port Figure 10 3. At the Add Port window, check Auto Assign, then click OK.
4. 5. Click Install this driver anyway or Continue Anyway, then a COM port would be assigned. Right click under the assigned COM port and click Add Net. COM 3 Add Net Figure 12 6. 7. Type in the IP address of the Serial over IP Ethernet Device Server in the Remote Address field. Type in the Serial I/O Port's Local port number to the Remote Port field.
8. A (Unconnceted) TCP Client... will be established. (Unconnected) TCP Client... Figure 14 9. Right click on the Virtualserial Port Console, click Add Port, then follow steps 3-7 to add the second serial port, if needed. 10. Close the Virtualserial Port Console and reopen it to make sure the COM port is successfully added. 11. Go to the Self-Testing section below to make sure the device is ready to use.
Figure 15 Enter a terminal name, choose an icon, and press OK button.
Select the assigned COM port at the Connect using field, see Figure 17. For example, if the virtual COM port was assigned COM 3, then select COM 3. Figure 17 Select the same values with the Controller Setup to the COMX Properties, then click OK.
If Hyper Terminal connects with the Serial over IP Ethernet Device Server successfully, the time clock at the lower left corner, Connected hh:mm:ss, will start counting, see Figure 19. Figure 19 Hyper Terminal for COM Port Initiate another Hyper Terminal as a COM Port Terminal. Select COM 1 or other COM port. Set the COM port properties to the same as those set for the serial port of the Serial over IP Ethernet Device Server.
Wiring Architecture PC Ethernet switch / hub RS-232 Serial to TCP/IP Tx Rx GND RS-232 (RTS / CTS) Serial Device Rx Tx GND RS-422 Serial to TCP/IP TxTx+ RxRx+ LAN cable Serial to TCP/IP Tx Rx GND CTS RTS Serial Device Rx Tx GND RTS CTS RS-485 Serial Device RxRx+ TxTx+ Serial to TCP/IP DD+ Serial Device DD+ Pin Assignment RS-232 (Port 1) Pin 1: Pin 3: Pin 5: Pin 7: Pin 9: N/A TxD GND RTS N/A Pin 2: RxD Pin 4: N/A Pin 6: N/A Pin 8: CTS 17
RS-232 / 422 / 485 (Port 2) 7 6 RS-232 Pin 5: Tx Pin 7: GND Pin 6: Rx 5 4 321 RS-422 Pin 1: RPin3: TPin 7: GND Pin 2: R+ Pin 4: T+ RS-485 Pin 3: DPin 4: D+ Pin 7: GND FAQ Q1. Why can't ETM.exe detect the Serial over IP Ethernet Device Server on the network? A1.
Technical Support and Warranty QUESTIONS? SIIG’ s Online Support has answers! Simply visit our web site at www.siig.com and click Support. Our online support database is updated daily with new drivers and solutions. Answers to your questions could be just a few clicks away. You can also submit questions online and a technical support analyst will promptly respond. SIIG offers a 5-year manufacturer warranty with this product.
About SIIG, Inc. Founded in 1985, SIIG, Inc. is a leading manufacturer of IT connectivity solutions (including Serial ATA and Ultra ATA Controllers, FireWire, USB, and legacy I/O adapters) that bridge the connection between Desktop/ Notebook systems and external peripherals. SIIG continues to grow by adding A/V and Digital Signage connectivity solutions to our extensive portfolio.