USB 3.1 to SATA 2.5 External Hard Drive Enclosure Installation Guide Introduction The USB 3.1 to SATA 2.5 External Hard Drive Enclosure easily adds additional external storage ( 2.5" HDD / SSD) up to 8TB via the latest generation USB 3.1 technology with data transfer rates up to 10Gb/s (2x faster than USB 3.0).
Congratulations for owning a SIIG product. Our products aim to meet all your connectivity needs wherever you go. Have fun with our products! Please read this manual carefully before first use. If you need more information about our products, please visit www.siig.com. For technical support, please email us at www.siig.com/ support/support-form.
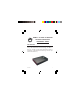
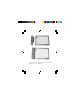
System Requirements • • • PC or Mac ® with an available USB port (USB 3.1 recommended) Windows ® XP or later Mac OS ® X v10.8.x or later Package Contents • • • • USB 3.1 to SATA 2.5 External Hard Drive Enclosure USB 3.1 Y-split (data and power) cable Installation kit Installation guide Layout Upper cover Power / Activity LED Lower cover USB 3.
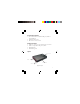
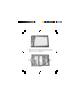
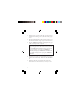
USB 3.1 Y-split (data and power) cable USB Data Connector (to computer) USB Data Connector (to enclosure) USB Power Connector (to computer / optional) Figure 2: USB 3.1 Y-split (data and power) cable Hardware Installaion Below shows how to install 2.5" HDD / SSD into the enclosure, and please handle storage device with caution in case of data-loss. 1. Remove the 2 screws on both sides, see Figure 3. Slide the top cover out of the case, then followed by lower cover, see Figure 4.
screws (x2) screws (x2) Figure 3 Figure 4 2. Take off the PCB and connect it to the hard disk drive, see Figure 5 and Figure 6.
Figure 5 Figure 6 3. Put the installed PCB with hard disk drive into the hard disk drive tray, see Figure 7.
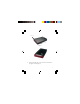
Figure 7 4. Hold onto the hard disk drive and turn the hard disk drive tray over. Secure the hard disk drive with four mounting screws, see Figure 8.
5. Slide the lower cover back into the case and secure it with the two mounting screws, and followed by upper cover. 6. Plug the included USB 3.1 cable into the enclosure. (Use the cable end with the single Type A USB connector.) 7. Plug the USB Data Connector, see Figure 2 on page 4, into a USB port of the computer. Note: In most cases the USB Data Connector will supply enough power to the enclosure. If not, use the optional USB Power Connector to supply morepower.
Blank Page 9
Blank Page 10
Technical Support and Warranty QUESTIONS? SIIG’ s Online Support has answers! Simply visit our web site at www.siig.com and click Support. Our online support database is updated daily with new drivers and solutions. Answers to your questions could be just a few clicks away. You can also submit questions online and a technical support analyst will promptly respond. SIIG offers a 2-year manufacturer warranty with this product.
About SIIG, Inc. Founded in 1985, SIIG, Inc. is a leading manufacturer of IT connectivity solutions (including Serial ATA and Ultra ATA Controllers, FireWire, USB, and legacy I/O adapters) that bridge the connection between Desktop/Notebook systems and external peripherals. SIIG continues to grow by adding A/V and Digital Signage connectivity solutions to our extensive portfolio.