USB Over IP 1-Port Quick Installation Guide Introduction The USB Over IP 1-Port allows multiple users to share an external hard disk, Multi-Function printer, or other USB devices within a network. Features and Benefits • • • • Compliant with USB 2.0 specification and backward compatible with USB 1.
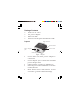
Package Contents • • • • USB Over IP 1-Port AC power adapter Network cable Software CD & Quick Installation Guide Layout USB connector Reset button Power LED Power adapter jack Network port Figure 1: Layout • • • • • 2 Power LED: On when power adapter is connected Power adapter jack: Connect the included power adapter here USB connector: Connect to USB device Network port: Connect Ethernet or wireless Switch/Router Reset button: Press and hold for several seconds to go back to default settings
Hardware Installation 1. 2. 3. Make sure that the USB Over IP 1-Port is not powered on and no USB devices are connected to it. You will be instructed when to connect your USB devices later. Connect the USB Over IP 1-Port to a router or switch on your Ethernet network. Connect the power adapter to the USB Over IP 1-Port and plug it into a reliable power outlet. Windows Installation Follow the instructions below to install USB Over IP 1-Port driver. Windows 8 (32-/64-bit) 1. 2. Insert the driver CD.
3. 4. 5. 6. For 64-bit: Type D:\Win8\64-bit.exe, click OK. (Change your D: to match your CD\DVD-ROM drive letter) At the User Account Control, click Yes. At the Windows Security, click Install two times. Skip this step if not prompted. At the InstallShield Wizard Complete, click Finish. Click Finish again to restart the computer. Windows 7 (32-/64-bit) / Server 2008 R2 1. 2. 3. 4 Insert the driver CD. Close the CD autoplay box if prompted.
4. 5. 6. At the Windows Security, click Install two times. Skip this step if not prompted. At the InstallShield Wizard Complete, click Finish. Click Finish again to restart the computer. Windows Vista (32-/64-bit) / Server 2008 (32-/64-bit) 1. 2. 3. 4. 5. Insert the driver CD. Close the CD autoplay box if prompted. Click Start and Run, For 32-bit: Type D:\Win 7_vista_2008\32bit.exe, click OK. (Change your D: to match your CD\DVD-ROM drive letter) For 64-bit: Type D:\Win 7_vista_2008\64bit.exe, click OK.
. Click Finish again to restart the computer. Windows XP (32-/64-bit) / Server 2003 (32-/ 64-bit) 1. 2. 3. 4. Insert the driver CD. Close the CD autoplay box if prompted. Click Start and Run, For 32-bit: Type D:\Win XP_2003\32bit.exe, click OK. (Change your D: to match your CD\DVD-ROM drive letter) For 64-bit: Type D:\Win XP_2003\64bit.exe, click OK. (Change your D: to match your CD\DVD-ROM drive letter) At the InstallShield Wizard Complete, click Finish. Click Finish again to restart the computer.
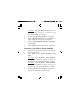
2. For Server 2008 / 2008 R2: Right click Computer, click Manage. Double click Diagnostics, then click Device Manager. Double click the Network USB Server Device, a Network USB Server Device should be displayed. For Windows XP & Server 2003, double click the Universal Serial Bus controllers, a Network USB Server Device XP should be displayed. USB Server Utility This utility must be running in order to use the USB Over IP 1-Port. Starting the USB Server Utility 1.
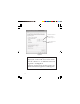
Private networks Public networks Allow access Figure 2 2. 3. 8 To start the USB Server utility, double click the shortcut icon on the desktop or go to the programs folder in which you installed the program and double click on the USB Server icon. The USB Over IP 1-Port will appear on the main menu as Networking USB Server 82E00C.... See Figure 3. If the USB Over IP 1-Port is not listed, click Search to refresh the main menu.
Networking USB Server 82E00C....(in different network segment) Search Figure 3 4. The default IP of the USB Over IP 1-Port is 169.254.10.10, and the default subnet mask is 255.255.0.0. Configure your network's IP address to be in the same network domain (subnet mask) as your USB Over IP 1-Port.
Enter IP 169.254.10.X ("X" may be any number except 10) Enter subnet mask 255.255.0.0 Figure 4 NOTE: Before IP configuration, the name displayed on the USB Server main menu will be similar to "in different network segment". See Figure 3. After IP configuration, the description "in different network segment" will disappear.
5. 6. Connect your USB device to the USB Over IP 1-Port's USB connector. Refer to your USB device's manual for further installation steps, if needed. Once the USB device is detected, it will show on the USB Server main menu. Click (select) the device, then click Connect Device to make the connection. See Figure 5.
7. Once the connection is successfully made, a green circled check will appear beside the selected device. See Figure 6. green circled check Figure 6 Default Settings of USB Over IP 1-Port 1. Click the Open Web Page button at the USB Server main menu, or right click the listed Networking USB Server 82E00C... and click Open Web Page for the default settings of USB Over IP 1-Port.
Configure the USB Over IP 1-Port 1. Right click on the listed Networking USB Server 82E00C... and click Server Configurations to change the default settings, if needed. See Figure 8. Note: If there's a device connected to the USB Over IP 1-Port, make sure the connection status is disconnected; otherwise the configuration is not allowed. Server Configurations Figure 8 2. Change your Server Name, IP Address and Subnet mask, if needed. Click Set after all the changes are done. See Figure 9.
Server Name Use DHCP IP Address Subnet Set Figure 9 3. 14 Other available configurations: Click Update Firmware to update the firmware, if available. Click Change Password if you want to change the password. Click Restart Server to shut down and restart the USB Server utility.
Technical Support and Warranty QUESTIONS? SIIG’ s Online Support has answers! Simply visit our web site at www.siig.com and click Support. Our online support database is updated daily with new drivers and solutions. Answers to your questions could be just a few clicks away. You can also submit questions online and a technical support analyst will promptly respond. SIIG offers a 3-year manufacturer warranty with this product.
About SIIG, Inc. Founded in 1985, SIIG, Inc. is a leading manufacturer of IT connectivity solutions (including Serial ATA and Ultra ATA Controllers, FireWire, USB, and legacy I/O adapters) that bridge the connection between Desktop/Notebook systems and external peripherals. SIIG continues to grow by adding A/V and Digital Signage connectivity solutions to our extensive portfolio.