USB Over IP User User’’s Manual SIIG’ T and SIIG’ss ONLINE SUPPOR SUPPORT Product Registration Visit SIIG’s web site atwww.siig.com and click Support for instant technical support.
About SIIG, Inc. Founded in 1985, SIIG, Inc. is a leading computer upgrade manufacturer of I/O connectivity products, including PCI & ISA serial and parallel ports, USB, Serial ATA & UltraATA controllers, FireWire (1394a/b), networking, sound cards, and other accessories. SIIG is the premier one-stop source of upgrades. SIIG products offer comprehensive user manuals, many userfriendly features, and are backed by an extensive manufacturer warranty.
User's Manual Contents Chapter 1: Introduction 1-1 Unpacking the USB Over IP ................................................. 1-1 1-1.1 Static Electricity Precaution ............................. 1-2 1-1.2 Record the Serial Number ................................ 1-2 1-2 Introducing the USB Over IP .............................................. 1-3 1-2.1 Features and Benefits ........................................ 1-3 1-2.2 System Requirements ....................................... 1-4 1-2.3 Layout ...
Contents Chapter 4: USB Over IP Admin 4-1 Introducing the USB Over IP Admin ................................. 4-1 4-2 Windows Vista Firewall ....................................................... 4-2 4-3 Using USB Over IP Admin .................................................. 4-3 4-3.1 Quick Start Icon .................................................. 4-3 4-3.2 USB Devices ........................................................ 4-3 4-3.2.1 USB Function Buttons .......................... 4-4 4-3.
User's Manual About This Manual The purpose of this manual is to introduce you to your USB Over IP server. It will guide you to properly configure and install into your system. Please save this manual for future reference. This manual is comprised of the following sections: Chapter 1: Introduction Provides unpacking instructions, and introduces features and specifications. Chapter 2: Hardware Installation and Device Compatibility General overview to connect install your adapter.
Introduction Chapter 1 Introduction Thank you for your purchase of the USB Over IP. SIIG’s goal is to provide reliable, high quality products and fast customer support. The purpose of this comprehensive user’s manual is to: • Introduce you to your USB Over IP features and benefits • Guide you through the steps for an easy, trouble-free installation in your system • Provide technical support information in the event of a problem.
User's Manual 1-1.1 Static Electricity Precaution One of the routine precautions you must be aware of when working with computer components is the problem of static electricity discharge. Note: Leave the product in its anti-static bag until you are ready to install it. Caution: Static electricity discharge may permanently damage your system.
Introduction 1-2 Introducing the USB Over IP The USB Over IP allows network users to connect remote USB devices like, printers, scanners, digital cameras and USB Flash drives over the network. It is ideal for home office, small office or classroom use! User friendly client software, which maps USB devices connected to the USB Over IP onto the local host computer, is included 1-2.
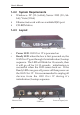
User's Manual 1-2.2 System Requirements • Windows® XP (32-/64-bit)/Server 2003 (32-/64bit)/Vista (32-bit) Ethernet network with an available RJ45 port CD-ROM drive • • 1-2.3 Layout Ready LED Power LED Power LED: USB Over IP is powered on Ready LED: when the box is first powered on, the USB Over IP goes through it's initialization/bootup sequence. The LED will blink for 10 seconds, then it will go off for 10-15 seconds, initialization is successful when the LED comes back on.
USB IP Admin Software Utility Chapter 2 Hardware Installation and Device Compatibility 2-1 Hardware Installation General hardware installation instructions are provided below. Since the design of computer cases and motherboards vary, refer to your computer's reference manual for further information, if needed. Static Electricity Discharge may permanently damage your system. Discharge any static electricity build up in your body by touching your computer case for a few seconds. 1. 2. 3. 4.
User's Manual 2-3 USB Device Support USB Over IP Admin client software is based on open architecture, wherein the USB Over IP box virtualizes the connected USB devices onto the remote client. The Client, installed on the remote host, interacts with the USB Over IP box and enables remote access. In this approach, device drivers of the connected USB device are installed on the remote host only, as if the device is connected to it's USB ports. 2-3.
USB IP Admin Software Utility 2-3.1 Device Interoperability List Contd.
User's Manual 2-3.1 Device Interoperability List Contd.
USB IP Admin Software Utility 2-3.1 Device Interoperability List Contd.
Driver Installation Chapter 3 Driver Installation 3-1 Driver Installation This section provides information on how to install the USB Over IP drivers. 3-1.1 Windows XP 1. 2. 3. 4. Connect the USB Over IP to your network and boot up Windows. At the Windows desktop insert the driver CD. Autorun should start the installation, if not, click Start, then Run. Type D:\Launch.exe then click OK. (Change D: to match your CD-ROM drive letter) At the USB Over IP screen click Install.
User's Manual 5. At Choose Components, click Next. 6. At Choose Installation Location, click Install.
Driver Installation 7. At the Security Alert, click Yes. (skip this step for 32-bit XP) 8. At Completed, click Finish.
User's Manual 9. At the Found New Hardware Wizard, select No, not this time, click Next. (skip this step if not prompted) 10. Windows detects a new device, at the Found New Hardware Wizard, select Install the software automatically (Recommended), click Next.
Driver Installation 11. At the Security Alert, click Yes. (skip this step for 32-bit XP) 12. Click Finish.
User's Manual 13. At Windows Security Alert, click Unblock. (skip this step for 32-bit XP) 14. Repeat steps 9-12 for each USB Over IP connected to your network. Restart XP to complete the installation. 15. 3-1.2 Windows Server 2003 1. 2. 3. 3-6 Connect the USB Over IP to your network and boot up Windows. At the Windows desktop insert the driver CD. Autorun should start the installation, if not, click Start, then Run. Type D:\Launch.exe then click OK.
Driver Installation 4. At the USB Over IP screen, click Install. 5. At Choose Components, click Next.
User's Manual 6. At Choose Install Location, click Install. 7. At Security Alert, click Yes.
Driver Installation 8. Click Finish. 9. At the Found New Hardware Wizard, select No, not this time, then click Next.
User's Manual 10. Select Install the software automatically (Recommended), click Next. 11. At Security Alert, click Yes.
Driver Installation 12. Click Finish. 13. Repeat steps 9-12 for each USB Over IP connected to your network. 3-1.3 Windows Vista™ 1. 2. Connect the USB Over IP to your network and boot up Windows. At the Windows desktop insert the driver CD. At the Auto Play window: click Open folder to view files.
User's Manual 3. 4. 3-12 If Auto Play doesn't start: click Start, in the Start Search box, type D:\Launch.exe. (Change D: to match your CD-ROM drive letter) Right click Launch, click Run as administrator. Click Allow. At the USB Over IP screen, click Install.
Driver Installation 5. At Choose Components, click Next. 6. At Choose Install Location, click Install.
User's Manual 7. At Windows Security, click Install this driver software anyway two times. 8. Click Finish.
Driver Installation 9. At Windows FireWall Security Alert, click Unblock. 10. Right click the USB Over IP Admin icon located on the desktop, click Properties.
User's Manual 11. Click Compatibility tab. Check Run this program as an administrator, click OK. (This step may take up to 30 seconds to complete) 12. Click Start, All Programs, USB Over IP.
Driver Installation 13. Right click the USB Over IP Admin icon, click Properties. 14. Click Compatibility tab, check Run this program as an administrator, click OK.
User's Manual 3-2 To Verify Installation 3-2.1 Windows XP/Server 2003 1. 2. 3. Right click My Computer, click Manage, click Device Manager. Double click USBoIP Device Servers. Virtual USB Bus should be displayed for each USB Over IP connected to the network. 3-2.2 Windows Vista 1. 2. 3. 3-18 Right click Computer, click Manage, click Continue. Click Device Manager, double click USBoIP Device Servers. Virtual USB Bus should be displayed for each USB Over IP connected to the network.
Driver Installation 3-3 Set IP Address The factory default IP address given to the USB Over IP is 192.168.3.22. This address may not match your network's subnet address, in this case, your USB devices will not be detected by the USB Over IP Admin. This section guides you through setting the IP address to match the subnet mask of your network. 1. At the SIIG USB Over IP screen, click Configure. Note: You must have Administrator rights to run this utility in Windows Vista.
User's Manual 2. Click Unblock. (Skip this step if not prompted) 3. At List of Servers, double click the MAC address of the USB Over IP you want to change.
Driver Installation 4. At IP Configuration screen, either type in the IP address, subnet mask, and gateway or select DHCP, then click Change. 5. Click Exit to save and exit.
Configuration Utility Chapter 4 USB Over IP Admin 4-1 Introducing the USB Over IP Admin The USB Over IP Admin is a user friendly PC software which supports High speed USB cameras, USB audio, USB Printers, Multi-function printers, scanners, storage devices, PDAs, digital cameras, serial adapters, mice, keyboards and much much more.
User's Manual 4-2 Windows Vista FireWall Windows Vista operating system firewall blocks the USB Over IP Admin Quick Start Icon from starting up automatically at boot up. Follow the steps below to enable it. 1. After Windows Vista has fully started, click on the Blocked startup programs icon located in the taskbar by the system clock. 2. Place the mouse cursor over Run blocked program, then click USB Over IP Admin Application. Click Allow.
Configuration Utility 4-3 Using the USB Over IP Admin The USB over IP Admin is used to connect to your USB devices and configure your USB Over IP server. 4-3.1 Quick Start Icon The USB Over IP Admin Quick Start Icon installs automatically during driver installation and is located on the right side of the taskbar by the system clock. Double click the icon to open the USB Over IP Admin. 4-3.2 USB Devices The USB Devices window is divided into two sections, Device Mapping and Device Details.
User's Manual 4-3.2.1 USB Function Buttons • • • • Refresh: refreshes USB device list Connect: connects to a free USB device Disconnect: disconnects from a connected USB device Printer Auto Connect: automatically connects and disconnect to your printer when a print job is sent 4-3.3 Servers Screen The Server screen is divided into three sections, Server Manager, Server Details and Connected Clients (IP:USBPort).
Configuration Utility 4-3.3.1 Server Function Buttons • • • • • Refresh: searches for servers Unlock: unlocks password enabled servers Upgrade: upgrades server firmware Setup: enters Server Configuration. This button is disabled whenever a server is password enabled Restore: restores the box to its factory default IP settings of 192.168.3.
User's Manual 4-4 How To's 4-4.1 Device Mapping 4-4.1.1 How to Connect 1. In the Device Mapping window, select a device who's status is Free, then click the Connect button. 2. The Status will change to Connected. 3. Depending on the device, Windows will either automatically install a driver for it or prompt you for a driver. Read the device's user's manual for driver installation instructions, if needed.
Configuration Utility 4-4.1.2 How to Disconnect 1. In the Device Mapping window, select a device who's status is Connected, then click the Disconnect button. 2. The Status will change to Unloading then to Free.
User's Manual 4-4.1.3 Printer Auto Connect The Printer Auto Connect feature automatically connects and disconnects your printer from your computer everytime you send a print job to the printer. Make sure the printer driver has been installed and the printer is configured to print from your computer before enabling this feature. Make sure you are disconnected from the printer before continuing, see section 4-4.1.2 on page 4-7 on how to disconnect. 1. 2. 3. Click the Printer auto connect button.
Configuration Utility 4-4.2 Server Manager 4-4.2.1 Setup (Server Configuration) Use the Setup button to change server name, modify IP settings and enable or disable password. If the server is password protected the setup button will be disabled. To enable the Setup button, go to section 4-4.2.2 Unlock Server and Reset Password. 1. 2. In Server Manager, click the server that you want to configure. Click the Setup button. 3. Select Basic Settings tab, modify the server name.
User's Manual 4. Select IP Settings tab. Check Modify, then either select Static and type in your IP address and gateway or, to have your server configured automatically, select DHCP. 5. Select Password tab. Check Modify, then enable, disable or change your password. 6. Click Save to save your changes and exit.
Configuration Utility 4-4.2.2 Unlock Server and Reset the Password Whenever the USB Over IP is password protected, it's Status will be Locked. Follow the steps in the order that they appear to unlock the server. 1. Select the locked server and click the Unlock button. 2. Type in your current password, and click OK.
User's Manual 3. Your password will be confirmed or denied, click OK. If failed, try again. If you continue to have problems, check with your system administrator for the correct password. 4. Click Refresh button, the server status should be Unlocked. Click the Setup button.
Configuration Utility 5. Select the Password tab. 6. Check Modify, uncheck Enable Password, then click Save.
User's Manual 4-4.2.3 Refresh (Refresh Servers) 1. Click the Refresh button. 2. The Searching for Servers box will pop up.
Configuration Utility 3. The Server Manager list will be refreshed. 4-4.2.4 Restore (Restore Factory Default Settings) The factory default settings are: SIIG (Server Name), 192.168.3.22 (IP) and 192.168.3.1 (Gateway). 1. Click the Restore button.
User's Manual 2. Click OK. 3. Click OK. 4. Click Refresh to display the server list.
Configuration Utility 4-4.2.5 Upgrade (Upgrade Firmware) 1. Select a server, click the Upgrade button. 2. In Select File box, browse to or type in the location of the file, then click Transfer. Do not unplug the power adapter from the USB Over IP during the update process.
User's Manual 4-4.2.6 Configure IP Address: Server Not On the Same Subnet 1. At the Server Manger screen, select the server that is not on the same subnet. 2. At Configure IP Address, click Yes.
Configuration Utility 3. Click Unblock. (Skip this step if not prompted) 4. Either type in an IP address and Gateway or select DHCP, then click Change.
User's Manual 5. 4-20 At the Server Manager screen, click Refresh. Yes should be displayed in the Same Subnet? column of the server.
Technical Support & Product Return Chapter 5 Technical Support & RMA 5-1 Overview This chapter will give you instructions on how to obtain product information, contact technical support and return defective product. This user's manual is written with easy-to-understand instructions on how to configure and install this product in your system. We encourage you to consult this manual as your first step for technical assistance. There are several steps you can take should you find problems with this product.
User's Manual 5-2 Technical Support and Warranty QUESTIONS? SIIG’s Online Support has answers! Simply visit our web site at www.siig.com and click Support. Our online support database is updated daily with new drivers and solutions. Answers to your questions could be just a few clicks away. You can also submit questions online and a technical support analysts will promptly respond. SIIG offers a lifetime manufacturer warranty with this product. Please see our web site for more warranty details.
Technical Support & Product Return Blank Page 5-3
User's Manual Blank Page 5-4
03-0315A