
User Manual


LS10061-001SK-E
4-1
Section 4
Control Panel Installation
4.1 Mounting the Control Panel Cabinet
Read the environmental specifications in Section 3.2 before mounting the control panel cabinet. This will ensure
that you select a suitable location.
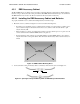
The panel should be accessible to main drop wiring runs. It should be mounted as close to the center of the
building as possible and located within a secured area, but should be accessible for testing and service.
Mount the control panel cabinet so it is firmly secured to the wall surface. When mounting on concrete,
especially when moisture is expected, attach a piece of 3/4-inch plywood to the concrete surface and then attach
the cabinet to the plywood. Also mount any other modules to the plywood.
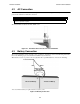
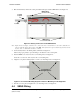
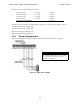
The 5820XL cabinet can be surface- or flush-mounted. Cabinet dimensions are
16.2" W x 26.4" H x 4.2" D. There should be 1.5" to 1.75" of cabinet extruding from the wall, this should be
measured from either the top edge or bottom edge to the exterior side of the sheet rock. Do NOT flush mount in
a wall designated as a fire break.
The 5820XL-EVS cabinet can be surface or flush mounted. Cabinet dimensions are 20" W x 26.5" H x 4.6" D.
There should be 1.5" to 1.75" of cabinet extruding from the wall, this should be measured from either the top
edge or bottom edge to the exterior side of the sheet rock. Do NOT flush mount in a wall designated as a fire
break.
4.1.1 Preventing Water Damage
Water damage to the fire system can be caused by moisture entering the cabinet through the conduits. Conduits
that are installed to enter the top of the cabinet are most likely to cause water problems. Installers should take
reasonable precautions to prevent water from entering the cabinet. Water damage is not covered under warranty.
4.1.2 Removing the 5820XL / 5820XL-EVS Assembly from the
Housing
If it should ever be necessary to remove the control panel assembly from the cabinet for repair, do so by
unscrewing the nuts that connect the control panel assembly to the cabinet. Do not attempt to disassemble the
circuit boards. See Section 3.5 for location of the nuts.
Caution!
To avoid the risk of electrical shock and damage to the unit, power should be OFF at the control panel while
installing or servicing.