
Installation manual


15
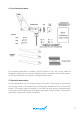
8. Getting started
Before getting your SILENTWIND started check the correct mounting and installa -
tion according to the following check list:
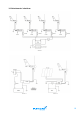
Connect to a 3-phase rectifier (optional) or the included charge controller. Please
read the charge controller manual for details on its installation.
Mast construction:
Optional;
Check according to instruction, especially all screw connections, bracing, vertical position.
Grounding and lightning protection according to local regulations?
Electric installation:
Check battery status and correct polarity.
Charge controller:
Charge controller securely fastened to the mounting location?
Battery connected with correct polarity, otherwise controller will be destroyed
Caution: Connect always first the battery to the charge controller.
Are all screw terminals firmly tightened?
Is stop switch in position “O”?
Fuse:
Fuse connected as close as possible to the battery?
STOP switch:
If a stop switch from a previous installation is installed in the connection cable at the AC- or
DC-side ot the charge controller, it must always be removed or secured against switching off. The
activation of the stop switch while the wind generator is running will immediately destroy the wind
generator and/or the charge controller.
Wiring:
All cables connected in line with plan? Check the polarity of all wires in the screw connection poles.
Is the 3-phase cable of the SILENTWIND connected to the charge controller? Are the cables
correctly crimped and is the strain relief inserted?
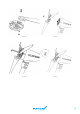
Yaw shaft:
Is the rubber pad well placed?
Rotor blades:
Mounted in line with instructions?
Assembly hub:
Is the assembly hub fixed to the generator shaft? Is the central screw nut fastened with 30 Nm?
Test OK
Test OK
Now you can go ahead!