
User Manual
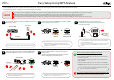


Table Of Contents

Step3 Setup SX-DS-3000WAN
<<< Windows environment >>>
Insert the Device Server Setup CD into your
computer.
* In Windows 7 (or Windows Vista), the User Account
Control screen is displayed. Click Yes .
(Click Continue in Windows Vista).
* If SX-DS-3000WAN is not displayed in a list,,,
- Check the network setting on your computer (IP
address setting) is properly congured.
- Please temporarily disable the security software
(e.g. "Virus Buster" of Trend Micro, Inc.) or the
rewall function of Windows XP.
1
2
3
5
6
7
Before clicking Finish, follow the instructions on Step 4
to take eect of the conguration you made. After
completing Step 4, click Finish and go on to install the
USB device connection utility, "SX Virtual Link".
* The information diplayed here will dier depending
on how you have congured.
* If you wish to assign the IP address manually, click
Assign IP Address and enter the IP address, subnet
mask and default gateway.
* If the window does not have the option, ”Get IP
Address Automatically”, it is unable to obtain the IP
address from DHCP server. In such a case, the sample
address created with your computer's setting will be
displayed. Please enter the IP address manually.
* Use the wireless setting information that you have
checked at Step 1.
Select the SSID of the wireless network that you to
connect to and enter the network key.
If the wireless network that you wish to connect to is
not shown on a list, click Detailed Cong button and
congure each setting in the window displayed.
* If you plan to use SX-DS-3000WAN on a wired network
using a network cable, check Skip wireless
conguration and click Next.
8
9
11
Congure SX-DS-3000WAN using the conguration software included in the Device Server Setup CD.
The conguration can be done from Windows or Macintosh computers.
Insert the Device Server Setup CD into your
computer.
Double click the CD-ROM icon ( )
and then double click DSSetup ( ).
1
2
3
4
5
6
7
8
9
11
10
Restart SX-DS-3000WAN to take eect of
the new settings.
Remove the AC plug from the power
outlet and then network cable from
SX-DS-3000WAN.
* If you plan to use SX-DS-3000WAN on a wired
network, it is not necessary to unplug the
network cable.
Step4 Enabling the New Settings
SX-DS-3000WAN
USB Devices
Conrm that the Wireless LED turns on.
SX-DS-3000WAN
SX-DS-3000WAN
Power Outlet
Network
Cable
Power Outlet
If Wireless LED turns to Green
Successfully connected to the wireless
network. The setup is complete now.
Go on to install the USB device
connection utility, SX Virtual Link.
Please refer to the "SX Virtual Link
User's Guide".
If Wireless LED blinks in Orange
Searching for a wireless network.
Please wait until a wireless connection is made.
When not connected within 2-3 min, the SX-DS-3000WAN's
wiress settings may not have been congured
properly. Go back to Step 1 and check the wireless
setting information once again.
If Wireless LED is OFF
The network cable is plugged.
When you plan to use SX-DS-3000WAN in a
wireless network, follow the instructions
from Step 4-1 again.
When you plan to use SX-DS-3000WAN in a
wired network, check the LAN LED's
lighting pattern. If the LAN LED turns to
Green or Orange, SX-DS-3000WAN has
been connected to a wired network.
The setup is complete now.
1
2
3
4
<<< Macintosh environment >>>
ON
Wireless LED
Click Device Server Conguration.
Click Congure using the setup utility
(Recommended).
Check the notice information and click Next.
Read the software license agreement and click
Yes.
Select SX-DS-3000WAN and click Next.
Select Get IP Address Automatically and click
Next.
Select the wireless network that you wish to connect
to from a list , enter the network key and click Next.
Check the settings and click Execute.
Click Device Server Conguration.
Click Congure using the setup utility
(Recommended).
Check the notice information and click Next.
Read the software license agreement and click
Yes.
Select SX-DS-3000WAN and click Next.
* If SX-DS-3000WAN is not displayed in a list,,,
- Check the network setting on your computer
(IP address setting) is properly congured.
Select Get IP Address Automatically and click
Next.
* If you wish to assign the IP address manually, click
Assign IP Address and enter the IP address, subnet
mask and default gateway.
* If the window does not have the option, ”Get IP
Address Automatically“, it is unable to obtain the IP
address from DHCP server. In such a case, the sample
address created with your computer's setting will be
displayed. Please enter the IP address manually.
Select the wireless network that you wish to connect
to from a list, enter the network key and click Next.
* Use the wireless setting information that you have
checked at Step 1.
Select the SSID of the wireless network that you with to
connect to and enter the network key.
If the wireless network that you wish to connect to is
not shown on a list, click Detailed Cong button and
congure each setting in the window displayed.
* If you plan to use SX-DS-3000WAN on a wired network
using a network cable, check Skip wireless
conguration and click Next.
Check the settings and click Execute.
* The information diplayed here will dier depending
on how you have congured.
Before clicking Finish, follow the instructions on Step 4
to take eect of the conguration you made. After
completing Step 4, click Finish and go on to install the
USB device connection utility, "SX Virtual Link".
Connect the USB device that you wish to use
over the network to SX-DS-3000WAN using
a USB cable and then insert the AC plug of
SX-DS-3000WAN to the power outlet.
Click Yes and click Finish.
Click Yes and click Finish.
* If the menu screen does not appear automatically,
open My Computer, select the CD-ROM drive and
execute Autorun.exe.
4
Click Yes.
10