Getting started with your
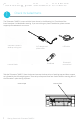
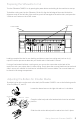
Connecting your Silhouette CAMEO® 1 Check Included Items The Silhouette CAMEO® comes with the items shown in the following list. Check that all the items have been included before starting. If you are missing any items listed below, please contact support@silhouetteamerica.com.com.
2 Install the Silhouette Studio‰ Software Installation 1. Navigate to silhouetteamerica.com. 2. Click the blue “Update Software” button at the top of the screen. 3. Under “Silhouette Studio” click the download link. Ensure you choose the correct one depending on your operating system (Windows or MAC). FOR WINDOWS: Proceed through the installation process by following the on-screen prompts.
How to Cut with Your Silhouette CAMEO® Opening the Silhouette Studio® Software Locate the Silhouette Studio® icon on the desktop, or in the Start Menu on your PC (in the Applications folder on a Mac®). Double-click the icon to run the application. Once Silhouette Studio® has loaded, you will notice a blank 12” x 12” page on your screen. If you would like to change the page dimensions or orientation, you will find the page setup options already opened in a panel on the right-hand side of the screen.
Getting Started with Silhouette CAMEO® 4 Offset Weld Send to Silhouette Zoom In Print Zoom to Selected Area Undo Redo Paste Drag Zoom Zoom Out Pan Copy Cut Fit to Window Select All Delete Send to Back Deselect All Duplicate Bring to Front Select by Color Ungroup Group Show Library Show Library and Drawing Area Library Online Store Text Tool Eraser Tool Knife Tool Drawing Area Arc Tool PolygonTool Smooth Freehand Tool Line Tool Rectangle Tool Rounded Rectangle Ellipse Tool Polygon Tool Curved Sha
Drawing Text To cut letters or words using any font on your computer, choose the text tool from the toolbar on the left-hand side of the screen. With the text tool selected, click anywhere on the page and begin typing. After clicking on the page with the text tool, a blinking cursor will appear. Begin typing any letters, words, or phrases you choose. While you are typing or editing text, the text options panel will appear on the right-hand side of the screen.
Drawing Simple Shapes Silhouette Studio® has built-in functions to draw simple shapes such as circles, squares, rectangles, lines, polygons, and freehand line art. Each of these tools can be found in the toolbar on the left-hand side of the Silhouette Studio® window. Lines To draw a line, choose the Line Tool on the left-hand toolbar. Either click and drag with the mouse to draw a line, or click once to start the line and click a second time to end.
Cutting Your Design Preparing the Cutting Mat Remove the non-stick liner from the cutting mat. Position your paper or other media on the cutting mat according to the diagram shown in Silhouette Studio®. If you don’t see an image of the cutting mat under your document on the screen, click the Page Setup button in the options toolbar in the upper right-hand corner of the window. Position your image on the screen where you want it to cut on the mat.
Preparing the Silhouette to Cut Turn the Silhouette CAMEO® on by pressing the power button and waiting for the machine to start up. To feed the cutting mat into the Silhouette, lift the lid, align the left edge of the mat with the blue alignment mark on the left side of the machine, press the mat against the white rollers, and press the “Load cut mat” button on the LOAD screen.
Blades Different styles of blades are adjusted by different methods. Instructions for adjusting alternate blade types will be included on the blade packaging. In all cases, higher blade settings expose more of the blade and are for cutting thicker materials. Refer to Silhouette Studio® for recommended blade settings for different materials.
Cutting Click the Cut Settings button on the toolbar at the top of the screen. The Cut Settings panel will appear on the right side of the screen. If using multiple tools, you can assign which lines will be performed by each tool. This can be done in one of two ways. If using the default “Standard” Cut Mode, you can select your image on your workspace and then click on the Tool you want to assign the image to.
My Library Browsing Designs Click the My Library button to view the Silhouette designs you have on your computer. Silhouette Studio® includes 100 free designs to help you get started. Connect your CAMEO to your computer and power it on to get your 100 free designs. Click the Show All Designs shortcut in the left panel of My Library to view all 100 designs included with your software. Click the icon next to the My Library folder to expand the folder and view its contents.
Organizing Designs You can organize your designs within My Library for your convenience by creating new folders for your designs. With the My Library folder highlighted, click the New Folder button in the toolbar at the top of the My Library window, then type a name for your new folder. Select the My Library folder again to reveal the 100 designs you already have. Drag any design from the right panel into your newly created folder in the folders panel on the left.
Searching Designs At the top of the My Library window you will find a search box. Click in the text box and type a keyword to search your library of images. Search results will display in the right panel of My Library. search box If you would like to view the keywords and description for a shape used for searching, right click (Control Click on Mac®) and choose Show Properties. At the bottom of My Library details about the highlighted shape will appear.
Downloading New Shapes Connecting to the Silhouette Design Store The Silhouette Design Store contains thousands of designs to cut with your Silhouette ranging from simple cutouts to intricate patterns and designs. Most shapes are only 99¢. Generally, a free shape is posted every week as well. To access the Silhouette Design Store, click the Design Store button in the toolbar on the left side of the window. The free design of the week will be displayed on the home page that appears.
Browsing for new designs The Silhouette Design Store works like any other web page and can be navigated by clicking on various links to browse new releases, popular designs, etc. The home page contains popular and new designs that you may be interested in. For now, try downloading a free design by clicking this week’s free design button on the home page or searching the Free Design tab. Click on the design in the search results to view details about the design.
Creating an account Several different account types exist. Once you’re more familiar with the Silhouette Design Store, you may wish to purchase a subscription and download dozens of designs each month. In order to create a free account and buy designs one at a time, choose the “Sign up FREE” option. You will be asked for your name, email and password in order to create an account. Type your information and click the Sign Up button.
Once your account is created, you will need to access your shopping cart again and try the checkout process once more. You will be asked to validate your password each time you download designs. Type your password to authorize the download. As your design begins to download, it will appear in the Recent Downloads folder of My Library which will appear on the screen showing the download progress.
Using your trial subscription card If your Silhouette came with a trial subscription card, you may use it to purchase designs from the Silhouette Design Store. After registering your machine at silhouetteamerica.com/setup, you will be emailed a unique code that entitles you to a 1-month Basic subscription to the Silhouette Design Store. Follow the directions within the email to activate you trial subscription and begin enjoying the Silhouette Design Store.
Using Your USB Device with the Silhouette CAMEO® Saving to Your USB Device Open or create a shape in the Silhouette Studio® software. Resize your design to the size you want it to cut and position it as desired. Insert a USB memory device into your computer. Go to the File > Save As option (or CTRL + SHIFT + S) and save your design to the USB memory device. Remove the USB memory device from your computer.
Using a USB Device in your Silhouette CAMEO® With the Silhouette CAMEO® powered on, insert your USB memory device into the slot on the side of the machine. Load your material into the Silhouette. With the USB memory device inserted and your cutting mat/media loaded, a USB menu will appear on your screen. Press the USB button in the bottom left-hand corner. From here, browse the files on your device and choose the your desired image.
Silhouette CAMEO® Safety Precautions Keep the Silhouette CAMEO® out of reach of children. Review and keep this document for future reference. The Silhouette CAMEO® is an electronic cutting tool and requires careful use and handling. To avoid personal injury or damage to the machine, please read the following safety precautions.
Do not use the AC adapter or power cord if it is damaged. Use of a damaged power cord or AC adapter may result in electrical shock or fire. Replace damaged power cords and AC adapters. Only use the AC adapter included in the Silhouette CAMEO® box. Use of other AC adapters may cause malfunctions or result in electrical shock or fire. Be sure to connect the AC adapter to the CAMEO before plugging it into the wall. The Silhouette blade is sharp.
Where to Find More Information Complete User’s Manual View the complete, illustrated User’s Manual within Silhouette Studio® by clicking Help -> User’s Manual. Website Visit the tutorials section of www.silhouetteamerica.com for help with specific features and step-bystep instructions on how to cut different media types with the Silhouette CAMEO®. Blog Visit the official Silhouette blog at blog.silhouetteamerica.com for ideas of new projects you can create.