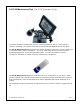
SI-2K Image & Software Install Manual SiliconDVR Version 1.
Table of Contents Section 1.0 - Introduction 1.1 Release Notes for SiliconDVR Version 1.1 2.0 SI-2K Maintenance Tool (SI-2K Recorder Use) 2.1 Download and Pre-installation Page 3 3 6 6 2.11 Downloading 4 2.12 Prepare the USB Drive 5 2.2 Before You Boot 9 2.3 Using the Maintenance Tool 10 2.4 Troubleshooting 12 2.5 Touchscreen Calibration & Drivers 13 3.0 SiliconDVR Installer (PC/Laptop Use) 14 3.1 - Minimum System Requirements 14 3.2 - Installing SiliconDVR for Intel Pro1000 NIC’s 15 3.
1.0 Introduction This manual covers the installation and update procedure for the following: • • SI-2K Recorders using Maintenance Tool (Section 2) PC/Laptop Systems with Software Installer (Section 3) The SI-2K Image installation uses a new SI-2K Maintenance Tool to update both SiliconDVR and the full operating system which resides on the internal Compact Flash. Once updated, no additional software or driver installation is required.
1.1 Release Notes for SiliconDVR Version 1.1 Image Quality -Improved reliability in black calibration -Enhanced deviant pixel detection processes -Increased total count of Deviant pixels detected and corrected -Reduced column FPN in high-temp -Higher Quality Cineform Encoder Modes (3.5:1) Operational Reliability - Feedback system during camera connection or loading new mode - Greater stability when recording .
SI-2K & Windows-XP Embedded Support tools - USB thumb-drive SI-2K Image Installer (Maintenance Tool) - New XP-e Write Filter (FBFW) used to prevent data writing to the compact flash card which contains the OS Image. Only the SiliconDVR data folder is accessible for storing .looks and preference settings.
2.0 SI-2K Maintenance Tool (For SI-2K Recorders Only) The SI-2K contains a compact flash memory card that appears as the “C:” drive when the system is operating. The system boots and runs the SiliconDVR application from this drive. The SI-2K Maintenance Tool is provided to quickly upgrade or restore the system’s flash drive to a previous state, called a “snapshot”. This is an exact image of the full camera system – SiliconDVR application, drivers and operating system.
2.1 Download and Pre-installation If you have received the SI-2K Maintenance Tool already installed on a USB drive, you may skip to the section “2.2 Before You Boot” 2.1.1 Downloading The SI-2K Maintenance Tool is distributed in a single ZIP file that may be more than 1GB in size. Download this file and save it to a computer running Windows. The application used to prepare the drive for booting is not available for Mac OS at this time. Please contact support@siliconimaging.
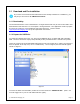
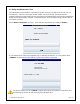
A warning message will appear as shown in Figure 2. Verify that the flash drive has been correctly identified, in this example it’s drive “F:”, and press ENTER to make the drive bootable. Figure 2 Use the “Safely Remove Hardware” function on the Windows Taskbar to insure that the drive is properly written prior to unplugging it. Please note that almost all recently manufactured flash drives from reputable manufacturers are compatible with the SI-2K’s booting process, but there are a few that may not work.
2.2 Before You Boot The Maintenance Tool is designed to modify only the internal flash drive, but it’s always prudent to make sure that any work you have on the SI-2K has been copied off the system prior to using the tool. You may also choose to remove the hard drive carrier from the SI-2K prior to booting with the Maintenance Tool. Customized “.LOOK” files are stored on the internal flash drive and will be overwritten during a snapshot restore.
2.3 Using the Maintenance Tool The Maintenance Tool interface is operated using the mouse on the side of the SI-2K (not via touchscreen). There are two types of flash media used in the SI-2K, Transcend and X4. Snapshot Images for both media types are provided in the Maintenance Tool and the appropriate image will be automatically selected. A brief description of the snapshot along with the date of its creation is shown. Press "Restore Snapshot" to begin. Then click the large button now labeled “START”.
Once the restore operation has completed, which typically takes five to ten minutes, you will see a message reporting OPERATION IS FINISHED. Click the large button at the bottom “CLICK HERE TO COMPLETE” to begin the system shutdown and insure that data written to the internal flash drive is safely stored. Note: The option to cancel the process once a restore has started is not available. If the restore process is interrupted, the internal flash drive will be in a corrupted state.
2.4 Troubleshooting 2.4.1 BIOS SETTINGS IF BOOT FAILS If the SI-2K does not boot into the Maintenance tool, the BIOS boot settings may need to be adjusted. 1. Connect a USB Keyboard and a monitor to the VGA port (do not use the SI-2K Electronic Viewfinder) to the switched off camera. 2. Switch on the camera and press the "DEL" Button in order to enter the BIOS as soon as the camera gives you that option (during start up the first time you see information on your monitor) 3.
2.5 Touchscreen Calibration & Drivers The flash drive of the SI-2K is protected from inadvertent writing by the File Based Write Filter (FBWF). This protection keeps the file system from being corrupted during unexpected shutdowns, such as when the battery runs down. In order to make changes to the system files, it is necessary to turn off this protection, make the changes and then re-enable the protection.
3.0 SiliconDVR Installer (For PC/Laptop Only) The installation instructions for installing SiliconDVR are split into two sets: One for Intel Pro1000 NIC-based systems, and a second set for other generic NIC’s systems not compatible with the Pleora High Performance Driver for Intel Pro1000 NIC’s (eg. Marvell Yukon). These installation instructions assume a clean install of SiliconDVR. If a previous version of SiliconDVR has been installed on the computer, follow the uninstall steps in ‘3.
3.2 Installing SiliconDVR for Pro1000 NIC’s: 1. Certify that the Pro1000 NIC being used for SiliconDVR has the Intel Pro1000 NIC driver software installed and the NIC can operate as a “normal” NIC, capable of receiving normal TCP/IP network traffic such as email, internet, file-sharing, etc. 2. Open the SiliconDVR Installer. You will be greeted by the installer splash-screen. Press the “Next” button. 3.
5. After SiliconDVR is installed, the CineForm installer will launch. Click though the “next” button and then when you arrive at the install screen, press the “Install” button. 6. After the CineForm Installer completes, the Pleora iPort Vision Suite will being installation. Click the “Next” button. 7. Under the “Setup Type” window select the “Complete” choice for installation.
8. Once the iPort Vision Suite has completed installing, the Pleora eBUS driver Suite will launch. Click though the “Next” button until the driver is completed installing. 9. After the eBUS driver has completed installation, the installer will go back to the SiliconDVR installer splash-screen. 10. Once the SiliconDVR installer has completed, you will be prompted to reboot the computer. 11. Restart the computer.
12. Installing Drivers: After rebooting the computer, go into \Program Files\Pleora Technologies Inc\Ethernet Bus\Binaries\ and launch the EbDriverTool.exe. 13. Once inside the EbDriverTool, you should see the active NIC on the computer available for installing the eBUS drivers on for use with SiliconDVR. It should be listed as “NIC Driver” under the “Driver” field. 14. Click on the Intel Pro 1000 NIC that will be used with SiliconDVR, and then click on the “Configure” button. 15.
16. After the driver installs, close the configuration window. 17. The NIC in the main EbDriverTool window should now read “High Performance Driver” in the driver field. 18. Quit the EbDriverTool application and then reboot the computer 19. After reboot, launch SiliconDVR.
3.3 Installing SiliconDVR for Generic NIC’s: As a pre-installation procedure to optimize the generic NIC and set IP Addresses for use with SiliconDVR, follow these procedures: 1. Go into the Network Connections dialog box by right-clicking on Network Neighborhood and going to “properties”. 2. Right-click on the “Local Area Connection” and go to “properties”. 3. Turn off the “Client for Microsoft Windows”, “QoS Packet Scheduler”, “File and Printer Sharing”, and on Windows Vista, the “IPv6” option. 4.
6. Press “Okay” to close the TCP/IP properties window. 7. Next Press “Okay” to close the “Local Area Connection Properties” window. This will reset the NIC and the IP address of the NIC. 8. Right click-again to re-open the “Local Area Connection” by selecting the “Properties” setting again. 9. Click on the “Configure” button and then in the driver settings window select the “Advanced Tab”. 10. Click on the “Jumbo Packets” property and select the 9K packet size. 11.
12. If your NIC provides these properties, select the “Transmit Buffers” property and set the number of buffers to 512. 13. Press “Okay” to exit the driver configuration dialog box and then “Okay” again to exit the “Local Area Connection” properties dialog box. 14. Open the SiliconDVR Installer (SiliconDVRSetup1.1). You will be greeted by the installer splash-screen. Press the “Next” button.
15. When you reach the “Select Components” screen, make sure that all three selections for CineForm, Pleora eBUS and Pleora iPort are checked. 16. Click the “Next” button and proceed with the installation of SiliconDVR.
17. After SiliconDVR is installed, the CineForm installer will launch. Click though the “next” button and then when you arrive at the install screen, press the “Install” button. 18. After the CineForm Installer completes, the Pleora iPort Vision Suite will being installation. Click the “Next” button.
19. Under the “Setup Type” window select the “Complete” choice for installation. 20. Once the iPort Vision Suite has completed installing, the Pleora eBUS driver Suite will launch. Click though the “Next” button until the driver is completed installing.
21. After the eBUS driver has completed installation, the installer will go back to the SiliconDVR installer splash-screen. 22. Once the SiliconDVR installer has completed, you will be prompted to reboot the computer. 23. Restart the computer.
24. After rebooting the computer, go into \Program Files\Pleora Technologies Inc\Ethernet Bus\Binaries\ and launch the EbDriverTool.exe. 25. Once inside the EbDriverTool, you should see the active NIC on the computer available for installing the eBUS drivers on for use with SiliconDVR. It should be listed as “NIC Driver” under the “Driver” field. 26. Click on the appropriate NIC that will be used with SiliconDVR, and then click on the “Configure” button.
27. Inside the configuration window, choose the “eBUS Universal Driver” choice. 28. After the driver installs, close the configuration window. 29. The NIC in the main EbDriverTool window should now read “eBUS Universal Driver” in the driver field. 30. Quit the EbDriverTool application and then reboot the computer 31. After reboot, launch SiliconDVR.
3.4 Uninstalling Previous Versions of SiliconDVR Prior to uninstalling SiliconDVR, check the subdirectories for any user information such as .Look libraries that may be stored there and move them to a safe location. To uninstall SiliconDVR 1.x: 1. Go into \Program Files\Pleora Technologies Inc\Binaries and run the EbDriverTool 2. In the main window, either the Pro1000 NIC with the High Performance driver or the generic NIC with the eBUS Universal driver should be visible in the “Network Adapters” panel.
3. In the NIC configuration window select “Manufacturer’s NIC Driver”. 4. Press “Finish”. The “Driver” field for either the Pro1000 or the generic NIC (depending on what your machine was running) should now read “NIC Driver” with a description of the manufacturer of the NIC in the “Description” field. 5. Press the “Exit” button to quit the EbDriverTool. You will be greeted by a window that asks you to reboot the system: select “No”.
6. Next go into the “Add/Remove Programs” control panel in Windows XP or the “Programs and Features” control panel in Windows Vista. Select the eBUS Driver Suite and then press the “Uninstall” or “Remove” button. 7. After completely removing the eBUS Drivers Suite, next select the GigE Link software and uninstall it. 8. After removing the GigE Link software, next select the SiliconDVR application in the window and uninstall it. 9.
10. After uninstalling SiliconDVR, go back into the “Add/Remove Programs” or “Programs and Features” control panel and uninstall “CineForm RAW Codecs”. 11. If it still exists after the uninstall of SiliconDVR, go into \Program Files\Silicon Imaging\Silicon DVR\ folder. Check what folders are remaining after the uninstaller. 11. Delete the \bin folder, and then check the \data folder for any important files such as custom .
4.0 Troubleshooting FAQ Why does the right-button mouse-click not stop recording the first time I press it when I started a recording with the external trigger? Starting a recording with the external trigger button requires two presses of the right-mouse button if the right mouse button is configured for record stop/start.
My “Slave” computer system when running a 3D stereo application is randomly dropping frames. What is going on? Faulty sync-signal cables can cause the “slave” SI-2K MINI head to appear to drop frames. These are actually “missed” frames because they did not receive a frame-trigger event from the “master” camera head. To ensure the reliability of 3D-sync signals from the master-to-slave camera in 3D stereo productions, use the 3D-sync box from Silicon Imaging.
I’m waking up my Windows Vista laptop, but when I launch SiliconDVR, I only get a “error connecting to camera” message. What actions do I take to fix this? In Windows Vista, connecting to a camera on a laptop that is woken up from a “sleep” state will cause a connection error in SiliconDVR.
6.0 SiliconDVR End User License Agreement ("EULA") Thank you for becoming a customer of Silicon Imaging! We’re enthused that you have chosen to use our Software Products (“Software”) for your Camera Interface. Protection of our intellectual property including all licensed intellectual property is critical to our future business success, and therefore, before you can use this product, you must agree to the following: Do not install or use Software until you have read and accepted all of the license terms.
Silicon Imaging does not provide any, and expressly disclaims all, warranty or representation for these video sample files. 9. LIMITED WARRANTY. If the Software is delivered on physical or optical media, Silicon Imaging warrants the media on which the Software is furnished to be free of defects in material and workmanship, under normal use, for a period of thirty (30) days following the date of delivery to You.
result of any termination of this Agreement. Sections 2 through 9 and Section 11 shall survive termination of this Agreement. 11. MISCELLANEOUS. This Agreement represents the complete agreement concerning this license between the parties and supersedes all prior agreements and representations between them. This Agreement may be amended only by a writing executed by both parties.