Contents 1 INTRODUCTION................................................................................................. 1 Product overview................................................................................................. 1 BT-3045 storage policies...................................................................................... 2 2 INSTALLING....................................................................................................... 4 Prerequisites.......................
6 Partitioning Configured Volumes .................................................................. 31 Partition a Volume ................................................................................................. 31 MS Windows .......................................................................................................... 31 Mac OS X ................................................................................................................ 36 7 Administering the SiI 4726 .........
11 Editing the UserConfig.xml ...................................................................... 51 Creating a Splash Screen .................................................................................... 53 12 Monitor and Troubleshooting ................................................................ 54 Monitor the SiI 4726 Storage Appliance ............................................................. Monitor drive status .....................................................................
1 1 INTRODUCTION Storage Appliance Product Overview The storage function of RAID is used to introduce on industrial field which means With expensive and expert maintain needed. For the personal computer and small office or home office field, Such a requiring just never satisfied but with the Data Marshalling This is just a part of its all.
2 BT-3045 storage policies The BT-3045 Data Marshalling System provides the following storage policies, for mapping physical to virtual drives. You can use the Basic Configuration Wizard or the Advanced Configuration Wizard to choose from these policies. It is important to choose an adequate policy to make the best use of your Storage Appliance. JBOD This storage policy grants the host computer direct access to a physical disk drive.
3 . Hot Spare One or more hard disk drives are unused during normal operation and are configured to be a spare. If an active drive in a SAFE volume fails, the data on the remaining hard disk drive is duplicated onto the Hot Spare to regain redundancy. All SAFE volumes can have a designated Hot Spare (SAVE, SAVE and FAST, and SAFE and BIG). Volume A virtual or logical drive comprised of one or more physical hard disk drives.
4 2 INSTALLING Prerequisites The BT-3045 installation has the following hardware and software prerequisites for the host computer(s) that will be connected to the BT-3045 Storage Appliances.
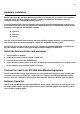
5 Hardware installation Before running the BT-3045 Data Marshalling System, it is required that you install a host controller (card and driver). The host controller provides a software and hardware link between the host computer and the BT-3045 Data Marshalling System. If your motherboard does not have a build-in Silicon Image SiI 4726 compatible host controller, you will need to install one on PCI-X or PCI slot.
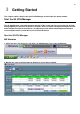
6 3 Getting Started This chapter explains how to start the SiI 4726 Manager and describes the Status window. Start the SiI 4726 Manager The SiI 4726 Manager starts with the Status window visible so the end-user can monitor the SiI 4726 StorageAppliances connected to the host com puter. Access the Basic Configuration Wizard from the Status window.From there, the end-user can optionally use the Advanced Configuration Wizard to create multiple volumes (virtual drives) on each hard disk drive.
7 3. Select menu options or click toolbar buttons and follow the instructions in the remainder of this guide to configure SiI 4726 Storage Appliances. When prompted, enter the administrative password. The default password is admin. The end-user can customize the password. See "hange password" for details. Mac OS X 1. Launch the Finder and locate the SiI 4726 program within the Applications > Utilities > SteelVine folder. Click the folder. Click the SiI 4726 icon to start the SiI 4726 Manager. 2.
8 4. A notice appears as the launch sequence attempts to start the daemon. Click OK. If the daemon fails to start, an error appears. Follow the recommendations in the error message to correct the problem. 5. Monitor the status of SiI 4726 Storage Appliances on the Status window. 6. Select menu options or click toolbar buttons and follow the instructions in the remainder of this guide to configure SiI 4726 Storage Appliances. When prompted, enterthe administrative password. The default password is admin.
9 A Look at the SiI 4726 Status Window The Status window displays a separate tab for each SiI 4726 Storage Appliance attached to the host computer. Table 1 Sections of the Status Window Status Cells Description System Status section Temp Indicates the current temperature of the Sil 4726 Storage Appliance. Fan Speed Indicates the system fan status. Use this data to monitor possible malfunctions.
10 Table 2 File Menu on the Status Window File Menu Item Description Change Password Opens a dialog to establish a new password. Scan Devices Refreshes the status details presented on the Status window. Change Connections Opens a dialog to make remote connections. Table 3 Edit Menu on the Status Window File Menu Item Description Configure Box Opens the Basic Configuration Wizard. From there, the end-user can access the Advanced Configuration Wizard.
11 4 Basic Configuration This chapter describes the Basic Configuration Wizard and explains how to configure volumes (virtual drives). A Look at the Basic Configuration Wizard The SiI 4726 Basic Configuration Wizard is accessible from the Status window and allows volume management. The Basic Configuration Wizard defines volumes based on a selected storage policy. An end-user cannot modify volume counts or capacities.
12 Table 5 Sections of the Basic Configuration Wizard Wizard Section Description Storage Policy Identifies available storage policies to assign to the SiI 4726 configuration. Volume List Shows Volume, Mode (storage policy), and Size details for created volumes. The Total GB s Left field (beneath the volume list) shows the remaining capacity in gigabytes for all the hard disk drives. Drive Graph Displays disk space for each hard disk drive.
13 Configure Volumes Before running the BT-3045 Data Marshalling System, it is required that you install a host controller (card and driver). The host controller provides a software and hardware link between the host computer and the BT-3045 Data Marshalling System. 1. Select Configure Box from the Edit menu or click the Configure Box toolbar button to open the Configuration Wizard. 2. When prompted, enter the administrator password. The default password is admin.
14 3. Select a storage policy in the Storage Policy Frame. Table 8 Basic Storage Policy Options Storage Policy Description JBOD (bypass) Creates a logical volume for each physical hard disk drive. SAFE (RAID 1) Creates two volumes. For each volume, one hard disk drive is mirrored onto a second drive. Makes the remaining drive the Hot Spare for both volumes. BIG (span) Concatenates all hard disk drives into a single volume. FAST (RAID 0) Opens the Event Log viewer.
15 4. When prompted to acknowledge that the configuration change may result in data loss, click Yes to accept the configuration. 5. Select Save to Config File from the File menu or click the Write configuration for system to a file toolbar button to save the configuration. 6. Click Apply to create the selected configuration. The Volume display will close automatically and the Status window will refresh (within a minute or so) 7. Partition the configured volume(s) to complete the implementation.
16 5 Advanced Configuration This section describes how to use the Advanced Configuration Wizard to apply more than one storage policy to volumes on the SiI 4726 Storage Appliance. Why Advanced Configuration? The Basic Configuration Wizard provides six predefined storage policies to quickly configure the SiI 4726 Storage Appliance. Each predefined storage policy allocates the maximum system capacity to the selected storage policy.
17 Why Advanced Configuration? 1. The Advanced Configuration Wizard is an extension of Basic mode that allows you to create two volumes (virtual drives) on each physical hard disk drive.
18 Table 9 Sections of the Advanced Configuration Wizard Section Description Storage Policy Shows the available storage policies that you can assign to volumes. The options are enabled after you create a new volume or select an existing volume to edit. Volume List Shows Volume, Mode (storage policy), and Size details for currently configured volumes. Select a volume to edit or delete it.
19 Table 11 Command Buttons on the Advanced Configuration Wizard Button Description To Basic Mode Opens the Basic Configuration Wizard When configuring a volume (create a new volume or edit a selected volume) Update Volume Applies the selected storage policy to a specific portion of a hard disk drive as a proposed configuration. Cancel Aborts the pending changes and returns the Wizard to the point where you can perform different advanced configuration functions.
20 Configure Multiple Volumes The Advanced Configuration Wizard allows many combinations of storage policies and capacities. This procedure shows how to modify a basic SAFE configuration so that it contains several volumes, each with different storage policies. This example illustrates one possible combination that allocates all of the system’s available capacity to: ● One 50-gigabyte (GB) SAFE volume on drives 0 and 1, with no reserved space for a Hot Spare.
21 2. Click To Advanced Mode to open the Advanced Configuration Wizard.
22 3. Select the “Delete all volumes” from the toolbar. 4. When prompted to confirm the deletion of the volumes, click Yes.
23 5. Select “Create a new volume” from the toolbar.
24 6. Select SAFE (RAID 1) as the Storage Policy. and 1. Move the slide to 50. Click on the “Use” check boxes underneath Drives 0 Tip: Click to the right or left of the slider within the slider’s channel to make half-GB changes. 7. Click Update Volume. 8. When prompted whether to create a Hot Spare for the SAFE volume, click Number In some configurations, the end-user may want the added redundancy of a Hot Spare.
25 9. Click the Create a New Volume toolbar button.
26 10. Select the FAST radio button in the Storage Policy section. 11. Select the ‘Use’ check box beneath both Drive 0 and Drive 1. This example illustrates two-drive striping. 12. Move the slider beneath Drive 0 all the way to the right to allocate the remaining capacity on the two drives to the Fast volume. If you wish, you can allocate less than the total remaining capacity to the new volume. However, doing so makes the unallocated capacity unavailable and unused. 13. Click Update Volume.
27 14. Click the Create a New Volume toolbar button. 15. Select the BIG radio button in the Storage Policy section. 16. Select the ‘Use’ check box beneath Drive 2, Drive 3, and Drive 4 to allocate all of the remaining system capacity to the BIG volume. 17. Click Update Volume. Note: Only the last Volume listed (in the above example, Volume 2) can be edited. In order to edit Volume 1, Volume 2 must be deleted.
28 18. Click the Write Configuration for System to a File toolbar button to save the configuration. 19. Click Update Volume to create the multi-volume configuration, close the Wizard, and display thevolumes in the Status window (within a minute or so). 20. Partition the configured volumes to complete the implementation. See “Partitioning Volumes” for details.
29 Manage Configuration Files The Basic Configuration Wizard provides menus and icons to manage configuration files. ● The Read Config File command from the File menu in the Basic Configuration Wizard imports a configuration file so that the end-user can restore a previously saved configuration (storage policy). ● The Save to Config File command from the File menu in the Basic Configuration Wizard exports an SiI 4726 configuration to a file.
30 Save a configuration file 1. Select Configure Box from the Edit menu or click the Configure Box toolbar button in the Status window to open the Basic Configuration Wizard. 2. Select Save to Config File from the File menu in the Basic Configuration Wizard. 3. Navigate to the appropriate directory, specify a file name in the File Name text box, and click the Save button.
31 6 Partitioning Configured Volumes This chapter explains how to partition volumes after configuring them with the SiI 4726 Manager. The end-user must partition volumes for the host computer’s operating system before one can store data on the volumes. Refer to the operating system documentation for further guidance. Why Advanced Configuration? MS Windows Important: Before reconfiguring a volume, back up the data and delete previously defined SiI 4726 partitions.
32 2. From the Computer Management window select Disk Management under Storage to open Windows Disk Manager. Note: The Disk numbers in the Windows Disk Manager may be different from the Volume numbers shown in the SiI 4726 Manager Status window, the Basic Configuration Wizard, and the Advanced Configuration Wizard. Be sure to select the correct disk based on the expected disk capacity to create a partition. 3. Right-click on the configured disk’s unallocated space and select New Partition.
33 4. Click Next to start the Partition Wizard. 5. Select the Primary or Extended option and click Next.
34 6. Specify the partition size. By default, the partition occupies the entire volume. Click Next. 7. Assign a drive letter or mount path and click Next.
35 8. Select file system and name the partition and click Next. 9. Review the file system settings and click Finish to create the logical partition. 10. Repeat steps 1 through 9 to partition any remaining disks you configured in the SiI 4726 Manager. Remember, do not partition the disk that represents the SteelVine processor.
36 Mac OS X 1. Launch Disk Utility from Application > Utilities folder. 2. Select a configured disk and click the Partition tab. 3. Select 1 Partition from the Volume Scheme drop-down list. 4. Enter a name for the volume in the Name field. 5. Select Mac OS Extended (journaled) from the Format drop-down list. 6. Specify the size of the partition in the Size field.. 7. Click the Partition button.
37 8. Click Partition to acknowledge the warning. Disk Utility mounts the created partition and represents it with an icon on the desktop. The icon is labeled with the partition name. 9. Repeat steps 1 through 8 to partition any remaining disks you configured in the SiI 4726 Manager. Remember, do not partition the 320.0 KB Config Disk that represents the SteelVine processor.
38 7 Administering the SiI 4726 This chapter explains how to perform administrative functions in the SiI 4726 Manager. Change Password The SiI 4726 Manager limits configuration access with a password prompt. The password information is stored locally on the server running the daemon. The default password is admin. 1. Select Change Password from the File menu. 2. Enter the current password (or use ‘admin’ if the default password has not been changed). 3.
39 Manage Client Connection to the Daemon The SiI 4726 Manager consists of two modules: ● Daemon ● User interface The daemon monitors the status of SiI 4726 Storage Appliances and performs SAFE volume rebuilds. By default, the user interface attaches to a daemon running on the same host to display the information gathered by the daemon. The end-user can configure the user interface to display information tracked by a daemon running on a remote host.
40 8 Configure SAFE Volume Rebuild Storage Policy This SiI 4726 feature is provided to manage rebuilds of SAFE volumes. When is a rebuild necessary? A rebuild is initiated to restore data redundancy for a SAFE volume that has entered a vulnerable state. In a vulnerable state, one of the two mirrored disks goes offline or is inaccessible.
41 In this example, the daemon started a rebuild of Volume #1 after a failure of Disk #3. Once the end-user replaces Disk #3 with a new hard disk drive, the SteelVine processor will initiate a rebuild to Drive #3. Note: Once the daemon rebuilds to a designated Hot Spare, a designated Hot Spare will not exist and the SteelVine processor will rebuild to empty space. With Automatic Rebuild and Immediate Rebuild options selected, the daemon automatically initiates an immediate rebuild.
42 2. Select one of the following policy options: ● The Manual Rebuild radio button requires a user to manually initiate a rebuild of the volume. ● The Automatic Rebuild option forces the daemon to initiate the rebuild process automatically and minimize the possibility of data loss. 3. If the Automatic Rebuild option is selected, the end-user will have the following additional choices: ● Immediate Rebuild causes the daemon to rebuild immediately following detection of an offline hard disk drive.
43 9 Email Notification The Email Notification feature allows the end-user to have the SiI 4726 Manager send an email if any of the following conditions/situations occur: z Partition Rebuild Start z Partition Rebuild Complete z Partition Verify Start z Partition Verify Complete z Partition Rebuild Resume z Temperature Too High z System Fan Too Slow z Power supply Fan Too Slow z No Boxes Found z Box Removed z Drive Unplugged z Drive Inserted Each of the above conditions can be cust
44 Setting-up Email Notification 1. The box available for the SMTP Server Name can be left blank. The SiI 4726 Manager will perform a DNS lookup and automatically find the correct address. 2. The box available for the SMTP Server Port# uses Port 25 as a default. 3. The From, To, and CC boxes are for specifying the intended receivers of the condition notifications. Note: In the From: box, the end-user should type in his/her own email address. 4.
45 c. The message information can be customized to suit the end-user’s needs. The Daemon can extract the following data from the SiI 4726 hardware: $B → Box serial number $T → Current Temperature $DS → Drive serial number $SF → System Fan OK Flag $DN → Drive id [slot #] $PSF → Power Supply fan OK Flag $V → Current volume d. If there is information that the end-user would like included in the error message, s/he can enter it themselves by typing in a selected message code listed above.
46 Why Advanced Configuration? When one of the conditions/situations occurs, a pop-up appears on the host computer stating that a email hasbeen sent. Note: The end-user must click ‘OK’ to remove the pop-up from the screen.
47 10 Install New Firmware & Software Firmware Update Note: Do not power off or access the SiI 4726 Storage Appliance while upgrading firmware. 1. Click the Specify Firmware toolbar button or select Specify Firmware from the Edit menu of the Status window. The Firmware Selection dialog shows all of the SiI 4726 Storage Appliances attached to the host, the integrated circuit (IC) revision, and the current firmware installed on each Storage Appliance.
48 2. Select the SiI 4726 Storage Appliance that requires a firmware upgrade. 3. Click the Browse button next to the Update firmware from file text box, navigate to the new firmware file you wish to load from a CD or hard disk drive, and select the .bin file. 4. Click Install Firmware to begin the upgrade. 5. Click OK to dismiss a message box that states the firmware was successfully downloaded.
49 Install New SiI 4726 Manager Software Before the end-user installs new software, the current version will need to be un-installed. The un-installation process stops the daemon so it can be removed along with the user interface. The new version of the daemon starts automatically when the new software has been installed. Install the host controller card and driver MS Windows 1. Exit the SiI 4726 Manager. 2. Select Start > Control Panel > Add or Remove Programs from the Windows taskbar. 3.
50 5. Click OK to confirm the complete removal of the SiI 4726 Manager. 6. Click Finish to complete the un-installation process. 7. Optionally, move or delete the .xml configuration files that the InstallShield Wizard left in the installation directory (by default, C:\Program Files\SteelVine\SiI 4726 Manager). MS Windows 1. Optionally, move saved.xml configuration files from the Applications > Utilities > SteelVine > SiI 4726 Manager Resources folder to another location. 2.
51 11 Editing the UserConfig.xml The UserConfig.xml file is used to define the Status Screen Title Bar and allow configuration of the Policy Change as well as the Advanced Configuration features. The UserConfig.xml file can be found in the following location: C:\Program Files\SiI4726\SiI 4726 Manager\SiI 4726 Config To edit this file, Right Click on the file name, move the mouse to Open With, and select Notepad.
52 The Email Notification feature allows the end-user to have the SiI 4726 Manager send an email if any of the following conditions/situations occur: SiI 4726 Manager Your Company Name The‘AllowPolicyChages’–True–turns on the Policy feature. If the end-user changes the XML tag value to False, the Policy Icon will not appear in the GUI and the feature will not be available.
53 Creating a Splash Screen The end-user can further customize the SiI 4726 Manager by creating a personalized splash screen. 1. Create the logo for your splash screen – there are no image size limitations 2. Save the logo as‘UserLogo.xpm’ The .xpm file type is UNIX based 3. Put the UserLogo.xpm file in the following location: C:\Program Files\SiI4726\SiI 4726 Manager\SiI 4726 Config The splash screen will come up each time the end-user starts the SiI 4726 Manager. 2 seconds.
54 12 Monitor and Troubleshooting This chapter describes Status window color codes, LED indicator states, and event log messages that are used to troubleshoot the SiI 4726 Storage Appliance. Monitor the SiI 4726 Storage Appliance Monitor drive status The color of the drives in the Status window indicates the status of the hard disk drives. Table 12 Drive Status Color State Description Green Normal Red Needs Rebuild Drive is in a failed state.
55 Monitor temperature The SiI 4726 Storage Appliance uses the following colors to indicate temperature status. Table 13 Temperature Status Color Description Resolution Green Temperature is normal. Yellow Temperature is greater than 50? Celsius (122?Fahrenheit). Remove object(s) that interfere with airflow around the SiI 4726 Storage Appliance. Red Temperature is greater than 53? Celsius (127?Fahrenheit). Ensure constant airflow around the SiI 4726 Storage Appliance.
56 Review Event Logs Event logs are helpful for troubleshooting and locating a system malfunction. 1. Select Event Log from the Edit menu in the Status window. 2. The Event Log screen displays a list of events in a tabular format. The Date column displays the date and time of the event. The Box SN and Drive SN columns display the respective serial numbers for the event. The Drive Manufacturer column displays vendor information. The Message column gives an event description. 3.
57 Front Panel LED Indicators Each disk drive and the host connection have two LEDs to indicate drive status and/or host communication status. LED 0 is on the left and is typically blue; LED 1 is on the right and is typically green. In addition, there is one error-condition LEDs, labeled‘!’and the SiI 4726 power on indicator‘OK’. When the SiI 4726 Storage Appliance is powered on, the host scans the disks in sequence, as indicated by a brief flash of lights on LED 1.
58 Troubleshooting Problem Resolution LEDs Green“OK”LED does not light. Confirm power at the outlet, verify power connection, and try an alternate power cable. Red“!”LED is lit. Power cycle the SiI 4726 Storage Appliance and to reload the firmware. SiI 4726 HOST LED 1 is not lit. See HBA connection below. LED 1 continuously flashes for one or more drives. LED1 flashes during a Safe volume rebuild.