
Manual


2
Operation
Initial Startup
After satisfying the installation requirements, the cream dispenser is ready to start. The unit will start when the power cord is connected
to a live electrical receptacle. This can be verified by checking the indicator panel on the front of the unit. The indicator should display
the current unit temperature. If the unit does not start when the power cord is plugged in, make sure that the switch on the back of the
unit is in the ‘on’ position. Allow the unit to run a minimum of two hours before loading it with product. It is completely normal for the
exterior of the unit to feel warm while it is running.
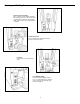
Indicator Panel
The Indicator Panel contains a digital LED display that reads the product temperature
during normal operation. The four lower buttons on the Indicator Panel are for selecting
portion sizes (small or large). The upper button is used to reset the computer whenever
the cream is refilled. This button must be pressed each time the
cream is refilled. Press and hold the REFILL button for 3
seconds until the indicator flashes 00.
Preparation for Use
Once the unit has achieved proper operating temperature, observe the procedures noted
on the label located on the door liner for loading cream into the cream dispenser. When
removing an empty bag of cream, be sure to push the Valve Slide in fully before pulling the
Dispensing Tube out of the valve. It may be easier to remove or install the Dispensing
Tube in the valve by removing the Valve Insert first then removing or installing the Cream
Container. The end of the tube may need to be cleaned daily with a clean cloth to prevent
buildup which could affect the dispensing of product. After loading the creamer, press
and hold the REFILL button for 3 seconds until the indicator flashes 00.
Defrost:
The Silver King cream dispenser is a manual defrost unit.
The unit should be defrosted whenever the walls accumulate
a frost bank that is 1/2 inch thick. To defrost the unit, either
turn the Power Switch to the ‘off’ position or disconnect the
power cord from the electrical receptacle, and open the
door. After the frost has melted or come loose from the
cabinet walls, wipe out the cabinet interior. Do not attempt
to scrape or chisel off the frost as you could do irreparable
damage to the unit.
MAINTENANCE
Preventative maintenance is minimal although these few
steps are very important to continued operation and
maximizing the life of the appliance.
Cabinet Surfaces:
The cabinet interior and exterior are stainless steel and
should be cleaned periodically with a solution of warm water
and a mild soap, rinsed and wiped dry with a clean soft
cloth. A stainless steel cleaner can also be used. Should a
surface become stained or discolored, do not attempt to
clean with an abrasive cleaner or scouring pad. Use a soft
cleaner and rub with the grain of the metal to avoid
scratching the surface. Do not use chlorinated cleaners.
The REFILL button must be
pressed for 3 seconds each
time the cream is replaced
Indicator Panel
The four lower buttons on
the Indicator Panel are for
selecting portion size
Calibration But
t
on
(See Calibration Instructions)