silvercote.com MBI (Laminated) Roof Install Instructions FOR NEW CONSTRUCTION Read the entire instructions before you begin.
STEP 1 — Identifying your rolls BEFORE BEGINNING READ THE CUTLIST THOROUGHLY THIS WILL GIVE IMPORTANT INFORMATION NEEDED FOR PROPER INSTALLATION. Verify that the material provided agrees with the cutlist. If there are any discrepancies NOTIFY SILVERCOTE IMMEDIATELY. When installing insulation inspect rolls for any defects. If defects are detected NOTIFY SILVERCOTE IMMEDIATELY BEFORE INSTALLING. Using the provided detailed cutlist and color coded bag tags locate the proper insulation for each roof slope.
STEP 2 — Determine your tab To meet increasing energy codes Silvercote recommends sealing all insulation seams by using our one - 6” tab with double sided tape pre-applied. However, Silvercote offers many different tab and tape configurations. Shown here are two options for installing your faced insulation. 2.1 Silvercote’s most popular MBI roof insulation has one - 6” handed tab or two - 3” tabs. See the cutlist and labels to determine which tabs were provided.
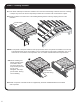
STEP 3 (Continued) — Two 3” tabs 3.4 3.4 If two - 3” tabs are supplied, a plier stapler should be used to connect adjacent rolls of insulation. Note! Caution should be taken not to staple too close to the base of the tabs as the staples may pull out during the sheeting process. This could result in undesired appearance and a poor vapor seal. 3.5 3.5 At the joined seam, pull the tabs upward and staple approximately every 8”. The initial staples should be placed ½” from the end of the tabs. 3.
STEP 4– — The1. proper process ROOF STEP Perforating the vapor barrier 4.1 Roof insulation should be installed in one piece from eave strut to eave strut. 4.2 Roofs may require more than one roll to span the roof. The first roll should be installed across the ridge to the top purlin on the opposite slope. A splice will need to be made when installing the rolls for the opposite slope. Refer to 6.1 Roof Splice at the end of these instructions. 4.1 Ea ve 4.2 Ea ve g fin oo R n io ct re di 4.
STEP 5– — Installing insulation ROOF STEP 1. Perforating the vapor barrier 5.1 Use double sided tape to attach the insulation roll to the eave strut allowing at least six inches of overhang. C clamps may need to be used to temporarily maintain this connection until roof sheets are in place. 5.2 Unroll insulation to the other eave of the building allowing similar overhang. Keeping tension on the insulation. Double sided tape 5.1 Ea ve 5.
ROOF 6– — STEP STEP Roof 1.splice Perforating the vapor barrier 6.1 Double sided tape R id ll wa nd E ge Pu rli n Double Sided Tape R 6.2 id 6.1 Before installing the roof panels on the second slope apply double stick tape to the top of the highest purlin. ge Pu rli n 6.3 Cut insulation only NOT facing 6.2 Stretch and tape down end of long roll. 6.3 Using care not to cut the facing, trim off excess insulation and remove fiberglass from above the purlin. 6.4 Double sided tape 2.
ROOF 7– — STEP STEP Ridge 1. Perforating Insulation the vapor barrier There may be a separate assembly used to attach the ridge cap. This may create a separate air space which could lead to condensation. Make sure to completely fill this space with insulation. Consult your cutlist to see if a roll was ordered.