Features • Remote controlled colour LCD TV. • Fully integrated Terrestrial digital TV (DVB-T - MPEG-2, MPEG-4). • HDMI connectors for digital video and audio. • USB input. • 1000 programmes (analogue+digital). • OSD menu system. • Integrated tuner MPEG 2 compatible. • Scart socket for external devices. • Stereo sound system. (German+Nicam) • Teletext, fastext, TOP text. • Headphone connection. • Automatic programming system. • Forward or backward manual tuning. • Sleep timer / Child lock.
1. Standby Manufacturer’s guarantee GB 2. Mono/Stereo - Dual I-II / Currrent Language (in DVB channels) 3. Image size / Zooms videos (in Media Browser video mode) We are glad that you have decided to buy one of our products and hope you have a great deal of fun with this high-quality product. Our strict production control guarantees the high quality of our devices. However, if you should have just cause for complaint, we grant you a guarantee for a period of 4.
Contents Instruction Book Information ............................... 1 Introduction ............................................................. 2 Proper operation ..................................................... 2 Preparation ............................................................. 2 Symbols in this Instruction Book............................. 2 Safety Precautions ................................................. 2 Environmental Information .....................................
Introduction Read the corresponding instructions of this handbook prior to the rst usage of the device, even when the usage of electronic devices is familiar to you. Notice especially the chapter SAFETY PRECAUTIONS. Carefully keep the handbook as future reference. When selling the device or giving it away, absolutely give these direction for use. Thank you for choosing this product. This manual will guide you for the proper operation of your TV. Before operating the TV, please read this manual thoroughly.
Waste Disposal Moisture and Water • Instructions for waste disposal: Do not use this device in a humid and damp place (avoid the bathroom, the sink in the kitchen, and near the washing machine). Do not expose this device to rain or water, as this may be dangerous and do not place objects filled with liquids, such as ower vases, on top. Avoid from dripping or splashing.
The power switch doesn´t separate this device completely from mains. Moreover the device consumes power in the standby operation. In order to separate the device completely from mains, the mains plug has to be pulled from the mains socket. Because of that the device should be set up in a way, that an unobstructed access to mains socket is guaranteed, so that in case of emergency the mains plug can be pulled immediately.
Viewing the Back side Connections 1. SCART 2 inputs or outputs for external devices. 2. SCART 1 input or output for external devices. Connect the SCART cable between SCART socket on TV and SCART socket on your external device (such as a decoder, a VCR or a DVD player). NOTE: If an external device is connected via the SCART socket, the TV will automatically switch to AV mode. NOTE: S-video signal is supported via the scart socket. A scart cable is not supplied. 3.
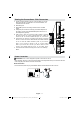
Viewing the Connections - Side Connectors 1. CI Slot is used for inserting a CI card. A CI card allows you to view all the channels that you subscribe to. For more information, see “Conditional Access” section. 2. Side USB inputs. 3. Side HDMI Input is for connecting a device that has an HDMI socket. 4. Headphone jack is used for connecting an external headphone to the system. Connect to the HEADPHONE jack to listen to the TV from headphones (optional). 5.
Using Digital Multimedia Connectors Connecting the LCD TV to a PC • You can connect USB devices to your TV by using the USB input of the TV. This feature allows you to display/play JPG, MP3 and video les stored in a USB stick. • It is possible that certain types of USB devices (e.g. MP3 Players) may not be compatible with this TV. • You may back up your les before making any connections to the TV set in order to avoid any possible data loss.
Side HDMI Connection Switching On/Off You can use side HDMI input to connect a device that has an HDMI connector to your TV. Use an appropriate HDMI cable to make such a connection. Note that you should switch to the HDMI 4 source to view the content from the connected device. Power off both the TV and the device before making any connections. Side HDMI Input supports connections between HDMI devices such as DVD players. You can use side HDMI input of the TV to connect to an external HDMI device.
Volume Setting • Touch the “ ” or“ ”buttons buttons to increase or decrease volume. A volume level scale (slider) will be displayed on the screen. Programme Selection • Touch the “P/CH ” oder “P/CH ” buttons to change channel. Touch the “P/CH ” button to select the next programme or the “P/CH ” button to select the previous programme. First Time Installation IMPORTANT: Ensure that the aerial is connected before switching on the TV for the first time installation.
To select the “Yes” or “No” option, highlight the item by using “ ” or “ ” buttons and press OK button. To exit a menu screen, press M button. Changes are stored automatically. Afterwards, the following OSD will be displayed on the screen and the digital television will search for digital terrestrial TV broadcasts NOTE: You can press MENU button to cancel. • After all the available stations are stored, Channel List will be displayed on the screen.
Green button: Programme schedule will be listed. You can list programmes according to schedule by pressing green button. Timeline Schedule (Yellow Button) Yellow button (time schedule): Display EPG data in accordance with timeline schedule. Green button (Next day): Displays the programmes of the next day. Blue button (Filter): Views ltering options. You can sort the channels using this option. Yellow button (Zoom): Expands programme information.
Select Automatic Channel Scan (Retune) by using “ ”/“ ” button and press OK button. Automatic Channel Scan (Retune) options will be displayed. You can select Digital, Analogue or Full Aerial-Analogue tuning using “ ”/“ ” and OK buttons. radio programmes and EPG data are available within the multiplex. Analogue Search - Analogue Automatic Channel Scan (Retune) Digital: Searches and stores aerial DVB stations. Analogue: Searches and stores analogue stations.
NOTE: During TV operation, if you press the “OK” button, you’ll go directly to the “Edit channel list” menu. Operating the Channel List Locking a Channel You can press GREEN button to tag/untag all channels; YELLOW button to tag/untag a single channel. • Select the channel that you want to lock and select Lock option. Press OK button to continue. • You will be asked to enter parental control PIN. Default PIN is set as 0000. Enter the PIN number.
Media Playback Using Media Browser Managing Stations: Sorting Channel List You can select broadcasts to be listed in the channel list. To display specic types of broadcast, you should use Active channel list setting. Select Active channel list from the Channel list menu by using “ ” or “ ” button. Press OK button to continue. To display Media Browser window, press either “MENU” button on the remote control and then select Media Browser by pressing “ ” or “ ” button. Press OK button to continue.
When you select Videos from the main options, available video les will be ltered and listed on this screen. You can use “ ” or “ ” button to select a video le and press OK button to play a video. Viewing Photos via USB When you select Photos from the main options, available image les will be ltered and listed on this screen. Jump 0..9 (Numeric buttons): Jumps to the selected le. Play This (OK button): Plays the selected le.
INFO: Displays information bar. Media Browser Settings Playing Music via USB When you select Music from the main options, available audio les will be ltered and listed on this screen. You can set your Media Browser preferences by using the Settings dialog. Press “ ” or “ ” button to highlight an item and use “ ” or “ ” button to set. 0..9 (Numeric buttons): You can directly jump to a track by selecting the letters of the music title using the numeric buttons 0..9.
16:9 Panoramic This uniformly stretches the left and right sides of a normal picture (4:3 aspect ratio) to ll the wide TV screen. This stretches the left and right sides of a normal picture (4:3 aspect ratio) to ll the screen, without making the picture appear unnatural. • For 16:9 aspect ratio pictures that have been squeezed into a normal picture (4:3 aspect ratio), use the 16:9 mode to restore the picture to its original shape. The top and bottom of the picture are slightly cut off.
Brightness: Sets the brightness value for the screen. PC Position: Select this to display PC position menu items. Sharpness: Sets the sharpness value for the objects displayed on the screen. Colour: Sets the colour value, adjusting the colors. Colour Shift: Adjust the desired colour tone. Hue (NTSC only): Adjusts the colour value. Colour Temp: Sets the desired colour tone. Setting Cool option gives white colours a slight blue stress. For normal colours, select Normal option.
Sound Settings Menu Items Conguring Your TV’s Settings Volume: Adjusts volume level. Equalizer: Press OK button to view equalizer submenu. Detailed settings can be configured to suit your personal preferences. Press MENU button and select Settings icon by using “ ” or “ ” button. Press OK button to view Settings menu. In equalizer menu, the preset can be changed to Music, Movie, Speech, Flat, Classic and User. Press the MENU button to return to the previous menu.
Using a Common Interface Module Conguring Language Settings You can operate the TV’s language settings using this menu. IMPORTANT: Insert or remove the CI module only when the TV is SWITCHED OFF. • In order to watch certain digital channels, a common interface module (CI module) can be necessary. This module must be inserted in the CI slot of your TV. To be able to watch scrambled digital channels you will need a common interface module from the Service Provider of your choice.
Parental Control To prohibit viewing of certain programmes, channels and menus can be locked by using the parental control system. This function enables or disables the menu protection system and allows the PIN code to be changed. Press M button and select the Settings icon by using “ ” or “ ” button. Press OK button to view Settings menu.
End: Enter an ending time using the numeric buttons. Duration: Displays duration between the starting and ending time. Repeat: Sets a timer to be repeated as Once, Daily or Weekly. Use “ ” or “ ” buttons to select an option. Conguring Source Settings You can enables or disable selected source options. The TV will not switch to the disabled source options when SOURCE button is pressed. • Press GREEN button to save the timer. Press RED button to cancel. Change/Delete:Controls parental settings on timers.
Backlight: This setting controls the backlight level and it can be set to Auto, Minimum, Medium and Maximum.. “No channels for this type have been found.” message will be displayed on the screen. Note: Backlight function will be not able to change if Power Save Mode is set to on. If the Standby Search is set to On, when the TV is in standby mode, available broadcasts will be searched.
Teletext Tips Teletext system transmits information such as news, sports and weather on your TV. Note that is the signal degrades, for example in poor/adverse weather conditions, some text errors may occur or the teletext mode may be aborted. Teletext function buttons are listed below: Screen Care: Clean the screen with a slightly damp, soft cloth. Do not use abrasive solvents as they may damage the coating layer of the TV screen. For your safety, unplug the mains plug when cleaning the set.
Appendix A: PC Input Typical Display Modes Appendix B: AV and HDMI Signal Compatibility (Input Signal Types) The display has a maximum resolution of 1920x1080. The following table is an illustration of some of the typical video display modes. Your TV may not support different resolutions. Supported resolution modes are listed below. If you switch your PC to an unsupported mode, a warning OSD will appear on the screen.
Appendix C: Supported File Formats for USB Mode Supported Players Player Stream Video Decoder (MSVD) Audio Decoder (MSAD) Audio MP3 None MP3 Audio WAV/AIFF None-- LPCM WMA / ASF VC1 WMA MPEG1 Program Stream MPEG-1 MPEG1 MP3, AC-3 and PCM MPEG2 Program Stream MPEG-2 MPEG2 MP3, AC-3 and PCM MPEG4 MPEG-4/H264 in MP4 container H264 and MPEG4 AAC AVI (Xvid) XVID MPEG2 MP3, AC-3 and PCM Windows Media (optional) Appendix E: Software Upgrade • Your TV is capable of nding and updatin
Specications Digital Reception (DVB-T) TV BROADCASTING Transmission Standards: PAL/SECAM B/G D/K K’ I/I’ L/L’ DVB-T, MPEG2, MPEG4 HD RECEIVING CHANNELS i. DEMODULATION VHF (BAND I/III) • -Symbol rate: COFDM with 2K/8K FFT mode.
Information to the conformity HDMI Television model LCD-TV32111 conforms to the following standards: High Denition Multimedia Interface. This connection provides high-quality, uncompressed digital video and audio, combining both audio and video signals via a single connection. With respect to its compliance with the basic requirements and relevant regulations, this device conforms to the EMV directive 2004/108/EC as well as the directive 2006/95/EC for low-voltage devices.
Important Instruction “Important! For qualied service personnel only!” For your own safety read following instruction carefully before attempting to connect this unit to the mains supply.
IE We are glad that you have decided to buy one of our products and hope you have a great deal of fun with this high-quality product. Our strict production control guarantees the high quality of our devices. However, if you should have just cause for complaint, we grant you a guarantee for a period of 3 years from purchase date with the following conditions: 1. 2. 3. 4. 5. This guarantee leaves your statutory warranty claims as a consumer unaffected vis-à-vis the party who sold the device.
the device. 9.