Universal Remote Control 3A KH 2156 Universal Remote Control KOMPERNASS GMBH BURGSTRASSE 21 ⋅ D-44867 BOCHUM www.kompernass.com ID-Nr.
KH 2156
INDEX Important safety instructions Device summary Initial use PAGE 2 3 4 Unpacking the device / checking the package contents Inserting the batteries Operating components 4 4 5 LCD display 5 Buttons SETUP - System settings Code Setup (Programming the remote control) 6 8 10 Programming by brand code search 10 Programming by manual code input 11 Programming by automatic code search System-Setup 11 13 Setting the time 13 Setting the date 13 Adjust contrast 14 Background Illumination
Universal remote control KH2156 Read the operating instructions carefully before using the device for the first time and preserve this booklet for later reference. Pass this manual on to whoever might acquire the device at a future date. Important safety instructions Proper use Children may only operate the remote control under adult supervision. The universal remote control can replace a maximum of ten remote controls. It can only be used for entertainment electronics with infrared receivers.
Damage to the device • If the device is defective, do not attempt to repair it yourself. In case of damage, contact the manufacturer or the manufacturer's service hotline (see Warranty information). • If liquid escapes from the device or if the device has been otherwise damaged, it must be inspected by the manufacturer or the manufacturer's service hotline. Contact the manufacturer or the manufacturer's service hotline (see Warranty information).
Initial use Unpacking the device / checking the package contents Important! Keep the plastic packaging well away from small children. There is a risk of suffocation! • Unpack the device and accessories. • Check the package contents - Universal remote control (URC), - Operating instructions, - Manufacturers directory with device code list: - 2 x 1,5 V Batteries, type AAA/LR03 (Micro) • Remove the protective foil from the LCD display q.
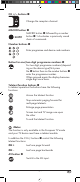
Note: If no LCD display q is visible check the polarity of the batteries or install new ones. Operating components LCD display The LCD display q is divided into fields. Text field 2! Here is shown the currently selected device, for example DVD, TV VCR etc. Infrared symbol 2@ Every time a button is pressed, with which an infrared signal is to be sent the Infrared symbol illuminates. Code/Time field 2# Here is shown the device code of the relevent selected device or the time of day.
The standard readout of the LCD display q consists of the details for the relevent device, for example, "TV", the initial for the day of the week and the time of day indicator. Buttons Note: All the functions described here can, of course, only be used if they are supported by the device being controlled. /ALL OFF button. w Switch device on/off. hold down for approx. 5 seconds to switch all devices on/off. Device buttons e The device buttons are used to select the device that should be operated.
CH +/— buttons u Change the reception channel. MACRO button i MACRO button i followed by a number button o 1-4 activates a previously saved chain of commands. Number buttons o Enter programme and device code numbers. Button for one/two digit programme numbers a For two digit programme numbers (depending on the device type) first press the a button then via the number buttons o enter the programme number. When pressed again the display becomes single digit once more.
Record/playback buttons f The playback buttons f control devices such as DVD/CD players and video recorders: Record Start playback Stop Playback/Record/Wind Pause playback Wind forward Rewind Mute switching g Switch sound on/off. VOL+/— buttons h Set volume (Volume). MENU button j Access the menu of the controlled device. OK button k You can confirm a menu selection with the OK button.
-9-
Code Setup (Programming the remote control) 3 Programming methods are available for the remote control: Programming by brand code search, by automatic code search and by direct code input (manual). First you should use the brand code search since this method is the fastest way of programming if the manufacturer of your device is itemized in the code list. As second is recommended the direct code input followed by the automatic code search.
9. If most of the buttons function press the OK button k to save the setting. In the LCD display q "OK" appears. Now the mode "BRAND CODE" appears again. 10. If, however, none or only a few of the buttons function select with the 5 or 6 button t the next code and test again as described in step 8. 11. With the EXIT button y you will move one level upwards in the menu. Repeat these operational steps for all devices that you would like to control with the remote control.
1. Press the device button e for the device that is to be controlled (i.e. VCR). 2. Switch the device that is to be controlled with the remote control on. With VCR/DVD/CD devices please insert a tape and/or disc. 3. Hold down the S button r for a little longer than 3 seconds. 4. In the LCD display q "CODE SETUP" appears. Press the OK button k. "ENTER CODE" now appears in the LCD display q. Press the or button t until "SEARCH CODE" is shown in the LCD display q.
System-Setup Setting the time The LCD display q shows you the time of day. You set this as follows: 1. Hold down the S button r for a little longer than 3 seconds. The notice "CODE SETUP" appears. If appox. 15 seconds passes without an entry the device exits the menu and returns to the standard display. 2. With the or button t select "SYSTEM SETUP" and confirm with the OK button k. 3. In the LCD display q "TIME SETUP" appears. Confirm with the OK button k.
Adjust contrast You can set the display's contrast as follows: 1. Hold down the S button r for a little longer than 3 seconds. The notice "CODE SETUP" appears. 2. With the or button t select "SYSTEM SETUP" and confirm with the OK button k. 3. With the or button t select "CONTRAST SETUP" and confirm with the OK button k. 4. In the LCD display q the contrast value now blinks which you can set with the or button t. Display readout: 0 = highest contrast: 15 = lowest contrast 5.
Timer Setup The URC offers 2 timer modes, sleep timer and event timer. Sleep timer 1. Press the device button e for the device that is to be controlled (i.e. VCR). 2. Hold down the S button r for a little longer than 3 seconds. The notice "CODE SETUP" appears. 3. Press the or button t until "TIMER SETUP" is shown. Press the OK button k "TIMER SLEEP" appears in the LCD display q. Confirm the selection of this function with the OK button k. 4.
Tips: 1. Per timer memory slot a maximum of 14 buttons can be programmed. After entry of the 14th button the sequence will be automatically saved and "FULL" is shown in the LCD display q. 2. In this menu also the device will return to the standard display after approx. 15 seconds without an entry. Learn Setup The Universal remote control (URC) can learn and save button signals of an original remote control.
5. First press the button on the URC that is to be taught. In the LCD display q "LEARNING" appears. The URC now waits for the infrared signal from the original remote control. Note: Should the notice not change to "LEARNING" you have selected a button for which no button code can be taught. 6. Point the infrared sensors 1( of both remote controls towards each other. 7. Now hold down the desired button of the original remote control until "SUCCESS" or "LEARN ERROR" appears in the display q of the URC. 8.
To programme a Macro For Macro programming proceed as follows: 1. Hold down the S button r for a little longer than 3 seconds. The notice "CODE SETUP" appears. 2. With the or button t select "MACRO SETUP" and confirm with the OK button k. In the display "MACRO SETUP 1" appears. 3. With the or button t select the memory slot to be programmed (MACRO SETUP 1 - 4) and confirm with the OK button k. 4. In the LCD display q "MACRO STEP" appears. Now press, one after the other, the desired buttons (max.
To delete all Macros To delete all pre-programmed Macros proceed as follows: 1. Hold down the S button r for a little longer than 3 seconds. The notice "CODE SETUP" appears. 2. With the or button t select "MACRO SETUP" and confirm with the OK button k. In the display "MACRO SETUP 1" appears. 3. With the or button t select "MACRO CLEAR" and confirm with the OK button k. 4. In the LCD display q "CONFIRM CLEAR" (confirm delete) appears. Confirm the delete process with the OK button k.
Note: The input of the channel numbers can vary according to the model and brand of the selected devices. If necessary, with multi-digit channel numbers you must first press the button a. To access favourites To access a pre-programmed favourite press the FAV/EPG button l followed by the corresponding number button for the desired memory slot (1 - 4). Delete All FAV channels To delete all pre-programmed favourites proceed as follows: 1. Hold down the S button r for a little longer than 3 seconds. 2.
For operation >> To operate one of the programmed devices with the URC first press the corresponding device button e. Then point the URC to this device and press the desired button. >> Put the number buttons o exactly as you do with the original remote control. Before you make a two digit entry press, if necessary, the button a. >> Press the FAV/EPG button l to start the electronic programme guide of a device equipped with this function.
>> It is possible that you are using the wrong code. Start the brand code search, the automatic code search or the direct code input (manual). The URC does not change the station on the device. >> Press the corresponding device button e to set the URC to the correct mode. >> In the event that the original RC does not have a "-/- -" button, change the programme with the CH+/— buttons u or the number buttons o. >> If this also does not work the child protection for the target device could be activated.
• Every consumer is legally obliged to surrender batteries/ rechargeable batteries to a community collection centre in their district or to a dealer. The purpose of this obligation is to ensure that batteries are disposed of in a nonpolluting manner. • Only dispose of batteries when they are fully discharged. Dispose of packaging materials in an environmentally responsible manner.
Note: The warranty provisions cover only material or factory defects. The warranty provisions do not cover • parts subject to wear and tear • for damage to breakable parts, such as switches or rechargeable batteries. This product is for private use only and is not intended for commercial use. The warranty is void in the case of abusive and improper handling, use of force and internal tampering not carried out by our authorized service branch.