CV_KH6515_16_V327_LB6_V1.qxd 09.11.2007 13:15 Uhr Seite 1 6 LETTORE DVD KH 6515/6516 DVD PLAYER Operating instructions KOMPERNASS GMBH · BURGSTRASSE 21 · D-44867 BOCHUM www.kompernass.com ID-Nr.
CV_KH6515_16_V327_LB6_V1.qxd 09.11.
INDEX 1. 2. 3. 4. 5. 6. 7. 8. PAGE Technical Data Applications and functions Delivery Contents Operating elements Setting up of the DVD player Safety instructions Remote control Connecting the DVD Player to a television 4 4 4 4 5 5 6 7 8.1 Connecting to a television via ScartCable/RGB 7 8.2 Connecting to a television via S-Video 7 8.3 Connection to a television via video input (Composite Video) 8 8.4 Connection via component signal (YPbPr/progressive scan and YUV) 8 8.5 Connection via VGA 9 8.
You can connect to the Silvercrest KH 6515/ KH 6516 DVD player for image outputs during playback of DVDs, VCDs, S-VCDs, Audio CDs and the MP3 data formats, Windows Media Audio and JPEG • Stereo and Mono televisions with the formats PAL or NTSC and the picture formats 4:3/16:9.
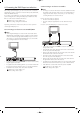
2^ 2& 2* 2( 3) 3! 3@ 3# 3$ 3% 5. Setting up of the DVD player VIDEO: Composite video output Power cord S-VIDEO: S-Video output HDMI: HDMI output FR: Output for front right audio channel SR: Output for rear right audio channel SUBWOOFER: Output for bass audio channel AUDIO OUT R: Right audio output PR/CR: Component video output COAXIAL: Coaxial audio output 1. Carefully remove the DVD player and the supplied accessories from the packing. 2. Remove the protective foil from the front reflector. 3.
7. Remote control Injury hazard • • • • Keep children away from the connecting cable and the appliance. Children frequently underestimate the dangers of electrical appliances. Ensure that the appliance stands with a safe and secure positioning. Do not operate the appliance if it has sustained a fall or is damaged. Arrange for the appliance to be checked and/or repaired by qualified technicians. Keep batteries away from children. Children can put batteries into their mouths and swallow them. 7.
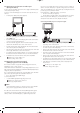
8.2 Connecting to a television via S-Video 8. Connecting the DVD Player to a television Note: After setting up the DVD player, you can now connect it to a television. The DVD player can be connected to a television that operates with the PAL, NTSC and SECAM standards. If you want to use the DVD player on a television with the NTSC standard you must change the video setting in the DVD players "OSD menu". There PAL is set as the television standard at the factory.
.3 Connection to a television via video input (Composite Video) If you are not sure whether the television (or Video projector), to which you want to connect the DVD player is capable of Progressive Scan and has cinch sockets available then you can check this by consulting the television's (or Video projectors's) instruction manual. For both variations – "YPbPr" and "YUV"– you will need • an audio cinch cable (not supplied) • an YUV cable (not supplied) These can be obtained from your dealer.
8.5 Connection via VGA 8.6 Connection via HDMI This connection variant is only possible with very high grade televisions, LCD/Plasma screens or Video projectors. For this type of connection the television must have available a VGA input and two audio "IN" cinch sockets. Check with the instruction manual of the corresponding playback device to see if this connections variant is available. It is possible that additional playback device settings may have to be implemented.
9. Connecting audio components to the DVD player Besides sound playback of DVDs, VCDs/S-VCDs and audio and MP3 CDs via the speaker of the television, to which the DVD player is connected, sound can also be played back via external audio components such as a HiFi system, Dolby digital/DTS receiver or a surround sound system. 9.1 Requirements for the connection of a HiFi system In order to enjoy a full sound experience when playing DVDs with the DVD player you can connect a HiFi system to the player.
Note: Make sure that no dirt can enter into the optical cable socket. This could cause signal interference. Always insert the protective plug into the socket if no optical cable is connected. 10. OSD menu settings All possible settings on the DVD player can be administered with the remote control via the so called "OnScreen display" menu (in short "OSD Menu"). The OSD Menu will be superimposed on the television screen. 9.
10.1. Using the OSD Menu 10.3 Video settings To access the DVD player's OSD Menu... • Press the SETUP button on the remote control. In this OSD menu you can administer the settings for Aspect Ratio, View Mode, TV-System, Video-out, Brightness, Sharpness, HD Resolution and HD-JPEG-Mode. The OSD Menu with its menu options will appear on the television screen: Here you set the Image format, in which the film should be displayed on the television screen (4:3 or 16:9).
Subwoofer: Attention! In the event that you set an incorrect Video output, for example "P-Scan", although your television is not capable of Progressive Scan, then the television screen will suddenly become black. This is not a defect of the television or the DVD player! STOP button on the front panel of the DVD player In this case press the or on the remote control. Test tones: Center delay, Surr.
10.5 Menu Rating 10.6 Diverse settings (Misc) In this menu you can implement the settings for child security and change the password. In this Menu you can return the DVD player to its factory defaults and set the DVD playback priority. Note: Only a few DVDs have a technical age restriction available. If there is no technical age restriction on the DVD your DVD players child lock feature can not be activated.
11.2 Inserting memory cards/USB memory sticks with MP3/WMA/ DivX/JPEG data SmartMedia memory cards (SM) Note: Note: The DVD-Player always starts in DVD mode. To read memory cards you press the button "DVD/Card/USB" on the remote control. The DVD player recognizes the data formats JPEG, MP3, WMA und MPEG4 (DivX). Always only insert one memory card in the DVD-Player. The DVD-Player always reads the data from the bottom compartment for the CF I/CF II-Card.
MemoryStick memory cards (MS/MSPro) MemoryStick memory cards must be inserted into the upper memory card compartment. Insert MF memory cards into the upper memory card compartment contacts first and straight. For this purpose... the side of the memory card that the contacts are on must be facing downwards and the slanted corner of the memory card must be on the left side. 12. Playing back DVDs, VCDs or S-VCDs 128 MB To play back a DVD/VCD/S-VCD with the DVD player... • Switch on your television.
Accessing the DVD menu (Menu) Depending on the inserted DVD/VCD/S-VCD it is possible that the contents of the DVD/VCD/s-VCD will not playback immediately, rather first a selection menu appears on the television screen. Note: This function may not be available on all DVDs! If you attempt to carry out a function that is not available the symbol will be displayed on the television screen.
Skip to start of chapter (SKIP) • Note: This function may not be available on all DVDs! If you attempt to carry out a function that is not available the symbol will be displayed on the television screen.
Slow down playback forwards/backwards (Slow motion) Change camera aspect (Angle) To playback the contents of the inserted DVD/VCD/S-VCD in slow motion … • For slow motion forward press the "S.FWD" button...
Programmed playback (PRG) • Note: This function may not be available on all DVDs/VCDs/S-VCDs! If you attempt to carry out a function that is not available the symbol will be displayed on the television screen. With the "Program“ function you can compile your own film program, by selecting only certain chapters of an inserted DVD/VCD/S-VCD for playing. In this way you can determine yourself the sequence, in which the chapters are played back.
In the case of VCDs/S-VCDs: • the already played back time of the currently playing VCD/SVCD in hours, minutes and seconds • the time to the end of the currently playing film in hours, seconds and minutes • the type of inserted disc (VCD/S-VCD) • the current playback language setting • To fade out the disc information press the DISPLAY button again.
• • • • • • 13. Playback of JPEG-Photo CD/WMA/MP3/MPEG4 If you want to place another bookmark then press the control button to select Bookmark 2 in the superimposed field on the television screen. Press the OK button again as soon as the passage is reached, on which you want to place the second bookmark. Proceed in the same manner to place a third bookmark. Once you have placed all the desired bookmarks press the MARK button to fade out the bookmark menu from the screen.
Effects (JPEG images only) • • • • • • With the Effect function you can cross fade JPEG images with various effects. • Press the Angle button during playback.
14. Cleaning of the DVD player 16. Troubleshooting Clean the casing of the DVD player with a soft damp cloth and a mild detergent only. When cleaning make sure that no moisture gets into the DVD player! Clean the inside of the disc tray, if necessary, with a clean dry brush only (i.e. a lens brush available from a photo dealer).
D Check by means of the televisions operating instructions to see if settings E F • • to the television may be necessary in order to use the DVD player with the television. Check by means of the operating instructions for a potential connected audio component if settings to it are necessary in order to use it with the DVD player.
Progressive scan Dolby Digital (5.1) In the normal way TV appliances and Video projectors are controlled with so called "Half images". Thereby clearly visible line structures develop. Contrary to this, Progressive Scan denotes the output of full images (with this DVD player, at the output YPbPr) Progressive Scan signals can only be processed by playback appliances equipped for this purpose (in particular large screen televisions and projectors).
Nero Digital NERO is a data compression program, which can compress all video formats to less than 20% of their original size, while still maintaining a high quality. CDs, which have been recorded with NERO, can contain chapters and subtitles in two languages. The CDs are operated via the normal buttons that are used for DVDs. Data, which are not created with the NERO Digital "Standard Profile", may not play immediately or only with restrictions.
- 28 -