HOME TECH Projection Alarm Clock SPU 900 A1 6 Projection Alarm Clock Operating manual KOMPERNASS GMBH BURGSTRASSE 21 ⋅ D-44867 BOCHUM www.kompernass.com ID-Nr.: SPU 900 A1-05/11-V6 CV_SPU 900 A1 - DT-67087.indd 6 19.07.
SPU 900 A1 CV_SPU 900 A1 - DT-67087.indd 8 19.07.
INDEX PAGE Intended Use 2 Items supplied 2 Technical Data 2 Safety information 2 The appliance components 4 Putting the appliance into use 5 Radio operation 9 Cleaning 11 Troubleshooting 11 Notice regarding conformity 11 Importer 11 Disposal 11 Warranty & Service 12 Read the operating instructions carefully before using the appliance for the first time and preserve this booklet for later reference. Pass this booklet on to whoever might acquire the appliance at a future date.
Dimensions (W x H x D): 21 x 7 x 14.1 cm Weight : 870 g approx. Protection class: II / Backup Batteries 2 x 1.5 V, Type AAA/ Micro (not supplied) Projection Alarm Clock SPU 900 A1 This documentation is copyright protected. All rights including those of photographic reproduction, duplication and distribution by means of particular methods (for example data processing, data carriers and data networks), wholly or partially as well as substantive and technical changes are reserved.
• Do not expose the appliance to rain and never use it in a humid or wet environment. • Always take hold of the power cable by the plug. Do not pull on the cable itself and never touch the power cable with wet hands, this could result in either a short circuit or you receiving an electric shock. • Do NOT place the appliance itself, furniture items or similar objects on the power cable and take steps to ensure it cannot become jammed or trapped in any way.
nected from the power supply and then reconnected. The batteries (if present) must be removed and then reinserted. Warnings about interaction with batteries The appliance uses batteries for memory storage.
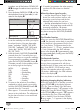
approx. 15 seconds, the appliance saves the adjustment and then leaves the programming mode. 1( Focus adjuster - for focussing the time projection 2) Wire aerial - for VHF reception 2! Power cable 2@ Battery compartment - for the backup batteries 1. Press theMODE/LOCK button e. The time display blinks. 2. Press the buttons DOWN/UP i/o to set the time at minute intervals. Pressing and holding down one of button changes the time in quick succession. Setting the date 1.
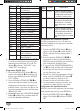
Abbr. UTC Diff.
automatically dimmed. 2. Press the buttons DOWN / UP i/o to set a different time. 3. Press the button MODE/LOCK e once more. The display g shows “DT 6:00 OFF” as the time at which the display is to return to its normal brightness. 4. Press the buttons DOWN/UP i/o to set a different time. 2. Press the button DOWN i to deactivate the up-date function. The display g then shows "UPDATE OFF". 3. Press the button UP o to reactivate the up-date function. Programme time for the slumber function 1.
8. If needed, programme the other memory positions for alarm times as detailed above. When the alarm signal sounds... • ... and the alarm function "Radio" is selected, the radio switches itself on with increasing sound volume and the last adjusted radio station for one hour. • ... and the selected alarm function is “signal tone”, the signal tone sounds with an increasing volume for 10 minutes. To close the individual alarm function press any button except the SNOOZE/DIMMER button y.
Radio operation Automatic station search You can also let the appliance search for radio stations. The radio alarm then searches the selected frequency range until it has found a radio station. The technical data of the appliance makes possible an adjustable frequency range wider than the permitted frequency ranges of 87,5 108 MHz resp. 526,5 - 1606,5 kHz. In some countries, different national regulations may apply to the assigned radio frequency ranges.
Should the second user be activated, the “B” indicator appears in the display g. 6. Repeat the steps 1 - 4 (for both users) until all desired radio stations have been saved. AMS (Automatic Memory System) With the AMS function the radio searches automatically for radio stations and then saves them to the memory positions. • Press and hold the button A.M.S. MEMORY h for two seconds. The radio alarm automatically searches for sufficiently powerful radio stations and saves them in the memory.
SNOOZE/DIMMER button y retains its function as a snooze button. To disable the button lock function, press and hold the MODE/ LOCK button e once again until the key symbol extinguishes. Cleaning Warning! Always remove the mains power plug before cleaning the appliance! Moisture penetrating into the appliance creates the risk of electric shock! Additionally, the appliance could become irreparably damaged! Clean the housing of the radio alarm only with a slightly moist cloth and a mild detergent.
this obligation is to ensure that batteries are disposed of in a non-polluting manner. • Only dispose of batteries when they are fully discharged. Disposal of packaging Dispose of the packaging materials in an environmentally responsible manner. Service Great Britain Tel.: 0871 5000 720 (£ 0.10/Min.) E-Mail: kompernass@lidl.co.uk IAN 67087 Service Ireland Tel.: 1890 930 034 (0,08 EUR/Min., (peak)) (0,06 EUR/Min., (off peak)) E-Mail: kompernass@lidl.