Manual de usuario ES Manuale d’uso IT/MT Manual do utilizador PT User guide GB/MT Gebrauchsanweisung DE/AT/CH ES Las características descritas en este manual pueden ser objeto de futuras modificaciones. IT / MT Le caratteristiche descritte nel presente manuale vengono pubblicate con riserva di modifica. PT As características descritas neste manual são publicadas sob reserva de modificação. GB / MT The features described in this manual are published with reservation to modifications.
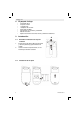
A B 3 12 13 14 15 1 2 11 16 17 18 24 23 10 4 5 6 9 22 21 8 20 19 7 26 25 C D
Twintalker 4810 Introducción 2 Finalidad 5 3 Marcado CE 5 4 4.1 4.2 4.3 4.4 4.5 4.6 4.7 Instrucciones de seguridad General Quemaduras Lesiones Riesgo de explosión Riesgo de envenenamiento Cuestiones legales Notas 5 5 5 5 5 6 6 6 5 Limpieza y mantenimiento 6 6 Eliminación del dispositivo (medio ambiente) 7 7 Uso de un dispositivo PMR 7 8 El paquete incluye: 8 9 9.1 9.
Twintalker 4810 14 Conector de auriculares 17 15 Solución de problemas 18 16 Especificaciones técnicas 18 17 Dirección de servicio técnico y asistencia telefónica 19 18 Declaración de conformidad y fabricante 19 19 19.1 19.2 19.
Twintalker 4810 Introducción Gracias por adquirir la unidad Twintalker 4810. Se trata de un aparato de radiocomunicación de baja potencia y largo alcance de máximo 8 km. No tiene más costes de funcionamiento que los costes mínimos de recarga de las pilas. El Twintalker funciona en 8 canales. El Twintalker está protegido contra gotas de agua verticales con una inclinación de la carcasa de 15° según la norma IPX2. 2 Finalidad Puede utilizarse con fines recreativos.
Twintalker 4810 • • Apagar el PMR siempre que se esté en una zona con un ambiente potencialmente explosivo. Las chispas en esas zonas pueden provocar explosiones o incendios que pueden causar lesiones corporales e incluso la muerte. No desechar nunca las pilas al fuego; éstas pueden explotar. Aunque no siempre es así, las zonas con ambientes potencialmente explosivos suelen estar claramente marcadas.
Twintalker 4810 Eliminación del dispositivo (medio ambiente) Al final de su vida útil este producto no debe ser desechado en un contenedor normal, sino en un punto de recolección destinado al reciclaje de equipos eléctricos y electrónicos. Tanto en el producto como en el manual de usuario y en la caja se incluye este símbolo. Si usted los lleva a un punto de reciclaje, algunos de los materiales del producto podrán reutilizarse.
Twintalker 4810 8 El paquete incluye: • • • • • • • • 9 9.1 1. 2. 9.2 2 Twintalker 4810 2 clips de cinturón 1 cargador dúo 1 adaptador de corriente 8 pilas AAA de NiMH 2 auriculares con micrófono y botón PTT Manual de usuario Tarjeta con dirección de servicio técnico y teléfono de asistencia Introducción A Retirada e instalación del clip del cinturón Empuje el clip del cinturón (B) hacia la antena y tire de la pestaña (A) para retirarlo de la unidad.
Twintalker 4810 2. 3. 4. 5. Retire el clip del cinturón (consulte el apartado “9.1 Retirada e instalación del clip del cinturón”). Levante la tapa de las pilas tirando con cuidado del enganche (C) con la uña. Instale las pilas NiMH. Asegúrese de que la polaridad de las pilas es correcta. Cierre la tapa de las pilas. Vuelva a colocar el clip del cinturón. ESPAÑOL 1. 10 Carga de las pilas Una vez instaladas las pilas, el cargador de sobremesa permite cargarlas cómodamente. 1. 2. 3. 4.
Twintalker 4810 11 Descripción Consulte la ilustración A de la página doblada de la portada. 1. 2. 3. 4. 5. 6. 7. 8. 9. 10. 11. Pantalla LCD Conexión de auriculares Antena Botón de llamar Botón de menú – Accede a los ajustes del menú. Botón de bajar – Baja el volumen del altavoz. – Selecciona la opción anterior del menú. Contactos del cargador Micrófono Botón de subir – Sube el volumen del altavoz. – Selecciona la opción siguiente del menú.
Twintalker 4810 13.1 Encendido y apagado de la unidad ESPAÑOL Para encender: • Mantenga pulsado el botón 10 durante 3 segundos. El aparato emitirá un pitido y la pantalla LCD mostrará el canal actual. Para apagar: • Mantenga pulsado el botón 10 durante 3 segundos. El aparato emitirá un pitido y la pantalla LCD se apagará. 13.
Twintalker 4810 13.5 Transmisión de una señal • • • Mantenga presionado el botón PTT 11 para transmitir. Aparecerá el símbolo TX. Mantenga la unidad en posición vertical con el micrófono a 10 cm de la boca y hable a través de él. Suelte el botón PTT 11 cuando quiera dejar de transmitir. Para comprobar la actividad que hay en el canal, utilice la función de rastreo (consulte el apartado “13.8 Rastreo”). 13.6 Cambio de canales • • • 5 .
.7.1 CTCSS • • • 5 dos veces: en pantalla parpadeará Pulse el botón «CTCSS» y el código actual de CTCSS. 6 para cambiar a 9 o el botón Pulse el botón otro código. Pulse el botón PTT 11 para confirmar y regresar al modo en espera. 13.7.2 DCS • • • 5 tres veces: en pantalla parpadeará Pulse el botón «DCS»y el código actual de DCS. 6 para cambiar a 9 o el botón Pulse el botón otro código. Pulse el botón PTT 11 para confirmar y regresar al modo en espera.
Twintalker 4810 • • • • 5 4 veces. La configuración actual de Pulse el botón VOX parpadea en la pantalla y aparece el icono VOX. 9 para configurar el nivel de Pulse el botón sensibilidad de la función VOX entre 1 y 3 (el nivel 3 es el más sensible). 6 hasta Para desactivar la función VOX, pulse el botón que aparezca en pantalla «OF» (apagado). Pulse el botón PTT 11 para confirmar y regresar al modo en espera. 13.
• • ESPAÑOL Twintalker 4810 Si pulsa el botón PTT 11 mientras está escuchando el código CTCSS que acaba de localizar, el dispositivo PMR entrará en el modo en espera en el canal con dicho código. Si no se detecta ningún código CTCSS, el usuario podría haber seleccionado un código DCS. En este caso, deberá realizar un barrido del código DCS (apartado 13.10.3). 13.10.
Twintalker 4810 Para establecer el pitido Roger: 5 9 veces. Aparecerá en pantalla «rO». • Pulse el botón • Pulse para activar («ON») o para desactivar («OF») el pitido Roger. • Pulse el botón PTT 11 para confirmar la selección y regresar al modo en espera. 13.13 Activación y desactivación del tono de las teclas Al presionar un botón la unidad emitirá un breve pitido. Para establecer el tono de las teclas: • Pulse 10 veces. Aparecerá en pantalla «tO».
Twintalker 4810 13.15 Bloqueo de botones • 5 durante 3 segundos Mantenga pulsado el botón para activar el modo de bloqueo de botones. El icono de bloqueo de botones aparecerá en la pantalla LCD. 5 de nuevo durante 3 Mantenga pulsado el botón segundos para desactivar el bloqueo de botones. ESPAÑOL • 4 y el botón 10 seguirán funcionando El botón PTT 11 , el botón aunque se haya activado el bloqueo de botones. 13.
Twintalker 4810 15 Solución de problemas No hay corriente. Limpie los contactos de las pilas con un paño suave. Cambie las pilas. No hay transmisión. Asegúrese de pulsar bien el botón PTT 11 antes de hablar. Supervise la actividad de los canales y cambie a otro canal, si el canal actual está siendo utilizado. No hay recepción. Revise el volumen del altavoz. Compruebe que está dentro de la zona de alcance del emisor y, si es necesario, cámbiese de sitio.
Twintalker 4810 No DCS code No DCS code No DCS code No DCS code 0 1 2 3 4 5 6 7 8 9 10 Disabled 23 25 26 31 32 43 47 51 54 65 21 22 23 24 25 26 27 28 29 30 31 134 143 152 155 156 162 165 172 174 205 223 42 43 44 45 46 47 48 49 50 51 52 311 315 331 343 346 351 364 365 371 411 412 63 64 65 66 67 68 69 70 71 72 73 516 532 546 565 606 612 624 627 631 632 654 11 12 71 72 32 33 226 243 53 54 413 423 74 75 662 664 13 14 73 74 34 35 244 245 55 56 431 432 76 77 703 712 15 16 114 115
Twintalker 4810 19.2 Tratamiento de la garantía Los aparatos averiados deberán remitirse a un servicio técnico oficial junto con un comprobante de compra válido y una tarjeta de servicio técnico cumplimentada. Si la unidad tiene una avería durante el período de garantía, el servicio técnico reparará sin cargo alguno cualquier avería causada por defectos de material o fabricación, ya sea reparando o sustituyendo las unidades defectuosas o partes de las mismas.
Introduzione 23 2 Destinazione d'uso 23 3 Marchio CE 23 4 4.1 4.2 4.3 4.4 4.5 4.6 4.7 Norme di sicurezza Informazioni generali Rischio di ustioni Lesioni Pericolo di esplosione Rischio di avvelenamento Informazioni legali Note 23 23 23 23 24 24 24 24 5 Pulizia e manutenzione 24 6 Smaltimento dell'apparecchio (ambiente) 25 7 Utilizzo di un apparecchio PMR 25 8 Contenuto della confezione 26 9 9.1 9.
Twintalker 4810 14 Collegamento dell'auricolare 36 15 Risoluzione dei problemi 36 16 Specifiche tecniche 37 17 Indirizzo dell'assistenza e supporto tramite hotline 38 18 Dichiarazione di conformità e del produttore 38 19 19.1 19.2 19.
Twintalker 4810 1 Introduzione Grazie per avere acquistato il Twintalker 4810. Si tratta di un apparato per radiocomunicazioni a lungo raggio, a basso consumo di energia, con una copertura massima di 8 Km, il cui unico e minimo costo di esercizio è rappresentato dalla ricarica delle batterie. Il Twintalker funziona su 8 canali. Se la custodia è inclinata di 15°, il Twintalker è protetto dalle gocce d'acqua che cadono verticalmente in conformità allo standard IPX2.
Twintalker 4810 4.4 • • • Pericolo di esplosione Non sostituire le batterie in ambienti a rischio di esplosione. Durante l'inserimento o la rimozione delle batterie, possono verificarsi scintille sui contatti, con conseguente rischio di esplosione. Quando ci si trova in un'area soggetta a rischio di esplosione, spegnere il PMR. L'emissione di scintille in tali aree può infatti dare origine a esplosioni o incendi con conseguente rischio di lesioni o morte.
Twintalker 4810 ore o almeno fino ad una asciugatura completa. Non utilizzare l'apparecchio finché non è completamente asciutto. Smaltimento dell'apparecchio (ambiente) Alla conclusione del suo ciclo di vita, il prodotto non deve essere gettato nel contenitore dei rifiuti domestici, ma deve essere depositato presso un apposito punto di raccolta per il riciclaggio di apparecchi elettrici ed elettronici.
Twintalker 4810 8 Contenuto della confezione • • • • • • • • 9 9.1 1. 2. 9.
Twintalker 4810 1. 2. 3. 4. 5. Rimuovere la clip da cintura (consultare il capitolo “9.1 Installazione/Rimozione della clip da cintura”). Sollevare il coperchio del vano batterie premendo delicatamente la clip del coperchio (C) con l'unghia. Inserire le batterie NiMh. Verificare che la polarità delle batterie NiMh sia corretta. Chiudere il vano batterie. Reinstallare la clip da cintura. 10 Ricarica delle batterie 1. 2. 3. 4.
Twintalker 4810 11 Descrizione Vedere la pagina di copertina ripiegata - figura A 1. 2. 3. 4. 5. 6. 7. 8. 9. 10. 11.
Twintalker 4810 13.1 Accensione/spegnimento dell'unità ITALIANO Accensione: • tenere premuto il tasto 10 per 3 secondi. L'apparecchio emette un segnale acustico e sul display LCD viene visualizzato il canale corrente. Spegnimento: • tenere premuto il tasto 10 per 3 secondi. L'apparecchio emette un segnale acustico e il display LCD si spegne. 13.
Twintalker 4810 Affinché i destinatari possano ricevere la trasmissione, è necessario che si trovino sullo stesso canale e sullo stesso codice CTCSS o DCS. (Consultare il capitolo “13.6 Cambio di canale” e “13.7 CTCSS (Continuous Tone Coded Squelch System, sistema squelch codificato a tono continuo) / DCS (Digital Coded Squelch, squelch codificato digitale)”). È possibile usare indistintamente il codice CTCSS o DCS, ma non contemporaneamente. 13.
Twintalker 4810 Quando si utilizza il CTCSS, insieme al segnale vocale viene trasmesso un tono di frequenza basso (tra 67 e 250 Hz). È possibile scegliere tra 38 toni diversi. Siete liberi di scegliere uno tra i 38 toni disponibili. A causa del filtraggio, questi toni in genere non sono udibili, quindi non disturberanno la comunicazione. Il DCS è simile al CTCSS, ma invece di inviare un tono continuo della frequenza selezionata, al segnale radio si aggiunge la trasmissione digitale dei dati.
Twintalker 4810 Durante il monitoraggio del canale, il circuito del ricevitore nel PMR non sentirà i codici CTCSS o DCS. 13.9 Selezione VOX Il ricetrasmettitore PMR è dotato della funzione di trasmissione ad attivazione vocale (VOX). In modalità VOX, l'apparecchio trasmette un segnale quando viene attivato dalla voce dell'utente o da un rumore qualsiasi nell'ambiente. La funzione VOX non è consigliata se si ha intenzione di usare il ricetrasmettitore in un ambiente rumoroso o esposto al vento.
Twintalker 4810 Premendo il tasto PTT 11 durante l'ascolto di un canale trovato, il PMR si rimetterà in modalità stand-by sul canale trovato. • • ITALIANO 13.10.2 Scansione di un codice CTCSS Quando viene identificato un canale attivo, premere il tasto PTT 11 per selezionarlo. È ora possibile cercare il codice CTCSS/DCS utilizzato dall'utente trovato. 5 : "SC" e "CTCSS 00" del Premere sei volte il tasto canale radio selezionato lampeggiano sul display.
Twintalker 4810 13.11 Segnali di chiamata Un segnale di chiamata avvisa gli altri interlocutori che si desidera di iniziare a parlare. 13.11.1 Impostazione del segnale di chiamata Il Twintalker 4810 dispone di 15 segnali di chiamata. • • • 5 : “CA” viene visualizzato Premere otto volte il tasto e il segnale di chiamata corrente lampeggia. Per passare a un altro segnale di chiamata, premere il tasto 9 o il tasto 6 . Premere il tasto PTT 11 per confermare e tornare alla modalità stand-by. 13.11.
Twintalker 4810 • • • • • 5 , "DCM OF" Premere undici volte il tasto lampeggerà sul display. 6 per cambiare il 9 o il tasto Premere il tasto canale. 5 per confermare il canale scelto e Premere il tasto passare alla selezione del CTCSS. (Premere nuovamente il 5 per passare alla selezione del DCS) tasto 6 per cambiare il 9 o il tasto Premere il tasto codice CTCSS o DCS. Premere il tasto PTT 11 per confermare e tornare alla modalità stand-by.
Twintalker 4810 13.17 Retroilluminazione del display Per attivare la retroilluminazione del display LCD, premere qualsiasi tasto tranne il tasto 4 . PTT 11 o il tasto La retroilluminazione del display LCD si accende per 6 secondi. 14 Collegamento dell'auricolare Il Twintalker 4810 può essere utilizzato con l'auricolare in dotazione. Il connettore si trova sotto la custodia in gomma protettiva nella parte superiore dell'apparecchio 2 .
Twintalker 4810 16 Specifiche tecniche Canali Subcodice Frequenza Copertura Batterie Potenza di trasmissione Tipo di modulazione Spaziatura canali Adattatore per caricatore Duo Charger Channel Frequency Chart: Channel 1 2 3 4 5 6 7 8 Frequency (MHz) 446,00625 446,01875 446,03125 446,04375 446,05625 446,06875 446,08125 446,09375 ITALIANO 8 CTCSS 38 / DCS 83 446,00625MHz - 446,09375 MHz Fino a 8 Km (in campo aperto) 4 x alcaline AAA o 4 x ricaricabili AAA NiMH =< 500mW ERP FM - F3E 12,5 kHz Entrata: 230
Twintalker 4810 17 Indirizzo dell'assistenza e supporto tramite hotline Gli indirizzi dell'assistenza sono stampati sulla scheda di assistenza supplementare inclusa nella confezione oppure sono reperibili sul sito www.ucom.be 18 Dichiarazione di conformità e del produttore Topcom Europe Nv. Grauwmeer 17 3001 Heverlee Belgio La dichiarazione di conformità si trova sull'ultima pagina del presente manuale d'uso. 19 Garanzia 19.1 Periodo di garanzia Gli apparecchi hanno un periodo di garanzia di 36 mesi.
Twintalker 4810 Introdução 41 2 Utilização prevista 41 3 Marca CE 41 4 4.1 4.2 4.3 4.4 4.5 4.6 4.7 Instruções de segurança Geral Queimaduras Lesões Perigo de explosão Perigo de envenenamento Restrições legais Notas 41 41 41 41 41 42 42 42 5 Limpeza e manutenção 42 6 Eliminação do dispositivo (ambiente) 43 7 Utilizar um dispositivo PMR 43 8 Esta embalagem inclui 44 9 9.1 9.
Twintalker 4810 14 Ligar o auricular 53 15 Diagnóstico de avarias 54 16 Especificações técnicas 54 17 Endereço de apoio ao cliente e linha de assistência 55 18 Declaração de conformidade e fabricante 55 19 19.1 19.2 19.
Twintalker 4810 1 Introdução Agradecemos a sua aquisição do Twintalker 4810. Este é um dispositivo de comunicação rádio de longo alcance e baixo consumo, que permite a comunicação com um alcance máximo de 8 Km. O seu único custo é limitado ao recarregamento das pilhas. O TwinTalker funciona em 8 canais. O Twintalker está protegido contra gotas de água a cair na vertical com o corpo virado para cima até 15° de acordo com a norma IPX2. 2 Utilização prevista Pode ser utilizado para fins recreativos.
Twintalker 4810 • • Desligue o PMR quando se encontrar em áreas com uma atmosfera potencialmente explosiva. Faíscas nestas áreas podem provocar uma explosão ou um incêndio, resultando em lesões físicas ou mesmo morte. Nunca coloque pilhas no fogo, pois podem explodir. Áreas com atmosferas potencialmente explosivas estão frequentemente marcadas de forma clara, mas nem sempre.
Twintalker 4810 6 Eliminação do dispositivo (ambiente) Quando o ciclo de vida do produto chega ao fim, não deve eliminar este produto juntamente com os resíduos domésticos. Deve levá-lo a um ponto de recolha de equipamentos eléctricos e electrónicos. O símbolo presente no produto, no manual do utilizador e na caixa dá esta indicação. Alguns dos materiais do produto podem ser reutilizados se os colocar num ponto de reciclagem.
Twintalker 4810 8 Esta embalagem inclui • • • • • • • • 9 9.1 1. 2. 9.2 2 x Twintalker 4810 2 x Clipe de cinto 1 x Carregador Duo 1 x Transformador 8 x pilhas AAA de NiMh 2 x Auriculares com microfone e botão PTT Manual do utilizador Cartão com endereço de apoio ao cliente e linha de assistência Iniciar A Colocar/retirar o clipe de cinto Para retirar o clipe de cinto da unidade, empurre o clipe de cinto (B) na direcção da antena ao mesmo tempo que puxa pela patilha (A).
Twintalker 4810 10 Carregar as pilhas 1. 2. 3. 4. Coloque o carregador de mesa sobre uma superfície plana. Ligue uma extremidade do transformador fornecido a uma tomada eléctrica facilmente acessível e a outra extremidade ao conector na parte de trás do carregador de secretária 25 .(Ver na página de rosto dobrada ilustração C) Coloque o rádio no carregador da forma indicada. O LED indicador de carregamento 26 acende-se quando o dispositivo está inserido da forma adequada e em carregamento.
Twintalker 4810 8. 9. 10. 11. Microfone Botão PARA CIMA – Aumenta o volume do som – Selecciona o valor seguinte no menu Botão Ligar/Desligar Botão premir para falar PTT 12 Informação apresentada no visor LCD Ver folha de rosto dobrada - ilustração B 12. 13. 14. 15. 16. 17. 18. 19. 20. 21. 22. 23. 24.
Twintalker 4810 Pilhas carregadas Pilhas a 2/3 Pilhas a 1/3 Pilhas descarregadas Quando o nível de carga das pilhas é fraco, o ícone de nível de carregamento das pilhas começará a piscar e ouve-se um sinal sonoro de modo a indicar que é necessário substituir ou recarregar as pilhas. Nunca recarregue pilhas não recarregáveis, como por exemplo pilhas alcalinas. 13.3 Ajustar o volume do altifalante • 9 em modo de espera para aumentar o Prima o botão volume de som. É mostrado o nível do volume.
Twintalker 4810 13.6 Mudar de Canal • • • 5 ; o número do canal actual Prima uma vez o botão aparece intermitente no visor. 9 ou o botão 6 para mudar de Prima o botão canal. Prima o botão PTT 11 para confirmar e regressar ao modo de espera. Se nenhum botão for premido no espaço de 5 segundos durante a configuração, a unidade regressa ao modo de espera. 13.
Twintalker 4810 13.7.1 CTCSS • • • 5 duas vezes : "CTCSS" e o código Prima o botão CTCSS actual piscam no visor. 6 para mudar para 9 ou o botão Prima o botão outro código. Prima o botão PTT 11 para confirmar a selecção e regressar ao modo de espera. 13.7.2 DCS • • • 5 três vezes: "DCS" e o código DCS Prima o botão actual piscam no visor. 6 para mudar para 9 ou o botão Prima o botão outro código. Prima o botão PTT 11 para confirmar a selecção e regressar ao modo de espera.
Twintalker 4810 • • • • 5 , a configuração Prima quatro vezes o botão corrente de VOX fica intermitente no visor e o ícone VOX é apresentado. 9 para seleccionar o nível de Prima o botão sensibilidade VOX de 1 a 3 (o nível 3 é o mais sensível). 6 até que ‘OF’ seja apresentado no Prima o botão visor, para desligar o modo VOX. Prima o botão PTT 11 para confirmar e regressar ao modo de espera. 13.10 Procura de canais (SCAN) A procura de canais procura sinais activos em contínuo, do canal 1 ao 8.
Twintalker 4810 • • Se premir o botão PTT 11 enquanto ouve um canal encontrado, o PMR regressa ao modo de espera no canal com o código CTCSS. Caso não seja detectado nenhum código CTCSS, há a possibilidade de estar a ser utilizado um código DCS seleccionado pelo utilizador. Neste caso, procure o código DCS. (secção 13.10.3) 13.10.3 Procura de um código DCS • 5 sete vezes : "SC" e "DCS 00" Prima o botão piscam no visor para o canal de rádio seleccionado.
Twintalker 4810 Para definir o sinal de fim de comunicação (Roger). 5 . ‘rO’ é apresentado. • Prima nove vezes o botão • Prima para ligar (ON) ou desligar o sinal de fim de comunicação (Roger) (OF). • Prima o botão PTT 11 para confirmar e regressar ao modo de espera. 13.13 Ligar/Desligar tons de teclado Quando um botão é premido, a unidade emite um ligeiro 'bip'. Para definir os tons do teclado. • Prima dez vezes. ‘tO’ é apresentado. • Prima para ligar (ON) ou desligar os Tons do Teclado (OF).
Twintalker 4810 4 e o botão 10 continuam funcionais O botão PTT 11 , o botão mesmo quando o bloqueio de teclado está activado. 13.16 Função de cronómetro • • • • • 4 e mantenha premido durante três Prima o botão segundos. O cronómetro é apresentado. 9 para iniciar o cronómetro. Prima o botão 9 para parar o cronómetro. Prima o botão 6 para repor o cronómetro a zeros. Prima o botão 4 durante três Prima e mantenha premido o botão segundos para desactivar o cronómetro. 13.
Twintalker 4810 15 Diagnóstico de avarias Sem energia Limpe os contactos das pilhas com um pano suave. Substitua as pilhas. Sem transmissão Certifique-se de que o botão - PTT 11 é completamente premido antes de falar. Monitorize a actividade do canal e mude para outro canal se o canal actual estiver ocupado. Sem recepção Verifique o volume do altifalante. Certifique-se de que se encontra dentro da área de cobertura de recepção do emissor e, se necessário, mude de lugar.
Twintalker 4810 No DCS code No DCS code No DCS code No DCS code 0 1 2 3 4 5 6 7 8 9 10 Disabled 23 25 26 31 32 43 47 51 54 65 21 22 23 24 25 26 27 28 29 30 31 134 143 152 155 156 162 165 172 174 205 223 42 43 44 45 46 47 48 49 50 51 52 311 315 331 343 346 351 364 365 371 411 412 63 64 65 66 67 68 69 70 71 72 73 516 532 546 565 606 612 624 627 631 632 654 11 12 71 72 32 33 226 243 53 54 413 423 74 75 662 664 13 14 73 74 34 35 244 245 55 56 431 432 76 77 703 712 15 16 114 115
Twintalker 4810 19.2 Modo de funcionamento da garantia Uma unidade com defeito tem de ser devolvida a um centro de serviços autorizado juntamente com uma nota de compra válida e um cartão de assistência preenchido. Caso a unidade desenvolva um defeito durante o período de garantia, o centro de serviços reparará qualquer defeito derivado de material ou falhas de fabrico, reparando ou substituindo as unidades ou as peças defeituosas, de forma gratuita.
Twintalker 4810 Introduction 59 2 Intended purpose 59 3 CE Mark 59 4 4.1 4.2 4.3 4.4 4.5 4.6 4.7 Safety instructions General Burning injuries Injuries Danger of explosion Poisoning danger Legal Notes 59 59 59 59 60 60 60 60 5 Cleaning and maintenance 60 6 Disposal of the device (environment) 61 7 Using a PMR device 61 8 Included in the package 61 9 9.1 9.
Twintalker 4810 14 Earpiece connection 71 15 Troubleshooting 72 16 Technical specifications 72 17 Service address and hotline support 73 18 Declaration of conformity and manufacturer 73 19 19.1 19.2 19.
Twintalker 4810 1 Introduction Thank you for purchasing the Twintalker 4810. It’s a long range, low powered radio communication device with a range of maximum 8 Km. It has no running costs other than the minimal cost of re-charging the batteries. The Twintalker operates on 8 channels. The Twintalker is protected against vertically falling water drops when enclosure tilted up to 15° according to the IPX2 standard. 2 Intended purpose It can be used for recreational purposes.
Twintalker 4810 4.4 Danger of explosion • • • Do not replace batteries in a potentially explosive atmosphere. Contact sparking may occur while installing or removing batteries and cause an explosion. Turn your PMR off when in any area with a potentially explosive atmosphere. Sparks in such areas could cause an explosion or fire resulting in bodily injury or even death. Never throw batteries in fire as they may explode.
Twintalker 4810 6 Disposal of the device (environment) At the end of the product lifecycle, you should not throw this product into the normal household garbage but bring the product to a collection point for the recycling of electrical and electronic equipments. The symbol on the product, user guide and/or box indicate this. Some of the product materials can be re-used if you bring them to a recycling point.
Twintalker 4810 9 Getting started A 9.1 1. 2. Installing/Removing the Belt Clip To remove the belt clip from the unit, push the belt clip (B) towards the antenna, while pulling the clip tab (A). When re-installing the belt clip, a click indicates the belt clip is locked into position. B 9.2 Battery Installation C 1. 2. 3. 4. 5. 62 Remove the belt clip (See chapter “9.1 Installing/Removing the Belt Clip”). Lift the battery door by gently pushing the door clip (C) using your finger nail.
Twintalker 4810 10 Charging the batteries When the batteries are installed, the desktop charger provides drop-in charging conveniency. 1. 2. 3. 4. Put the desktop charger on a flat surface. Plug one end of the supplied adapter into an easy accessible electric socket and the other end into the connector on the backside of the desktop charger 25 .(See folded cover page illustration C) Put the radio in the charger as indicated. The charging LED 26 will turn on if it’s properly inserted and charging.
Twintalker 4810 9. 10. 11. UP button – Increase the speaker volume – Select the next value in the menu On-off button Push to talk button PTT 12 LCD display information See folded cover page - illustration B 12. 13. 14. 15. 16. 17. 18. 19. 20. 21. 22. 23. 24.
Twintalker 4810 Battery Full Battery 2/3 charged Battery 1/3 charged Battery empty When the battery charge level is low, the battery icon will flash and a beep will be heard to indicate that the batteries need to be replaced or recharged. Never recharge non-rechargable batteries like for exemple Alkaline batteries. 13.3 Adjusting Speaker Volume • • Press the - button 9 in stand-by-mode to increase the speaker volume. The volume level is displayed. Press the - button 6 to decrease the speaker volume. 13.
Twintalker 4810 13.6 Changing Channels • • • Press the - button 5 once, the current channel number flashes on the display. - button 6 to change Press the - button 9 or the the channel. Press the PTT - button 11 to confirm and return to stand-by mode. If no button is pressed within 5 seconds during setting, the unit will return to standby. 13.
Twintalker 4810 13.7.2 DCS • • • Press the -button 5 three times : "DCS" and the current DCS code flashes on the display. Press the -button 9 or the -button 6 to change to another code. Press the PTT-button 11 to confirm and return to stand-by mode. To disable CTCSS or DCS, select code "00" for CTCSS or for DCS in the menu. When the entry is confirmed, "OF" will be displayed. 13.8 Monitor You can use the monitor feature to check for weaker signals in the current channel. • • Press the monitoring.
Twintalker 4810 13.10 Channel Scan Channel scan performs searches for active signals in an endless loop from channel 1 to 8. Once an active channel is found you have the option to search for the CTCSS code or the DCS code that is set by the user who is broadcasting on the channel. 13.10.1 Scanning for an active radio channel • • Press the -button 5 five times : "SC" and the current channel flashes on the display. Press the -button 9 or the -button 6 to start the channel scan.
Twintalker 4810 13.10.3 Scanning for a DCS code • • Press the -button 5 seven times : "SC" and "DCS 00" flashes on the display for the selected radio channel. Press the -button 9 or the -button 6 to start the DCS scan. Once there is a transmission on the channel, the DCS code (if used) will be detected and displayed. If you press the PTT button 11 while listening to a found DCS code, the PMR will go back in stand-by mode on the channel with the DCS code. 13.
Twintalker 4810 13.13 Key-Tone On/Off When a button is pressed, the unit will beep briefly. To set the key-tone. • Press ten times. ‘tO’ will be displayed. • Press to enable (ON) or disable the Key Tones (OF). • Press the PTT - button 11 to confirm your selection and return to the. standby mode. 13.14 Dual Channel Monitor function In stand-by, the PMR is set on one channel with CTCSS/DCS code. The PMR will only receive signals transmitted on that channel with the CTCSS/DCS code.
Twintalker 4810 13.16 Stopwatch function The Twintalker 4810 has a stopwatch that will count to 59'59''99. • • • • • Press the -button 4 and hold for three seconds , the stopwatch display will appear. Press the -button 9 to start the stopwatch. Press the -button 9 to stop the stopwatch. Press the -button 6 to reset the stopwatch to zero. Press the -button 4 and hold for three seconds to deactivate the stopwatch. 13.
Twintalker 4810 15 Troubleshooting No power Clean the battery contacts with a soft cloth. Replace the batteries. No transmission Make sure the PTT - button 11 is pressed completely before you speak. Monitor the channel activity and switch to another channel if the current is used. No reception Check the speaker volume. Make sure that you are in the reception range of the sender and change if necessary your location.
Twintalker 4810 Channel Frequency Chart: Channel 1 2 3 4 5 6 7 8 Frequency (MHz) 446,00625 446,01875 446,03125 446,04375 446,05625 446,06875 446,08125 446,09375 CTCSS Code Chart Code 0 1 2 3 4 5 6 7 8 9 Frequency (Hz) Disabled 67,0 71,9 74,4 77,0 79,7 82,5 85,4 88,5 91,5 Code 10 11 12 13 14 15 16 17 18 19 Freq. (Hz) 94,8 97,4 100,0 103,5 107,2 110,9 114,8 118,8 123,0 127,3 Code 20 21 22 23 24 25 26 27 28 29 Freq.
Twintalker 4810 19 Warranty 19.1 Warranty period The devices have a 36-month warranty period. The warranty period starts on the day the new unit is purchased. There is no warranty on standard or rechargeable batteries (AA/AAA type). Consumables or defects causing a negligible effect on operation or value of the equipment are not covered. The warranty has to be proven by presentation of the original or copy of the purchase receipt, on which the date of purchase and the unit-model are indicated. 19.
Twintalker 4810 Einleitung 77 2 Verwendungszweck 77 3 CE-Kennzeichnung 77 4 4.1 4.2 4.3 4.4 4.5 4.6 4.7 Sicherheitshinweise Allgemein Verbrennungsgefahr Verletzungsgefahr Explosionsgefahr Vergiftungsgefahr Vorschriften Hinweise 77 77 77 77 78 78 78 78 5 Reinigung und Wartung 79 6 Entsorgung des Geräts (Umweltschutz) 79 7 Betrieb eines Sprechfunkgeräts 79 8 Packungsinhalt 80 9 9.1 9.
Twintalker 4810 14 Anschluss des Kopfhörers 90 15 Problembeseitigung 91 16 Technische Eigenschaften 91 17 Kundendienstadresse und Support-Hotline 92 18 Konformitätserklärung und Hersteller 92 19 19.1 19.2 19.
Twintalker 4810 1 Einleitung Vielen Dank, dass Sie sich für der Twintalker 4810 entschieden haben. Er ist ein Sprechfunkgerät für große Entfernungen mit einer Reichweite bis zu 8 km. Er verursacht keine laufenden Betriebskosten außer den geringfügigen Kosten für das Aufladen der Akkus. Der TwinTalker verwendet 8 Kanäle. Der Twintalker ist geschützt gegen schräg fallendes Tropfwasser (15°) nach IPX2 Norm.
Twintalker 4810 4.4 Explosionsgefahr • • • Tauschen Sie die Batterien / Akkus niemals in einer potenziell explosionsgefährdeten Umgebung aus. Während des Einsetzens oder Entfernens der Batterien / Akkus kann es zu einem Funkenschlag kommen, der eine Explosion auslöst. Schalten Sie Ihr Sprechfunkgerät aus, wenn Sie sich in einer explosionsgefährdeten Umgebung befinden.
Twintalker 4810 5 Reinigung und Wartung • • • • • • 6 Reinigen Sie das Gerät mit einem weichen, leicht feuchten Tuch. Reinigen Sie schmutzige Anschlüsse und Kontakte mit einer kratzfreien Bürste. Reinigen Sie die Batteriekontakte und das Batteriefach mit einem trockenen flusenfreien Tuch. Sollte das Gerät nass werden, schalten Sie es aus, und entfernen Sie sofort die Batterien/Akkus. Trocknen Sie das Batteriefach mit einem weichen Tuch, um einen möglichen Wasserschaden zu minimieren.
Twintalker 4810 Drücken zwei oder mehr Benutzer die PTT-Taste 11 gleichzeitig, so wird der Empfänger nur das stärkste Signal empfangen. Alle anderen Signale werden unterdrückt. Daher sollten Sie nur ein Signal übertragen (die PTT-Taste 11 drücken), wenn der Kanal frei ist. Die Reichweite der Funkwellen wird stark durch Hindernisse wie beispielsweise Gebäude, Beton- und Metallstrukturen, Unebenheiten in der Landschaft, Bewaldungen, Bepflanzungen usw. beeinflusst.
Twintalker 4810 9.2 Einlegen der Batterien / Akkus C 1. 2. 3. 4. 5. Entfernen Sie den Gürtelhalter (siehe Kapitel „9.1 Anbringen/Entfernen des Gürtelhalters“). Heben Sie die Batteriefachabdeckung ab, indem Sie mit dem Fingernagel vorsichtig den Clip der Abdeckung (C) drücken. Legen Sie die Batterien / Akkus ein. Achten Sie dabei auf richtige Polarität der Batterien / Akkus. Schließen Sie das Batteriefach. Montieren Sie den Gürtelhalter wieder. 10 Laden der Akkus 1. 2. 3. 4.
Twintalker 4810 Schließen Sie die Batterien / Akkus nicht kurz und verbrennen Sie sie nicht. Entfernen Sie die Batterien / Akkus, wenn das Gerät längere Zeit nicht verwendet wird. Laden Sie im Ladegerät keine nicht aufladbaren Batterien wie Alkaline Batterien auf. Hierdurch können die Sprechfunkgeräte und das Ladegerät beschädigt werden. 11 Beschreibung Siehe Abbildung A auf der ausklappbaren Umschlagseite 1. 2. 3. 4. 5. 6. 7. 8. 9. 10. 11.
Twintalker 4810 13 Betrieb des Twintalker 4810 Die Displayabbildungen in dieser Bedienungsanleitung zeigen immer nur die Teile an, die für diese Funktion oder Einstellung wichtig sind. 13.1 Ein-/Ausschalten des Geräts Zum Einschalten: • Halten Sie die -Taste 10 3 Sekunden lang gedrückt. Sie hören einen Signalton und im LCD-Display erscheint der aktuelle Kanal. Jetzt befindet man sich im “ Stand By “ - Modus. Zum Ausschalten: • Halten Sie die -Taste 10 3 Sekunden lang gedrückt.
Twintalker 4810 13.3 Einstellen der Lautsprecherlautstärke • • Drücken Sie die -Taste 9 im Standby-Modus, um die Lautsprecherlautstärke zu erhöhen. Die Lautstärke wird angezeigt. Drücken Sie die -Taste 6 , um die Lautsprecherlautstärke zu verringern. 13.4 Empfangen eines Signals Das Gerät befindet sich immer im Empfangsmodus, wenn es eingeschaltet ist und nicht sendet. Damit andere Personen Ihre Übertragung empfangen können, müssen sie denselben Kanal und CTCSS-Code oder DCS-Code eingestellt haben.
Twintalker 4810 13.7 CTCSS (Continuous Tone Coded Squelch System) / DCS (Digital Coded Squelch) Lizenzfreien Sprechfunkgeräten, die wie der Twintalker 4810 auf dem Frequenzband 446 MHz senden, stehen 8 Funkkanäle zur Verfügung. Falls in Ihrer Nachbarschaft viele Sprechfunkgeräte im Einsatz sind, besteht die Möglichkeit, dass einige der Benutzer denselben Funkkanal verwenden. Um zu vermeiden, dass Sie Signale von anderen Benutzern empfangen, wurden Subkanäle integriert.
Twintalker 4810 Zum Deaktivieren von CTCSS oder DCS wählen Sie im Menü für CTCSS oder für DCS der Code „00“ aus. Nach Bestätigung wird im Menu „OF“ angezeigt. 13.8 Kanalüberwachung Mit der Überwachungsfunktion können Sie schwächere Signale im aktuellen Kanal suchen. • • Drücken Sie die -Taste 5 und die -Taste 6 gleichzeitig, um die Kanalüberwachung zu aktivieren. Drücken Sie die -Taste 5 , um die Überwachung zu beenden.
Twintalker 4810 13.10.1 Suchen nach einem aktiven Funkkanal • • Drücken Sie die -Taste 5 fünfmal: „SC“ und der aktuelle Kanal blinken im Display. Drücken Sie die -Taste 9 oder die -Taste 6 , um den Kanalsuchlauf zu starten. Sobald ein aktiver Kanal gefunden wird, hört der Suchlauf auf und Sie können die Übertragung abhören. Wenn die Übertragung auf dem gefundenen Kanal beendet wird, wird der Suchlauf automatisch fortgesetzt.
Twintalker 4810 13.10.3 Suchen nach einem DCS-Code • • Drücken Sie die -Taste 5 siebenmal: „SC“ und „DCS 00“ blinken im Display für den ausgewählten Funkkanal. Drücken Sie die -Taste 9 oder die -Taste 6 , um den DCS-Suchlauf zu starten. Sobald eine Übertragung auf dem Kanal stattfindet, wird der DCS-Code (falls verwendet) erkannt und angezeigt.
Twintalker 4810 Einstellen des Tastentons: • Drücken Sie zehnmal. „tO“ wird angezeigt. • Drücken Sie zu m Aktivieren (ON) oder zum Deaktivieren (OF) des Tastentons. • Drücken Sie die PTT-Taste 11 , um die Auswahl zu bestätigen und in den Standby-Modus zurückzukehren. 13.14 Zweikanalsuchlauf (DCM) Im Standby-Modus ist das Sprechfunkgerät auf einen Kanal mit CTCSS/DCS-Code eingestellt. Das Sprechfunkgerät empfängt nur Signale, die auf diesem Kanal und mit diesem CTCSS/DCS-Code übertragen werden.
Twintalker 4810 13.16 Stoppuhrfunktion Der Twintalker 4810 verfügt über eine Stoppuhr, die bis 59'59''99 zählt. • • • • • Halten Sie die -Taste 4 drei Sekunden lang gedrückt. Die Stoppuhranzeige erscheint im Display. Drücken Sie die -Taste 9 , um die Stoppuhr zu starten. Drücken Sie die -Taste 9 , um die Stoppuhr zu stoppen. Drücken Sie die -Taste 6 , um die Stoppuhr auf Null zurückzusetzen. Halten Sie die -Taste 4 drei Sekunden lang gedrückt, um die Stoppuhr zu deaktivieren. 13.
Twintalker 4810 15 Problembeseitigung Keine Funktion Reinigen Sie die Batteriekontakte mit einem weichen Tuch. Tauschen Sie die Batterien / Akkus aus. Keine Übertragung Stellen Sie sicher, dass die PTT-Taste 11 vollständig gedrückt ist, bevor Sie sprechen. Prüfen Sie die Kanalaktivität und wechseln Sie auf einen anderen, wenn der aktuelle Kanal in Benutzung ist. Kein Empfang Überprüfen Sie die Lautsprecherlautstärke.
Twintalker 4810 Channel Frequency Chart: Channel 1 2 3 4 5 6 7 8 Frequency (MHz) 446,00625 446,01875 446,03125 446,04375 446,05625 446,06875 446,08125 446,09375 CTCSS Code Chart Code 0 1 2 3 4 5 6 7 8 9 Frequency (Hz) Disabled 67,0 71,9 74,4 77,0 79,7 82,5 85,4 88,5 91,5 Code 10 11 12 13 14 15 16 17 18 19 Freq. (Hz) 94,8 97,4 100,0 103,5 107,2 110,9 114,8 118,8 123,0 127,3 Code 20 21 22 23 24 25 26 27 28 29 Freq.
Twintalker 4810 19 Garantie 19.1 Garantiezeit Die Geräte haben eine Garantiezeit von 36 Monaten. Die Garantiezeit beginnt an dem Tag, an dem das neue Gerät erworben wird. Die Garantie gilt nicht für normale Batterien oder wiederaufladbare Akkus (Typen AA/AAA). Verbrauchsmaterialien und Schäden, die unbedeutende Auswirkungen auf den Betrieb oder den Wert des Geräts haben, sind nicht abgedeckt.
MD17200287