Wake-Up Light 3 KH 2600 Wake-Up Light Operating instructions Lys til at vågne ved Betjeningsvejledning KOMPERNASS GMBH BURGSTRASSE 21 · D-44867 BOCHUM www.kompernass.com ID-Nr.
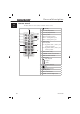
KH 2600 2 3 4 5 10 19 17 20 15 13 18 16 14 9 8 7 6 11 12 21 5 22 26 25 24 23
Index GB IE Introduction . . . . . . . . . . . . . .2 Handling and operation . . .14 Information for these operating instructions . . . . . . . . . . . . . . . . . . . . 2 Copyright . . . . . . . . . . . . . . . . . . . . . 2 Proper use. . . . . . . . . . . . . . . . . . . . . 2 Warnings . . . . . . . . . . . . . . . . . . . . . 3 Switching On and Off . . . . . . . . . . 14 Setting the time . . . . . . . . . . . . . . . . 14 Adjusting the volume . . . . . . . . . . . 15 Radio operation . . . . . . . . .
Introduction Introduction GB IE Information for these operating instructions These operating instructions are a component of the KH 2600 Wake-Up Light (henceforth designated as the device) and they supply you with important information about the intended use, safety and connection as well as operation of the device . The operating instructions must be constantly kept available close to the device. They are to be read and applied by everyone assigned to operate and troubleshoot the device.
Introduction Warnings GB IE In the current operating instructions the following warnings are used: DANGER A warning at this danger level indicates a threatening dangerous situation. If the dangerous situation is not avoided, it could result in death or serious injury. ► Follow the instructions given in this warning notice to avoid the risks of death or serious injury to people. WARNING A warning of this danger level signifies a possible dangerous situation.
Safety Safety GB IE In this chapter you receive important safety information regarding handling of the device. This device complies with the statutory safety regulations. Incorrect usage can, however, lead to personal injury and property damage. Basic Safety Instructions For safe handling of the device observe the following safety information: ■ Before use check the device for visible external damage. Do not put into operation a device that is damaged or has been dropped.
Safety ■ Do not operate the device close to open flames (e.g. candles). GB IE ■ Avoid direct sunlight. ■ Do not use the device when the room temperature is below 10° C or above 35° C. ■ If you have previously suffered from severe depression or are suffering from such at present, consult your doctor before you use the device. ■ Always pull on the power plug when disconnecting from the wall socket, never pull on the connection cable.
Safety Interaction with batteries GB IE WARNING Danger from improper use! For safe handling of batteries observe the following safety instructions: ► Do not throw batteries into a fire. ► Do not short circuit batteries. ► Do not attempt to recharge batteries. ► Regularly check the condition of the batteries. Leaking battery acid can cause permanent damage to the device. Special caution should be shown when handling damaged or leaking batteries. Danger from acid burns! Wear protective gloves.
General description General description GB IE Device summary For the following see the diagrams on the fold out sides.
General description Remote control GB IE All device functions can be carried out with the remote control.
General description Display GB IE The symbols in the display have the following meanings: Symbol Meaning Alarm 1 activated Alarm 2 activated Alarm tone Radio function Lamp / wake-up light function Nature sound 1 Nature sound 2 Nature sound 3 Nature sound 4 Stereo reception iPod/iPhone function Automatic switch off activated External audio device VHF reception Temperature Display Memory slot indicator Light intensity indicator Volume level indicator Snooze function activated KH 2600 9
Setting up and connecting Setting up and connecting GB IE Safety instructions WARNING Damage may occur to people and property when operating the device! Observe the following safety information to avoid any risks: ► Packaging material should not be used as a play thing. There is a risk of suffocation! ► To avoid risks to persons and property, pay attention to the requirements for the set-up location and the electrical connections.
Setting up and connecting Disposal of the packaging GB IE The packaging protects the device from transport damage. The packaging materials are chosen from an environmentally friendly and disposal technological point of view and are therefore recyclable. The recirculation of packaging into the material circuit saves on raw material and reduces generated waste. Dispose of packaging material that is no longer needed according to the regionally established regulations.
Setting up and connecting Electrical connections GB IE ■ Before connecting the device, compare the connection data (voltage and frequency) on the rating plate of the device with that of your power supply network. This data must tally in order to avoid damage to the device. ■ Make sure that the device's connection cable is not damaged and is not laying over hot surfaces and/or sharp edges. ■ Make sure that the connection cable is not tightly stretched or bent.
Setting up and connecting Activating the remote control battery GB IE The remote control battery is already inserted when delivered. ¡ Activate the battery by removing the isolation strip. Changing the remote control battery ¡ Press, with the fingernail, the recess (A) to the right and, at the same time, pull the battery compartment out. ¡ Insert a 3 V battery type CR 2032 in the battery compartment. The side with the marking "+" points upwards.
Handling and operation Handling and operation GB IE In this chapter you receive important information for the handling and operation of the device. Switching On and Off ¡ Press the /ALARM OFF button 20 or the button on the remote control to switch the device on. The display 4 is activated. ¡ Press the /ALARM OFF button 20 or the button on the remote control to switch the device off. In the display 4 is shown the time of day, the temperature and a programmed alarm time (Standby mode).
Handling and operation Adjusting the volume GB IE Prerequisite: The device is switched on. ¡ Press the button 6 or button 7 on the device or on the remote control to adjust the volume. The set volume level is shown below and to the right in the display 4 . NOTICE ► The set volume applies for all functions. ► The volume you have selected will also be saved automatically as the volume for the wake function. Radio operation NOTICE ► For a good radio reception the wire antenna 24 must be completely uncoiled.
Handling and operation Saving stations manually GB IE The device has 20 memory slots available for station frequencies. To save a station frequency proceed as follows: ¡ Press the /ALARM OFF button 20 or the to switch the device on. button on the remote control ¡ Press the FUNC. button 12 several times to select the radio function. ¡ Select a station with the ►►I button 11 or the I◄◄ button 13 . button 17 or the ¡ Press the MEMORY/TIME MEM button on the remote control.
Handling and operation Playback music from an iPod/iPhone GB IE With the station 5 you can use the device as a speaker for your iPod/iPhone. If you insert the iPod/iPhone in the station it will, in addition, be automatically charged. The device is equipped with 5 adapters for the station thus even the most current iPod/iPhone models will, in any case, fit into the station. The adapters, provided with numbers, are on the rear panel.
Handling and operation Inserting / removing the adapter in / from the station GB IE Select from the table the required adapter and place it in the station dock as follows: Groove ¡ Lay the front edge of the Adapter adapter on the front edge of the dock. ¡ Press the rear edge downwards until you hear a light "click". Station To remove the adapter from the dock proceed as follows: ¡ Grip with the thumbnail in the groove and lift the adapter out of the dock.
Handling and operation Playback of external audio devices GB IE ¡ Connect an external audio device, for example, an MP3 player to the 3.5 mm jackplug socket AUX IN 22 on the rear panel of the device. ¡ Press the FUNC. button 12 several times to select the AUX function. ¡ Start playback of the external audio device and set the volume. NOTICE ► Follow the operating instructions for the external audio device. Playback of nature sounds ¡ Press the /ALARM OFF button 20 or the to switch the device on.
Handling and operation Reading lamp GB IE You can use the device as a reading lamp. ¡ Press the button 19 on the device or on the remote control to switch the lamp on and off. ¡ Press the / button to set the brightness. The symbol light intensity (00 to 20) are shown in the display 4 .
Handling and operation Alarm Function GB IE When setting the wake time you configure the light intensity, the wake sound and the volume. In the 30 minutes before the set wake time the light intensity increases slowly to the selected level. When the set wake time is reached the sound level increases, within 90 seconds, slowly to the selected volume. Programming alarm wake times The device has two alarms available. All settings for both alarms can be carried out independently from each other.
Handling and operation Setting the wake tone GB IE ¡ Press the ►►I button 11 or the I◄◄ button 13 repeatedly to select a wake tone: → → → → → → → delete. (For an explanation of the symbols see chapter Display.) button to activate, in addition, the ¡ Press the wake-up light function. NOTICE ► Set the volume that you want to be woken with as described in the chapter Setting the volume. ► Set the light intensity that you want to be woken with as described in the chapter Reading lamp.
Handling and operation Switching the alarm off GB IE Snooze function ("SNOOZE" function) ¡ Whilst the alarm is sounding press the SNOOZE button 8 to temporarily switch off the alarm. In the display 4 appears the notice . After 9 minutes the alarm sounds again. (In the diagram on the right both alarm 1 and alarm 2 are programmed. The alarm 2 goes off and the symbol blinks.) Switching the alarm off When the programmed time is reached the alarm continues to sound until it is switched off.
Handling and operation Deleting wake times GB IE ¡ Press the ALARM1/DOWN button 18 /ALARM2/UP button 16 on the device or the AL1/AL 2 button on the remote control three times until the alarm symbol in the display 4 blinks. ¡ Press the ►►I button 11 or the I◄◄ button 13 until no more wake tones appear in the display 4 . ¡ Press the ALARM1/DOWN button 18 /ALARM2/UP button 16 on the device or the AL1/AL2 button on the remote control again or wait approx. 10 seconds. There are no more wake times programmed.
Cleaning/Storage/Disposal Cleaning GB IE Safety instructions DANGER Risk of fatal electrocution! ► Remove the plug from the mains power socket before cleaning. IMPORTANT Damage to the device! ► Make sure when you are cleaning the device that no moisture gets inside in order to avoid irreparable damage to it. Cleaning the housing ■ Clean the surfaces of the device with a soft, dry cloth.
Troubleshooting Troubleshooting GB IE In this chapter you will receive important information for malfunction localization and remedies. Observe the instructions in order to avoid danger and damage. Safety instructions WARNING Observe the following safety information to avoid danger and property damage: ► Repairs to electronic devices may only be carried out by specialists who have been trained by the manufacturer.
Troubleshooting/Appendix Defect The alarm does not go off. Possible cause Solution The alarm time is incorrectly programmed. Check the programmed wake time. The alarm is not programmed. Programme the alarm correctly. GB IE The device is not in standby Switch the device to the standby mode. mode before you go to sleep. iPod/iPhone does not charge. The mains power plug is not plugged in. Insert the plug into the mains power socket.
Appendix Technical data GB IE Operational voltage 220-240 V / 50 Hz Backup batteries 2 x 1.5 V Typ “AA” (supplied) Remote control Battery: 3 V, CR 2032 Power consumption Operation with light 50 W Operation without light 10 W approx. 1.7 W Standby Speaker power output: Headphone Output Voltage max. 120 mV Radio frequency range (VHF) 87.
Appendix Warranty GB IE You receive a 3-year warranty for this device as of the purchase date. This device has been manufactured with care and meticulously examined before delivery. Please retain your receipt as proof of purchase. In the case of a warranty claim, please get in touch by telephone with our service department. Only in this way can a post-free dispatch for your goods be assured.
Indholdsfortegnelse Introduktion . . . . . . . . . . . . .32 Betjening og funktion. . . . . .44 Informationer til denne betjeningsvejledning . . . . . . . . . . . . 32 Ophavsret . . . . . . . . . . . . . . . . . . . . 32 Anvendelsesområde . . . . . . . . . . . . 32 Advarselsinfo . . . . . . . . . . . . . . . . . 33 Tænd/sluk. . . . . . . . . . . . . . . . . . . . 44 Indstilling af klokkeslæt . . . . . . . . . . 44 Indstilling af lydstyrke . . . . . . . . . . . 45 Radiofunktion . . . . . . . . . . . . . .
Introduktion Introduktion Informationer til denne betjeningsvejledning Denne betjeningsvejledning er del af clockradioen KH 2600 og giver vigtige informationer om anvendelsesområdet, sikkerheden, tilslutningen samt betjeningen af den. DK Betjeningsvejledningen skal altid opbevares i nærheden af clockradioen. Den skal læses og anvendes af de personer, som skal installere, betjene og reparere fejl på clockradioen.
Introduktion Advarselsinfo I denne betjeningsvejledning anvendes følgende advarselsinformationer: FARE! DK Advarselsinfo på dette faretrin markerer en truende farlig situation. Hvis den farlige situation ikke undgås, kan den medføre alvorlige eller livsfarlige kvæstelser. ► Overhold anvisningerne i denne advarselsinfo, så livsfarlige eller alvorlige kvæstelser af personer undgås. ADVARSEL Advarselsinfo på dette faretrin markerer en mulig farlig situation.
Sikkerhed Sikkerhed I dette kapitel får du vigtige sikkerhedsanvisninger til brug af clockradioen. Denne clockradio overholder de foreskrevne sikkerhedsbestemmelser. Forkert anvendelse kan føre til personskader og materielle skader. DK Grundlæggende sikkerhedsanvisninger Overhold de følgende sikkerhedsanvisninger for sikker brug af clockradioen: ■ Kontrollér clockradioen for udvendige, synlige skader før brug. Tænd ikke for clockradioen, hvis den er beskadiget eller har været faldet ned.
Sikkerhed ■ Clockradioen må ikke anvendes i nærheden af åben ild (f.eks. stearinlys). ■ Undgå direkte påvirkning fra solens stråler. ■ Brug ikke clockradioen ved en rumtemperatur under 10° C eller over 35° C. ■ Hvis du har haft en alvorlig depression eller lider af depression i øjeblikket, skal du konsultere din læge, før du bruger clockradioen. DK ■ Træk altid ledningen ud af stikket ved at holde på stikkontakten og ikke ved at trække i ledningen.
Sikkerhed Anvendelse af batterier ADVARSEL Fare på grund af forkert anvendelse! DK Overhold følgende sikkerhedsanvisninger vedrørende sikker brug af batterier: ► Smid aldrig batterier ind i ild. ► Kortslut aldrig batterierne. ► Prøv ikke på at genoplade batterierne. ► Kontrollér regelmæssigt batterierne. Hvis der løber batterisyre ud, kan det forårsage vedvarende skader på clockradioen. Vær særligt opmærksom ved omgang med beskadigede eller udløbne batterier. Ætsningsfare! Bær beskyttelseshandsker.
Almindelige beskrivelse Almindelige beskrivelse Oversigt over fjernbetjeningen Se billederne på klap-ud-siden.
Almindelige beskrivelse Fjernbetjening Alle clockradioens funktioner kan udføres med fjernbetjeningen.
Almindelige beskrivelse Display Symbolerne på displayet har følgende betydning: Symbol Betydning DK Alarm 1 aktiveret Alarm 2 aktiveret Alarmtone Radiofunktion Lampe/wake-up light-funktion Naturlyd 1 Naturlyd 2 Naturlyd 3 Naturlyd 4 Stereomodtagelse iPod/iPhone-funktion Automatisk afbrydelse aktiveret Eksternt audioapparat FM-modtagelse Temperaturvisning Visning af hukommelsesplads Visning lysintensitet Visning lydstyrkeniveau Slumrefunktion aktiveret KH 2600 39
Opstilling og tilslutning Opstilling og tilslutning Sikkerhedsanvisninger DK ADVARSEL Ved opstart af clockradioen er der fare for personskader og materielle skader! Overhold følgende sikkerhedsanvisninger for at undgå farerne: ► Emballeringsmaterialer må ikke bruges til leg. Der er fare for kvælning. ► Overhold info om kravene til opstillingsstedet samt om eltilslutning af clockradioen, så personskader og materielle skader undgås.
Opstilling og tilslutning Bortskaffelse af emballagen Emballagen beskytter clockradioen mod transportskader. Emballagematerialerne er udvalgt efter miljøforligelige og bortskaffelsestekniske synspunkter og kan derfor genbruges. DK Aflevering af emballagen til materialerecirkulation sparer råstoffer og reducerer affaldsmængden. Bortskaf emballeringsmaterialerne, som ikke skal bruges mere, i henhold til de gældende lokale forskrifter.
Opstilling og tilslutning Eltilslutning ■ Sammenlign tilslutningsdataene (spænding og frekvens) på typeskiltet med strømnettet, før clockradioen sluttes til. Disse data skal stemme overens, så clockradioen ikke beskadiges. DK ■ Kontrollér, at clockradioens tilslutningsledning er ubeskadiget og ikke lægges over varme flader og/eller skarpe kanter. ■ Sørg for, at tilslutningsledningen ikke strammes eller knækkes. ■ Lad ikke tilslutningsledningen hænge ud over hjørner (snubletrådseffekt).
Opstilling og tilslutning Aktivering af batteri til fjernbetjeningen Batteriet til fjernbetjeningen er allerede sat i ved udleveringen. ¡ Aktivér batteriet ved at fjerne isoleringsstrimlen. DK Skift af batteri til fjernbetjeningen ¡ Tryk kærven (A) til højre med en fingernegl, og tag samtidig batterirummet ud. ¡ Sæt et 3 V batteri af typen CR 2032 i batterirummet. Siden med markeringen "+" skal vende opad. ¡ Skub batterirummet helt ind i fjernbetjeningen igen.
Betjening og funktion Betjening og funktion I dette kapitel får du vigtige informationer om clockradioens betjening og funktion. Tænd/sluk DK ¡ Tryk på /ALARM OFF-knappen 20 eller -knappen på fjernbetjeningen for at tænde for clockradioen. Displayet 4 aktiveres. ¡ Tryk på /ALARM OFF-knappen 20 eller -knappen på fjernbetjeningen for at slukke for clockradioen. I displayet 4 vises klokkeslættet, temperaturen og en programmeret alarm (standbymodus).
Betjening og funktion Indstilling af lydstyrke Forudsætning: Clockradioen er tændt. ¡ Tryk på -knappen 6 eller -knappen 7 på clockradioen eller på fjernbetjeningen for at indstille lydstyrken. Den indstillede lydstyrke vises nederst til højre i displayet 4 . DK BEMÆRK ► Den indstillede lydstyrke gælder for alle funktioner. ► Den valgte lydstyrke gemmes automatisk som lydstyrke for vækkefunktionen. Radiofunktion BEMÆRK ► Ledningsantennen skal vikles helt af, for at radiomodtagelsen 24 er god.
Betjening og funktion Manuel lagring af kanal Clockradioen har 20 hukommelsespladser til rådighed til sendefrekvenser. Gå frem på følgende måde for at gemme en sendefrekvens: ¡ Tryk på /ALARM OFF-knappen 20 eller for at tænde for clockradioen. DK -knappen på fjernbetjeningen ¡ Tryk flere gange på FUNC.-knappen 12 for at vælge funktionen radio. ¡ Vælg en kanal med ►►I -knappen 11 eller I◄◄ -knappen 13 . - 17 knappen eller ¡ Tryk på MEMORY/TIME MEM-knappen på fjernbetjeningen.
Betjening og funktion Afspilning af musik fra iPod/iPhone Med stationen 5 kan du bruge clockradioen som højttaler til din iPod/iPhone. Hvis du sætter iPoden/iPhonen ind i stationen, oplades den endvidere automatisk. DK Clockradioen er udstyret med 5 adaptere til stationen, så de almindeligste iPod/ iPhone-modeller passer ind i stationen. Adapterne er forsynet med numre på bagsiden. I tabellen kan du finde en opstilling over, hvilken adapter, der skal anvendes til modellen.
Betjening og funktion Indsætning/udtagning af adapteren i/af stationen Vælg den rigtige adapter fra tabellen, og sæt den ind i stationens fordybning på følgende måde: Åbning ¡ Sæt adapterens forreste kant Adapter på fordybningens forreste kant. DK ¡ Tryk den bageste kant ned, indtil du hører et let "klik". Station Gå frem på følgende måde for at tage adapteren ud af fordybningen: ¡ Sæt tommelfingerneglen ind i åbningen, og løft adapteren ud af fordybningen.
Betjening og funktion Afspilning fra eksterne audioapparater ¡ Slut et eksternt audioapparat som f.eks. en MP3-player til 3,5 mm jackstikket AUX IN 22 på bagsiden af clockradioen. ¡ Tryk flere gange på FUNC.-knappen 12 for at vælge funktionen AUX . DK ¡ Start afspilningen på det eksterne audioapparat, og indstil lydstyrken. BEMÆRK ► Overhold betjeningsvejledningen til det eksterne audioapparat. Afspilning af naturlyde ¡ Tryk på /ALARM OFF-knappen 20 eller for at tænde for clockradioen.
Betjening og funktion Læselampe Du kan bruge clockradioen som læselampe. ¡ Tryk på -knappen 19 på clockradioen eller på fjernbetjeningen for at tænde/slukke for lampen. DK ¡ Tryk på / -knappen for at indstille lysstyrken. Symbolet lysintensiteten (00 til 20) vises i displayet 4 . og BEMÆRK ► Hvis du har indstillet lysintensiteten på 00, kan du ganske vist indstille en højere værdi igen, men lampen er slukket og skal tændes igen på -knappen 19 på clockradioen eller på fjernbetjeningen.
Betjening og funktion Alarmfunktion Ved indstilling af vækketiden fastsætter du lysintensiteten, vækkelyden og lydstyrken. 30 minutter før den indstillede vækketid stiger lysintensiteten langsomt til det valgte niveau. Når den indstilled vækketid er nået, stiger støjniveauet langsomt til den valgte lydstyrke i løbet af 90 sekunder. DK Programmering af vækketider Clockradioen har to vækkemuligheder. Alle indstillinger kan foretages uafhængigt af hinanden for de to vækkemuligheder.
Betjening og funktion Indstilling af vækketone ¡ Tryk på ►►I-knappen 11 eller I◄◄-knappen 13 flere gange for at vælge en vækketone: → → → → → → → slet. (Se kapitlet Display vedrørende forklaring af symbolerne.) DK -knappen for at aktivere wake-up ¡ Tryk på light-funktionen. BEMÆRK ► Indstil lydstyrken, du vil vækkes med, som beskrevet i kapitlet Indstilling af lydstyrke. ► Indstil lysintensiteten, du vil vækkes med, som beskrevet i kapitlet Læselampe.
Betjening og funktion Deaktivering af vækkeur Slumrefunktion ("SNOOZE"-funktion) ¡ Tryk på SNOOZE-knappen 8 , mens alarmen lyder, for at deaktivere alarmen forbigående. I displayet 4 vises . Efter 9 minutter starter alarmen igen. DK (På billedet til højre er både alarm 1 og 2 programmeret. Alarm 2 går i gang, og symbolet blinker.) Deaktivering af alarm Når den programmerede tid er nået, lyder alarmen, indtil den slukkes. ¡ Tryk på /ALARM OFF-knappen 20 eller for at slukke for alarmen.
Betjening og funktion Sletning af vækketider ¡ Tryk på ALARM1/DOWN-knappen 18 /ALARM2/UP-knappen 16 på clockradioen eller på AL1/AL 2-knappen på fjernbetjeningen tre gange, indtil alarmsymbolet / blinker på displayet 4 . DK ¡ Tryk på ►►I -knappen 11 eller I◄◄ -knappen 13 , indtil der ikke vises nogen vækketone mere i displayet 4 . ¡ Tryk på ALARM1/DOWN-knappen 18 /ALARM2/UP-knappen 16 på clockradioen eller på AL1/AL2-knappen på fjernbetjeningen eller vent ca. 10 sekunder.
Rengøring/Opbevaring/Bortskaffelse Rengøring Sikkerhedsanvisninger DK FARE! Livsfare på grund af elektrisk strøm ► Tag stikket ud af stikkontakten, før du begynder rengøringen. OBS Skader på clockradioen! ► Sørg for, at der ikke trænger fugt ind i clockradioen ved rengøring, så irreparable skader undgås. Rengøring af kabinettet ■ Rengør clockradioens overflader med en blød, tør klud.
Afhjælpning af fejl Afhjælpning af fejl I dette kapitel får du vigtige anvisninger til fejlfinding og fejlafhjælpning. Overhold anvisningerne, så farer og skader undgås. DK Sikkerhedsanvisninger ADVARSEL Overhold følgende sikkerhedsanvisninger, så farer og materielle skader undgås: ► Reparationer på elapparater må kun udføres af autoriserede reparatører, som er oplært af producenten. Der kan opstå alvorlige farer for brugeren og skader på clockradioen, hvis reparationerne udføres forkert.
Afhjælpning af fejl/Tillæg BEMÆRK ► Hvis problemet ikke kan løses med de angivne forslag, bedes du henvende dig til kundeservice. DK Tillæg Info til EF-overensstemmelseserklæringen Denne clockradio er i overensstemmelse med de grundlæggende krav og andre relevante forskrifter i det europæiske direktiv for elektromagnetisk kompatibilitet 2004/108/EC, lavspændingsdirektivet 2006/95/EC samt økodesign-direktivet 2009/125/EC (forordning 1275/2008 tillæg II, nr.1).
Tillæg Tekniske data DK Driftsspænding 220-240 V / 50 Hz Backup-batterier 2 x 1,5 V type AA (medfølger ved køb) Batteri fjernbetjening 3 V, CR 2032 Strømforbrug Drift med lys 50 W Drift uden lys 10 W ca. 1,7 W Standby Udgangseffekt højttaler Hovedtelefon-udgangsspænding Frekvensområde radio (FM) maks. 120mV 87,5 - 108 MHz Lysmidler E27 maks. 42 W Funktionstemperatur +10 - +35 °C 5 - 90 % 29 x 17,5 x 19,5 cm cm ca.
Tillæg Garanti På denne clockradio får du 3 års garanti fra købsdatoen. Clockradioen er produceret omhyggeligt og inden levering afprøvet samvittighedsfuldt. Opbevar kassebonen som bevis for købet. Kontakt venligst din serviceafdeling telefonisk, hvis du ønsker at gøre brug af garantien. På denne måde garanteres det, at tilsendelsen af varen er gratis. DK BEMÆRK ► Garantiydelsen gælder kun for materiale- eller fabrikationsfejl, men ikke for transportskader, sliddele eller skader på skrøbelige dele som f.