
User Manual

6
GB
Unpacking Your Tool
• Carefully unpack and inspect your tool. Fully familiarise yourself with all
its features and functions
• Ensure that all parts of the tool are present and in good condition. If
any parts are missing or damaged, have such parts replaced before
attempting to use this tool
Operating Instructions
WARNING: Never fit any attachment with a maximum speed lower than the
no load speed of the machine.
Fitting a Bit
1. Pull the Sleeve (2) forward and insert the bit into the Bit Holder (1)
2. Release the sleeve
3. Pull on the bit to check that it is securely fitted. If the bit is not secure,
repeat the above procedure
Direction Control
• The direction of rotation can be set using the Reverse Switch (3)
• To make the driver rotate clockwise, push the reverse switch to the left
• To make the driver rotate anti-clockwise, push the reverse switch to
the right
• When the reverse switch is in the central position, the driver is locked
WARNING: Do not attempt to move the reverse switch when the driver is
running.
Switching On
• To start the driver, squeeze the Trigger Switch (6). The LED Guide Light (7)
will illuminate automatically
NOTE: The speed of the driver is controlled by the movement of the trigger,
the further the trigger is depressed, the faster the driver will run.
Checking the Battery Level
• To check the level of charge in the battery, press the Battery Charge
Level Indicator Button (5) in the base of the Battery Pack (4)
• There are three indicator lights: red, amber and green
• When all lights are illuminated, the battery is fully charged. When only the
red light is illuminated, the battery charge level is low
• The battery can be placed on charge at any time as the intelligent
charger will charge from any level of existing charge in the battery
Charging the Battery
Note: Before charging check the contacts of the battery and charger battery
socket are clean and in good condition
1. Depress the clip at the back of the Battery Pack (9) to remove the
battery from the tool
2. Connect the Charger (11) to the mains power. The green light on the
charger will illuminate
3. Insert the battery into charger so it is fully recessed into the charger
battery socket . This ensures the battery and charger contacts are
connected correctly. The red light will flash evenly, indicating the
battery is receiving charge
4. If both the red and green lights illuminate, the battery is not fully
inserted in the charger. Adjust position of battery until it is fully inserted
and red light begins to flash evenly
5. When the battery has reached 90% charge, the green LED will flash. At
100% charge the green LED will display solid green
6. After charging, allow 15 minutes for the battery to cool before use
7. Disconnect the charger from the power supply and store in a clean,
dry environment out of the reach of children
8. Do not leave batteries on charge for extended periods and do not store
batteries on charge
WARNING
• Do not store battery pack for long periods discharged. Always fully
charge the battery pack before long term storage
• There are 3 battery cell protection features built into this product that
protect the battery from being fully discharged, over-charged and from
excessive current demands from the tool
IMPORTANT: Failure to follow the correct charging procedure may result in
permanent damage to the batteries
Maintenance
Cleaning
• Keep your machine clean at all times. Dirt and dust will cause internal
parts to wear quickly, and shorten the machine’s service life. Clean the
body of your machine with a soft brush or dry cloth. If available, use
clean, dry, compressed air to blow through the ventilation holes
Storage
• Store this tool and accessories in a dry, secure place out of the reach
of children
Disposal
• Do not dispose of power tools, or other waste electrical and electronic
equipment, with household waste
• Contact your local waste disposal authority for information on the correct
way to dispose of tools
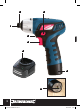
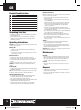
1 Bit Holder
2 Sleeve
3 Reverse Switch
4 Battery Pack
5 Battery Charge Level Indicator Button
6 Trigger Switch
7 LED Guide Light
8 Charger
Product Familiarisation
527958_Z1MANPRO1.indd 6 02/01/2014 17:25