
Owner manual


6
GB
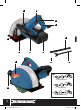
Unpacking Your Tool
• Carefully unpack and inspect your tool. Fully familiarise yourself with all
its features and functions
• Ensure that all parts of the tool are present and in good condition. If
any parts are missing or damaged, have such parts replaced before
attempting to use this tool
Preparation
WARNING: Always disconnect from power supply before carrying out any
adjustments
Dust extraction
• Connect a dust bag or vacuum system to the Dust Extraction Port (10) for
efficient dust collection and a cleaner, safer working environment
Setting the cutting depth
The depth of cut can be adjusted from 10mm to 42mm
1. Loosen the Depth Lock (8) and move the Baseplate (7) along the guide
to the depth required
2. Tighten the depth lock firmly
Setting the cutting width
The following cutting widths can be set: 14, 19 and 29mm
1. Use the 6mm Hex Key (11) supplied to undo the Blade Guard (9)
retaining screws. Remove and set aside
2. Loosen the Depth Lock (8), then secure the Baseplate (7) at minimum
depth
3. Depress the Spindle Lock (1) and use the Pin Spanner (12) supplied to
loosen and remove the outer flange. Note: reverse thread
4. Carefully remove the outer blade and spacers
5. Arrange the spacers and outer blade on the spindle as necessary to
achieve the required cutting width. See Fig A
Note: Replace the blade in the correct direction of rotation, with the printed
side facing away from the machine and the direction arrows matching
those on the blade guard
6. Refit the outer flange and secure with the pin spanner
7. Refit the blade guard
Operating Instructions
Wear all necessary safety equipment required to use this tool
Set up
1. Mark a reference line on the wall at the centre line of the required chase
2. Using a suitable detector, check there are no hidden cables or pipes
in the cutting area
Cutting
1. Hold the unit firmly with both hands - one on the Rear Handle (4), and
one on the Front Handle (6)
2. Start the motor by depressing the safety Lock-Off Button (3) and
squeezing the Trigger Switch (2)
3. Allow the motor to reach full speed, then apply the wall chaser at the
top end of the chase required
4. Press firmly so the baseplate is flat against the wall, and move the tool
slowly down the wall, following the marked reference line
5. If the discs become too hot, cool them by taking the tool off load and running
it freely for approximately 30 seconds. DO NOT use water or cooling fluid
6. Remove the chaser from the wall and release the trigger to switch off
the machine
7. Allow the cutting discs to stop completely before putting the unit down
8. To form the chase, clear the block between the two cut lines with the
Chisel (13) supplied
Maintenance
WARNING: Always disconnect from the power supply before carrying out
any maintenance/cleaning
Replacing the cutting discs
Regularly check the condition of the cutting discs and replace as necessary.
Cracked or bent blades must be replaced immediately
1. Remove the Blade Guard (9) and set the Baseplate (7) at minimum depth
2. Use the Pin Spanner (12) to remove the outer flange
Note: Reverse thread
3. Remove the worn cutting blades and install the new blades,
positioning the spacers as necessary to achieve the cutting width
required
Note: Never install the blades without the inner flange in position first
Note: Always install the blades in the correct direction of rotation, with
the printed side facing away from the machine and the direction arrows
matching those on the blade guard
4. Refit the outer flange and secure with the pin spanner
5. Refit the blade guard
Cleaning
Keep your tool clean at all times. Dirt and dust will cause internal parts
to wear quickly, and shorten the machine’s service life. Clean the body of
your machine with a soft brush, or dry cloth. If available, use clean, dry,
compressed air to blow through the ventilation holes
Brushes
• Over time the carbon brushes inside the motor may become worn
• Excessively worn brushes may cause loss of power, intermittent failure,
or visible sparking
• Regularly check the condition of the brushes and replace if worn
• Always replace both brushes at the same time. A spare pair of brushes is
supplied
• To replace the brushes, remove the Motor Cover (5) and carbon brush holders
• Insert new carbon brushes and refit the brush holders and motor cover
• After installing new carbon brushes run the machine at no load for 15
minutes
Storage
• Store this tool carefully in a secure, dry place out of the reach of children
Disposal
• Do not dispose of power tools, or other waste electrical and electronic
equipment, with household waste
• Contact your local waste disposal authority for information on the correct
way to dispose of tools
817089_Z1MANPRO1.indd 6 16/11/2012 14:24