3 Year Guarantee *Register online within 30 days. Terms & Conditions apply 3 años de garantía *Registre su producto online durante los primeros 30 días. Se aplican términos y condiciones Garantie de 3 ans *Enregistrez votre produit en ligne dans les 30 jours. Sous réserve des termes et conditions appliquées 3 anni di garanzia *Registrare il vostro prodotto on-line entro 30 giorni. Termini e condizioni si applicano 3 Jahre Garantie *Innerhalb von 30 Tagen online registrieren.
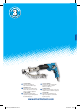
ILV 267412 ERLIN S E DIY RA NGE W 0 8 3 r wdrive e r c S d e Auto-Fe Auto-Feed Screwdriver 380W Visseuse automatique 380 W Schnellbauschrauber, 380 W Atornillador autoalimentado 380 W Avvitatore auto-alimentato 380 W Schroefautomaat, 380 W www.silverlinetools.com 267412_Z1MANPRO1.
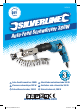
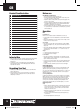
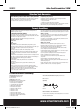
1 18 9 19 8 20 2 3 4 5 Fig A 6 7 10 11 12 14 15 13 16 17 2 267412_Z1MANPRO1.
ILV ERLIN S E DIY RA NGE ® W 0 8 3 r e crewdriv S d e e F o Aut English................... 4 Français................. 10 Deutsch.................. 16 Español.................. 22 Italiano................... 28 Nederlands............. 34 www.silverlinetools.com 267412_Z1MANPRO1.
GB Description of Symbols The rating plate on your tool may show symbols. These represent important information about the product or instructions on its use. Wear hearing protection Wear eye protection Wear breathing protection Wear head protection Wear hand protection Read instruction manual Double insulated for additional protection. Conforms to relevant legislation and safety standards Environmental Protection Waste electrical products should not be disposed of with household waste.
267412 f) If operating a power tool in a damp location is unavoidable, use a residual current device (RCD) protected supply. Use of an RCD reduces the risk of electric shock WARNING: When used in Australia or New Zealand, it is recommended that this tool is ALWAYS supplied via Residual Current Device (RCD) with a rated residual current of 30mA or less. Personal Safety a) Stay alert, watch what you are doing and use common sense when operating a power tool.
GB Product Familiarisation Before use Assembling for autofeed use 1 Autofeed Connector 2 Screw Length Knob 3 Screw Length Notches 4 Screwdriver Bit Eye 5 Loading Point 6 Guide 7 Stopper Base 8 Screw Belt Feeder 9 Depth Adjuster Operation 10 Chuck Drill 11 Autofeed Mechanism Mounting 12 Forward/Reverse Selector 13 Speed Adjuster 14 Trigger 15 Lock On Button 16 Handle 17 Chuck Key 18 Screw Belt Feeder 19 Collated Screw Belt 20 Collated Screwdriver Bit Intended Use •
Auto-Feed Screwdriver 380W 267412 5. Set the Speed Control Adjuster (13) to the minimum setting 6. Ensure the Forward/Reverse Selector (12) is in the forward position to insert screws into the workpiece Operating 1. Place the Stopper Base (7) over the location for the first screw 90° to the surface 2. Hold the drill by the Handle (16) and the Autofeed Connector (1) 3. Squeeze the Trigger (14) to operate.
GB Troubleshooting Problem Possible cause Solution Screw is driven too deep into the workpiece Depth Adjuster (9) incorrectly set Move the Depth Adjuster up to reduce the depth Screw head is not driven fully into the workpiece Screw belt isn’t feeding correctly Depth Adjuster incorrectly set Move the Depth Adjuster down to increase screw depth Incorrect operation Plunge the mechanism fully so it is stopped by the Depth Adjuster Belt damaged Move past damaged part of belt Incorrectly fitted bel
Auto-Feed Screwdriver 380W 267412 Silverline Tools Guarantee This Silverline product comes with a 3 year guarantee Registering your purchase Register this product at www.silverlinetools.com within 30 days of purchase in order to qualify for the 3 year guarantee. Guarantee period begins according to the date of purchase on your sales receipt. Registration is made at silverlinetools.com by selecting the Guarantee Registration button.
F Description des symboles La plaque signalétique figurant sur votre outil peut présenter des symboles. Ces symboles constituent des informations importantes relatives au produit ou des instructions concernant son utilisation.
Visseuse automatique 380 W 267412 b) Eviter le contact corporel avec les surfaces mises à la terre telles que tuyaux, radiateurs, cuisinières et réfrigérateurs. Le risque de décharge électrique est plus important si le corps est mis à la terre. c) Ne pas exposer l’appareil électrique à la pluie ou à l’humidité. L’infiltration d’eau dans un appareil électrique accroît le risque de décharge électrique. d) Ne pas maltraiter le cordon électrique.
F • N’appliquez pas de pression sur l’appareil car cela réduirait sa durée de vie utile. • Les accessoires (mèches, etc.) pourront avoir atteint des températures élevées lors du perçage, laissez-les refroidir avant de les manipuler. • Ne retirez jamais la sciure ou la poussière avec les mains à proximité de la mèche. • Si l’on vous interrompt pendant le perçage, terminez l’opération et éteignez l’appareil avant de vous concentrer sur l’évènement.
267412 Réglage de la profondeur de vissage Pour régler la profondeur de vissage, desserrez le réglage de la profondeur (9), déplacez-le sur la position requise et resserrez. Ce réglage influe sur le retour de la partie interne du mécanisme de vissage automatique qui détermine la profondeur de vissage : Plus le retour est important, plus la profondeur est grande. Gardez généralement le réglage au milieu et déplacez-le complètement vers le haut ou vers le bas pour un réglage entre -5 et +5 mm.
F En cas de problème Problème Cause Solution Vissage trop profond Réglage de la profondeur (9) mal ajusté Déplacez le cran de réglage pour réduire la profondeur Réglage de la profondeur (9) mal ajusté Déplacez le cran de réglage pour augmenter la profondeur Mauvaise utilisation Le mécanisme doit être complètement compressé jusqu’à ce qu’il soit arrêté par le réglage de la profondeur Tête de la vis mal encastrée Bande endommagée Faites passer la bande pour utiliser la partie non-endommagée Bande
Visseuse automatique 380 W 267412 Garantie Silverline Ce produit Silverline bénéficie d’une garantie de 3 ans Enregistrez ce produit sur le site silverlinetools.com dans les 30 jours suivant l’achat afin de bénéficier de la garantie de 3 ans. La période de garantie commence à partir de la date d’achat figurant sur votre facture d’achat. Enregistrement de votre achat Visitez silverlinetools.
D Beschreibung der Symbole Auf dem Typenschild des Werkzeugs sind möglicherweise Symbole abgebildet. Sie vermitteln wichtige Informationen über das Produkt oder dienen als Gebrauchsanweisung.
Schnellbauschrauber, 380 W 267412 Elektrische Sicherheit a) Der Anschlussstecker des Elektrowerkzeuges muss in die Steckdose passen. Der Stecker darf in keiner Weise verändert werden. Verwenden Sie keine Adapterstecker gemeinsam mit schutzgeerdeten Elektrowerkzeugen. Unveränderte Stecker und passende Steckdosen verringern das Risiko eines elektrischen Schlages. b) Vermeiden Sie Körperkontakt mit geerdeten Oberflächen wie von Rohren, Heizungen, Herden und Kühlschränken.
D • Einsatzwerkzeuge werden während des Betriebs heiß. Lassen Sie sie vor dem Berühren abkühlen. • Entfernen Sie Sägemehl, Sägespäne oder Ausschussmaterial nahe dem Einsatzwerkzeug niemals mit den Händen. • Falls Sie beim Betrieb der Bohrmaschine unterbrochen werden, führen Sie den begonnenen Arbeitsschritt zu Ende und schalten Sie das Gerät aus, bevor Sie aufschauen. • Verwenden Sie nach Möglichkeit Spannvorrichtungen oder einen Schraubstock zur sicheren Befestigung des Werkstücks.
Schnellbauschrauber, 380 W 267412 Nachschubmechanismus Schraubenlänge einstellen Um das Magazin auf die zu verwendenden Schrauben einzustellen, lösen Sie das Rändelrad zur Schraubenlängeneinstellung (2) und verändern Sie die Längenposition durch Ziehen oder Schieben der Anschlagplatte (7), bis sich das Rändelrad zur Schraubenlängeneinstellung in eine der Kerben zur Schraubenlängeneinstellung (3) einsetzen und dort anziehen lässt.
D Instandhaltung Lagerung WARNUNG: Trennen Sie das Gerät stets vom Stromnetz, bevor Sie Reinigungs- oder Wartungsarbeiten daran vornehmen. Reinigung • Halten Sie Ihr Gerät stets sauber. Durch Schmutz und Staub verschleißen die inneren Teile schnell und die Lebensdauer des Gerätes wird verkürzt. Reinigen Sie das Gerätegehäuse mit einer weichen Bürste oder einem trockenen Tuch. Die Entlüftungsöffnungen mit sauberer, trockener Druckluft reinigen, sofern verfügbar.
Schnellbauschrauber, 380 W 267412 Silverline-Tools-Garantie Dieser Silverline-Artikel wird mit einer 3-Jahres-Garantie angeboten Registrierung Ihres Kaufs Registrieren Sie diesen Artikel unter silverlinetools.com innerhalb von 30 Tagen nach dem Kauf, um die 3-Jahres-Garantie zu aktivieren. Der Garantiezeitraum beginnt mit dem Kaufdatum auf Ihrem Kaufbeleg. Gehen Sie auf silverlinetools.
ESP Descripción de los símbolos Los símbolos siguientes pueden aparecer en la placa de características de su herramienta. Éstos representan información importante sobre el producto o instrucciones relativas a su uso Lleve protección auditiva Lleve protección ocular Lleve protección respiratoria Lleve un casco de seguridad Lleve guantes de seguridad Lea el manual de instrucciones Doble aislamiento para mayor protección Conforme a las normas de seguridad y la legislación correspondiente.
267412 d) No maltrate el cable de alimentación. No use nunca el cable de alimentación para transportar la herramienta eléctrica, tirar de ella o desenchufarla. Mantenga el cable de alimentación alejado de fuentes de calor, del aceite, de los bordes afilados o de las piezas móviles. Los cables de alimentación dañados o enredados aumentan el riesgo de descargas eléctricas. e) Cuando utilice una herramienta eléctrica en el exterior, use un cable de extensión adecuado para uso en exteriores.
ESP • Siempre que sea posible, utilice mecanismos de sujeción. • Desenchufe siempre la máquina antes de cambiar un accesorio. • Examine el portabrocas con regularidad en busca de signos de desgaste o daños. Lleve las piezas dañadas a reparar por un centro de servicio cualificado. • Espere siempre hasta que la broca se detenga por completo antes de dejar la herramienta. • Al finalizar el trabajo, quite la broca de la máquina y desenchúfela de la red eléctrica.
7412 5. Coloque el ajuste de velocidad (13) al mínimo. 6. Asegúrese de que el selector de avance/retroceso (12) esté colocado hacia adelante para poder atornillar tornillos en la pieza de trabajo. Funcionamiento 1. Coloque el tope (7) a 90° de la pieza de trabajo para introducir el primer tornillo. 2. Sujete el atornillador por la empuñadura (16) y el conector para la caja de alimentación automática (1). 3. Apriete el gatillo (14) para operar la herramienta.
ESP Solución de problemas Problema Causa Solución Los tornillos no se introducen demasiado en la pieza de trabajo Ajuste de profundidad (9) incorrecto Mueva el ajuste de profundidad hacia arriba para disminuir la profundidad Ajuste de profundidad (9) incorrecto Mueva el ajuste de profundidad hacia abajo para incrementar la profundidad Funcionamiento incorrecto Baje el mecanismo completamente hasta alcanzar el ajuste de profundidad Cinta dañada Coloque la cinta en la parte que no esté dañada Cint
Atornillador autoalimentado 380 W 267412 GarantíaGarantía Silverline Tools Este producto Silverline dispone de una garantía de 3 años. Registre el producto en www.silverlinetools.com antes de que transcurran 30 días a partir de la fecha de compra para obtener la garantía de 3 años. El periodo de garantía comienza desde la fecha indicada en su recibo de compra. Registro del producto Visite: silverlinetools.
I Descrizione dei simboli La targhetta sul vostro strumento può mostrare simboli. Questi rappresentano importanti informazioni sul prodotto o istruzioni sul suo utilizzo. Indossare una protezione per l'udito. Indossare occhiali di protezione. Indossare protezione delle vie respiratorie. Indossare il casco. Indossare la protezione delle mani. Leggere il manuale di istruzioni. Doppio isolamento per una protezione aggiuntiva. Conforme alle normative pertinenti e gli standard di sicurezza.
267412 d) Non usare il cavo in modo improprio. Non afferrare mai il cavo per trasportare, tirare o staccare l’elettroutensile dalla presa di corrente. Tenere il cavo lontano da fonti di calore, olio, e sostanze affini, bordi appuntiti o parti in movimento. I cavi danneggiati o attorcigliati aumentano il rischio di scosse elettriche. e) Qualora si voglia usare l’utensile all’aperto, usare cavi di prolunga compatibili con l’uso in ambienti esterni.
I Familiarizzazione con il prodotto 1 Connettore auto-alimentato 2 Ghiera di lunghezza vite 3 Tacche di lunghezza vite 4 Occhiello della punta avvitamento 5 Punto di carico 6 Guida 7 Base a tappo 8 Alimentatore della cintura di vite 9 Regolatore di profondità 10 Mandrino 11 Meccanismo di montaggio auto-alimentato 12 Selettore avanti/indietro 13 Regolatore velocità 14 Grilletto 15 Pulsante di blocco 16 Maniglia 17 Chiave del mandrino 18 Alimentatore cintura di vite 19 Cin
267412 Avvitatore auto-alimentato 380 W 4. Spingere attentamente la base a tappo contro il materiale in modo che il meccanismo autoalimentato viene compresso e il cacciavite collega con la vite. Mentre questo accade, la parte interna del meccanismo autoalimentato immerge nella cassa esterna del meccanismo autoalimentato 5.
I Risoluzione dei problemi Problema Possibile causa Soluzione Vite è azionato troppo in profondità nel pezzo Regolatore di profondità (9) impostato in modo errato Spostare il regolatore di profondità fino a ridurre la profondità Profondità di regolazione impostato in modo errato Spostare il regolatore di profondità verso il basso per aumentare la profondità di avvitamento Uso scorretto Immergere il meccanismo completamente in modo che viene fermato dal regolatore di profondità Cintura danneggiata
Avvitatore auto-alimentato 380 W 267412 Garanzia Silverline Tools Questo prodotto Silverline è protetto da una garanzia di 3 anni Per attivare la garanzia di 3 anni è necessario registrare il prodotto sul sito www.silverlinetools.com entro 30 giorni dalla data d’acquisto. La data d’inizio del periodo di garanzia corrisponde alla data d’acquisto riportata sullo scontrino di vendita. Registrazione dell'acquisto Accedere al sito: silverlinetools.
NL Beschrijving symbolen Op het gegevensplaatje van uw gereedschap kunnen zich symbolen bevinden. Deze vertegenwoordigen belangrijke productinformatie en gebruiksinstructies. Draag gehoorbescherming Draag een veiligheidsbril Draag een stofmasker Draag een veiligheidshelm Draag handschoenen Lees de handleiding Dubbel geïsoleerd voor extra bescherming Voldoet aan de relevante wetgeving en veiligheidsnormen Milieubescherming Elektrische producten mogen niet met het normale huisvuil worden weggegooid.
Schroefautomaat, 380 W 267412 d) Beschadig het snoer niet. Gebruik het snoer nooit om het elektrisch gereedschap te dragen, te trekken of om de stekker uit het stopcontact te trekken. Houd het snoer uit de buurt van hitte, olie, scherpe randen of bewegende delen. Een beschadigde of in de knoop geraakte snoer verhoogt het risico op een elektrische schok toe. e) Wanneer u elektrisch gereedschap buiten gebruikt, maak dan gebruik van een verlengsnoer dat geschikt is voor gebruik buitenshuis.
NL Productbeschrijving 1 Schroefautomaat koppeling 2 Schroeflengte knop 3 Schroeflengte gleuven 4 Schroevendraaier bit oog 5 Laadpunt 6 Geleider 7 Stopper basis 8 Schroefriem voeder 9 Diepte verstelwiel 10 Boorhouder 11 Schroefautomaat mechanisme koppelpunt 12 Rotatierichting schakelaar 13 Snelheidsversteller 14 Trekker schakelaar 15 Aan stand vergrendeling 16 Handvat 17 Boorhouder sleutel 18 Schroefriem voeder 19 Schroefriem 20 Schroevendraaier bit Gebruiksdoel • Met
Schroefautomaat, 380 W 267412 6. Zorg ervoor dat de rotatierichting schakelaar (12) in de voorwaartse positie staat zodat de schroeven in het werkstuk gedraaid kunnen worden Gebruik 1. Plaats de stopper basis (7) recht op de eerste schroefpositie 2. Houdt de machine bij het handvat (6) en de schroefautomaat koppeling (1) vast 3. Knijp de trekker schakelaar (14) in om de machine te starten. Knijp de trekker schakelaar voor elke schroefingang in, of vergrendel de machine in de aan stand 4.
NL Probleemopsporing Probleem Mogelijke oorzaak Oplossing Schroeven worden te diep in het werkstuk geschroefd Diepte verstelwiel (9) is onjuist ingesteld Verstel het wiel omhoog om de ingangsdiepte te verminderen Diepte verstelwiel (9) is onjuist ingesteld Verstel het wiel omlaag om de ingangsdiepte te vergroten Onjuist gebruik van de machine Duw de machine volledig naar beneden tot deze door het verstelwiel geblokkeerd wordt De riem is beschadigd Sla het beschadigde deel van de riem over De rie
Schroefautomaat, 380 W 267412 Silverline Tools Garantie Dit Silverline product komt met 3 jaar garantie. Het gekochte product registreren Registreer dit product binnen 30 dagen van aankoop op www.silverlinetools.com om in aanmerking te komen voor 3 jaar garantie. De garantieperiode begint op de datum van aankoop op het ontvangstbewijs. Ga naar: silverlinetools.