SUGO GO Series SG13 The benchmark b h k for f smallll form f factor f t value l
Installation and system optimization guide: The following manual and guides were carefully prepared by the SilverStone engineering team to help you maximize the potential of your SilverStone product. Please keep this manual for future reference when upgrading or performing maintenance on your system. A copy of this manual can also be downloaded from our website at: Product Overview P.1 Special Features P.1 Specification P.1 Disassemble Chart P.2 Exterior Overview P.3 Installation Guide P.
SUGO Series SG13 Product Overview O Introduction on SG13B-Q SG13B X into mainstream DIY (do it yourself) market in 2009 with the Sugo SG05, SilverStone is looking to define the After bringing Mini-ITX G13, a newly evolved design that aims to satisfy every type of computer users. At only 11.
SUGO Series SG13 Disassemble Chart TOP COVER 3.5” DRIVE BAY * 1 OR 2.5” DRIVE BAY * 2 EXPANSION SLOTS * 2 ATX / PS2 PSU (OPTION) 12025 FAN * 1 OR 14025 FAN (OPTION) RESET BUTTON POWER BUTTON PVC - FILTER FAN FILTER (SG13B ONLY) RESET BUTTON POWER BUTTON MOTHERBOARD (Mini-DTX, Mini-ITX) (OPTION) USB 3.0 * 2 + SPK + MIC (SG13B-Q) 2.5” DRIVE BAY * 1 PVC - FILTER (SG13B) PICTURE ITEM FAN - RUBBER - 2 USB 3.
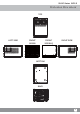
SUGO Series SG13 Exterior Overview TOP LEFT SIDE FRONT SG13B FRONT SG13B-Q RIGHT SIDE BOTTOM BACK 3
SUGO Series SG13 Installation Chart Before you begin, please make sure that you 1 2 3 4 5 have all components collected check that all components do not have compatibility problems with each other or with the case if possible, assemble the components outside the case first to make sure they are working keep the motherboard manual ready for reference during installation prepare a Philips screwdriver.
SUGO Series SG13 Installation Chart 02 Remove the screws holding the hard drive bracket with a screw driver as shown, then remove the cage outward from the chassis. Entfernen Sie die Schrauben, die die Festplattenhalterung halten, wie abgebildet mit einem Schraubendreher; nehmen Sie dann den Käfig aus dem Gehäuse. Retirez les vis de fixation du support de disque dur à l'aide d'un tournevis, comme indiqué, puis retirez la cage vers l'extérieur du châssis.
SUGO Series SG13 Installation Chart 03 Remove front panel. Entfernen Sie die Frontblende. Enlevez le panneau frontal. Retire el panel frontal. Rimuovere il pannello frontale. Снимите лицевую панель. 拆卸前面板。 拆卸前面板。 フロントパネルを取り外します。 전면 패널을 분리합니다.
SUGO Series SG13 Installation Chart 04 Install motherboard into the chassis. Installieren Sie das Motherboard im Gehäuse. Installez la carte mère sur le châssis. Instale la placa base en el chasis. Installare la scheda madre nel telaio. Установите системную плату в корпус. 將主機板安裝上機殼。 将主板安装上机壳。 ケースにマザーボードを装着します。 메인보드를 섀시에 설치합니다.
SUGO Series SG13 Installation Chart 05 Install 2.5” drive onto the bottom panel. Installieren Sie das 2,5-Zoll-Laufwerk an der Bodenplatte. Installez le lecteur 2,5" sur le panneau inférieur. Instale el dispositivo de 2,5” en el panel inferior. Installare l’unità da 2,5” sul pannello inferiore. Установите 2,5-дюймовый привод на нижнюю панель. 安裝底板的2.5吋硬碟。 安装底板的2.5吋硬盘。 2.5"ドライブを底部パネル上にインストールします。 2.5” 드라이브를 하단 패널에 설치합니다.
SUGO Series SG13 Installation Chart 06 If you wish to use all-in-one liquid cooler or a front fan, please install it now. Wenn Sie einen Alles-in-Einem-Flüssigkeitskühler oder einen frontseitigen Lüfter nutzen möchten, installieren Sie diesen bitte jetzt. Si vous souhaitez utiliser le refroidisseur liquide tout-en-un ou un ventilateur en façade, veuillez l'installer à présent. Si desea usar refrigeración líquida multifunción o un ventilador frontal, por favor instálelos ahora.
SUGO Series SG13 Installation Chart 07 Connect all front I/O connectors. Verbinden Sie alle frontseitigen Ein-/Ausgänge. Connectez tous les connecteurs d'E/S en façade. Conecte todos los conectores frontales E/S. Collegare tutti i connettori I/O frontali. Подключите все разъемы ввода/вывода на передней панели. 建議您此時連接前置I/O線材。 建议您此时连接前置I/O线材。 すべてのフロントI/Oコネクタを接続します。 모든 전면 I/O 커넥터를 연결합니다.
SUGO Series SG13 Installation Chart 08 Due to limited internal space between expansion card and power supply area, we recommend to install power supply into the chassis before expansion card. Aufgrund des beschränkten Platzes zwischen Erweiterungskarte und Netzteilbereich sollten Sie das Netzteil vor der Erweiterungskarte im Gehäuse installieren.
SUGO Series SG13 Installation Chart 09 Install drives into drive cage’s mounting holes depending on their sizes. Figure 1 shows 2.5" drives, Figure 2 show 3.5" drive, and Figure 3 shows a high capacity hard drive. Installieren Sie Laufwerke je nach Größe in den Montagelöchern des Laufwerkskäfigs. Abbildung 1 zeigt 2,5-Zoll-Laufwerke, Abbildung 2 zeigt 3,5-Zoll-Laufwerke und Abbildung 3 zeigt eine Festplatte mit hoher Kapazität.
SUGO Series SG13 Installation Chart 10 Reinstall completed drive cage assembly back into the chassis. Bringen Sie den bestückten Festplattenkäfig wieder im Gehäuse an. Réinstallez l'ensemble de la cage avec les lecteurs dans le châssis. Reinstale la carcasa para dispositivos con el montaje completo de nuevo en el chasis. Reinstallare nel telaio la gabbia con disco rigido. Установите заполненный отсек приводов обратно в корпус.
SUGO Series SG13 Installation Chart 11 Connect all remaining cables. Schließen Sie alle restlichen Kabel an. Connectez tous les câbles restants. Conecte todos los cables restantes. Collegare tutti i cavi rimanenti. Подключите остальные кабели. 連接所有排線。 连接所有扁平电缆。 残りのケーブルを全て接続します。 남아 있는 모든 케이블을 연결합니다.
SUGO Series SG13 Installation Chart 12 Install graphics or expansion card as needed. If the card you wish to use is too long to fit through the side of the chassis, you can alternatively install it through the front panel of the case. Installieren Sie nach Erforderlichkeit eine Grafik- oder Erweiterungskarte. Falls die Karte, die Sie nutzen möchten, aufgrund ihrer Länge nicht durch die Seite des Gehäuses passt, können Sie sie alternativ durch die Frontblende des Gehäuses installieren.
SUGO Series SG13 Installation Chart 13 Close the front panel. Schließen Sie die Frontblende. Fermez le panneau frontal. Cierre el panel frontal. Chiudere il pannello frontale. Закройте лицевую панель. 蓋上前面板。 盖上前面板。 フロントパネルを閉じます。 전면 패널을 닫습니다.
SUGO Series SG13 Installation Chart 14 Re-install expansion card slot holder and secure with screws. Bringen Sie die Halterung des Erweiterungskartensteckplatzes wieder an und befestigen Sie sie mit Schrauben. Réinstallez le support de l'emplacement de la carte d'extension et fixez-le avec des vis. Reinstale el enganche del zócalo de la tarjeta de expansión y fíjelo con tornillos. Reinstallare il supporto dell’alloggio per schede di espansione e fissarlo con le viti.
SUGO Series SG13 Installation Chart 15 Make sure again that all cables and connectors are installed, then remount the top cover and secure with screws. Stellen Sie sicher, dass alle Kabel und Anschlüsse installiert sind; bringen Sie die obere Abdeckung dann wieder an und befestigen Sie sie mit Schrauben. Assurez-vous de nouveau que tous les câbles et connecteurs sont installés, puis remontez le capot supérieur et fixez-le avec des vis.
SUGO Series SG13 Installation Chart 16 Installation complete. Damit ist die Installation abgeschlossen. L'installation est terminée. Instalación completa. L'installazione è completata. Установка завершена. 安裝完成 安装完成 インストール完了。 설치가 완료되었습니다.
SUGO Series SG13 Connector Definition (1) Front Panel Connectors A.Power switch and reset switch installation guide: Please refer to the motherboard manuals for the motherboard’s “Front Panel Connector” or “System Panel Connector” pin definitio Power switch and reset switch have no polarity, so they can be connected in any orientation. Bitte suchen Sie in der Motherboard-Dokumentation nach der Pinbelegung der Anschlüsse des Frontbedienfeldes („Front Panel Conne oder „ System Panel Connectors“).
SUGO Series SG13 Connector Definition (1) Front Panel Connectors B:LED indicators installation guide Please refer to the motherboard manuals for the motherboard’s “Front Panel Connector ” or “System Panel Connector” pin definition.; the white/black wires are negative while other colors are positive wires. The Power LED wires are separate pins for compatibility with different motherboard pin definition so please make sure they are connected in the right polarity by referring to your motherboard manual.
SUGO Series SG13 Connector Definition (2) Front I/O connector guide Below are the front I/O connectors pin definition, please also check your motherboard manual to cross reference with motherboard’s front I/O pin headers. SilverStone’s I/O connectors are in block type to simplify installation. Nachstehend finden Sie die Pinbelegung der vorderen E/A-Anschlüsse; bitte gleichen Sie zudem das Handbuch Ihres Motherboards mit den vorderen E/A-Pinzuweisungen ab.
SUGO Series SG13 Component Size Limitations SG13 is a small form factor (SFF) case, we recommend the following guidelines for assembly or future upgrades. (1) CPU cooler height limitation A. Air cooling 8mm 61mm 90mm CPU cooler height limitation:The SG13 has 61mm height limitation for CPU cooler. Upper boundary:The cooler can protrude 8mm over the motherboard edge. Front boundary:Cooler can protrude from motherboard edge by 90mm without system fan installed.
SUGO Series SG13 Component Size Limitations B. Liquid cooling 90mm 264mm The maximum thickness for radiator plus fans is 90mm. When using coolers such as SilverStone’s TD03, we recommend installing only one fan with it. To reduce interference of tubing against the motherboard, the radiator should be installed in front of the fan. Installing larger 140mm based radiator will require the removal of the upper drive cage and sacrifice to available room for graphics card.
SUGO Series SG13 Component Size Limitations (2) PSU limitation 140mm 264mm Maximum depth for a standard PS/2 (ATX) power supply is 150mm. Models with modular cables may or may not fit depending on connector locations. If upper drive cage is removed, there is nearly no limit to power supply depth, pending the thickness of the fan or radiator used on the front panel. The table shows power supply we have tested: Die maximale Tiefe eines standardmäßigen PS/2(ATX)-Netzteils beträgt 150 mm.
SUGO Series SG13 Component Size Limitations (3) Graphics card length limit 10.6” SG13 can support graphics card up to 10.6” (270mm) long. Das SG13 kann Grafikkarten mit einer Länge bis 270 mm (10,6 Zoll) unterstützen Le SG13 peut prendre en charge une carte graphique jusqu'à 10,6" (270 mm) de long.
SUGO Series SG13 Upgrade And Maintenance Fan removal steps 01 Remove front panel Снимите лицевую панель. Entfernen Sie die Frontblende. 拆除前面板 Enlevez le panneau frontal. 拆除前面板 Retire el panel frontal. フロントパネルを取り外します。 Rimuovere il pannello frontale. 전면 패널을 분리합니다. Unscrew screws holding the fans to remove them. Отверните винты крепления вентилятора и извлеките его. Lösen Sie die Fixierschrauben des Lüfters und nehmen Sie den Lüfter heraus.
SUGO Series SG13 Upgrade And Maintenance SG13 ’s positive air pressure design is an effective configuration that will reduce dust buildup inside the case. Small air particles or lint will accumulate over time on intake filters instead of on the components inside the case. To maintain SG13 ’s excellent cooling performance for years to come, we recommend to clean all fan filters regularly every three months or half a year (depending on your environment). Below are steps to remove fan filters.
SUGO Series SG13 Upgrade And Maintenance Filter removal steps 01 Remove front panel Снимите лицевую панель. Entfernen Sie die Frontblende. 拆除前面板 Enlevez le panneau frontal. 拆除前面板 Retire el panel frontal. フロントパネルを取り外します。 Rimuovere il pannello frontale. 전면 패널을 분리합니다. Remove filter from the front panel for cleaning. Снимите фильтр с лицевой панели для очистки. Entfernen Sie den Filter zur Reinigung von der Frontblende. 從前面板上拆下濾網清理 Retirez le filtre du panneau avant pour le nettoyage.
SUGO Series SG13 Q&A Q: Why do you recommend using all-in-one liquid coolers? A: Many Mini-ITX motherboards are currently designed based off of Intel’s reference layout, which means the CPU is likely positioned too close to the PCI Express slot and limits the size of CPU coolers that can be installed. Normally if the same size fan is used, a high-end air cooler is more efficient than liquid cooler.
SUGO Series SG13 Q&A В: Почему рекомендуется использовать жидкостные кулеры конструкции «все в одном»? О: Многие современные системные платы Mini-ITX разрабатываются на основе эталонной компоновки компании Intel, при которой процессор зачастую располагается слишком близко к слоту PCI Express, что ограничивает допустимые размеры кулеров для процессоров. Обычно при применении вентилятора одного размера мощный кулер с воздушным охлаждением превосходит по эффективности кулер с жидкостным охлаждением.
SUGO Series SG13 Warranty Information 计算器机箱 有毒有害物质/元素及其化学含量表 部件名称 铅 (Pb) 汞 (Hg) 镉 (Cd) 六价铬 (Cr(VI)) 多溴联苯 (PBB) 多溴二苯醚 (PBDE) 机壳(金属) × ○ ○ ○ ○ ○ 机壳(塑胶) ○ ○ ○ ○ ○ ○ 风扇 × ○ ○ ○ ○ ○ 电子卡 × ○ ○ ○ ○ ○ 线材 × ○ ○ ○ ○ ○ 螺丝 × ○ ○ ○ ○ ○ 包材 ○ ○ ○ ○ ○ ○ ○:表示该有毒有害物质在该部件所有均质材料中的含量均在SJ/T11364-2014 标准规定的限量要求以下。 ×:表示该有毒有害物质在该部件材料中的含量超出SJ/T11364-2014标准规定 的限量要求。 本表中有×的部件均符合欧盟RoHS法规,即欧盟第2011/65/EU号指令要求。 产品合格证 检验员:检01 生产日期:见产品条码 This product has a limited 1 year warranty
G11223162