DS380 Premium SFF chassis with unbelievable storage capacity
DATA STORAGE SERIES DS380 Premium SFF chassis with unbelievable storage capacity acity • Unbelievable storage space and versatility for small form factor • Support 12 total drives with 8 hot-swappable 3.5” or 2.5” SAS/SATA and 4 fixed 2.5” drives • • • • Premium brushed aluminum front door n from TJ08-E Support graphics card up to 11” with supporter design om GD07 Lockable power button design and adjustable LED from Includes three 120mm fans with filtered intake vents Model No.
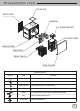
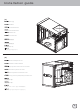
Disassemble chart TOP FILTER SIDE FILTER 12025FAN 2.5" DRIVE BRACKET 3.5" DRIVE CAGE DRIVE COVER 12025 FAN*2 DRIVE TRAY*8 SIDE COVER SPARE-PARTS PICTURE ITEM MANUAL PURPOSE USER INSTALLATION GUIDE SCREW-A(632*5) PSU*3, MOTHERBOARD*4, 3.5’HDD*32 AND DRIVE CAGE*8 SCREW-B(M3*4) REAR DRIVE CAGE (2.5” HDD/SSD*16) SCREW-C(M3*6) FRONT DRIVE CAGE (2.
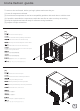
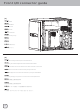
Front I/O connector guide (1) Adjust LED indicator brightness DS380’s front door contains a slider to adjust LED brightness. If you need to adjust brightness, we suggest turning on the system first with the door closed and then open the front door to adjust the brightness slider up and down to desired level. An der Fronttür des DS380 finden Sie einen Schieber zum Einstellen der LED-Helligkeit.
Installation guide To save on time and hassle, before you begin, please make sure that you : (1) have all components collected. (2) check that all components do not have compatibility problems with each other or with the case. (3) if possible, assemble the components outside the case first to make sure they are working. (4) keep the motherboard manual ready for reference during installation. (5) prepare a Philips screwdriver.
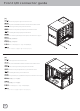
Front I/O connector guide (3) Remove screws from the primary drive cage to remove it from the case Schrauben am primären Laufwerkhalter herausdrehen und Halter aus dem Gehäuse nehmen Retirez les vis de la cage du lecteur primaire pour le retirer du boîtier Quite los tornillos de la carcasa primaria para dispositivos para retirarla de la carcasa Rimuovere le viti dalla gabbia unità principale per rimuoverla dal case Удалите винты с основного кронштейна для жестких дисков, чтобы извлечь его из корпуса.
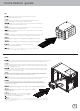
Installation guide (5) Install SFX power supply SFX-Netzteil installieren installez la source d'alimentation SFX Instale la fuente de alimentación SFX Installazione della PSU SFX Установите блок питания SFX. 安裝SFX規格電源供應器。 安装SFX规格电源供应器。 SFX電源を取り付けます。 SFX 전원 공급장치를 설치합니다.
Front I/O connector guide (7) Install motherboard Motherboard installieren Installez la carte mère Instale la placa base Installare la scheda madre Установите системную плату. 安裝主機板。 安装主机板。 マザーボードを取り付けます。 메인보드를 설치합니다. (8) We recommend connecting all cables required on the motherboard now Wir empfehlen, jetzt sämtliche benötigten Kabel an das Motherboard anzuschließen.
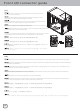
Installation guide (9) Install 2.5” drives into the 2.5” drive cage, if there are insufficient SATA connectors, we recommend using SilverStone’s CP06-E. Installieren Sie die 2,5-Zoll-Laufwerke im 2,5-Zoll-Laufwerkhalter. Falls nicht genügend SATA-Anschlüsse vorhanden sind, empfehlen wir SilverStones CP06-E. Installez les lecteurs de 2,5” sur la cage du boîtier de 2,5”, s'il n'y a pas assez de connecteurs SATA, nous vous recommandons d'utiliser SilverStone’s CP06-E.
Front I/O connector guide (11) Install expansion card. If necessary you can convert the third drive slot in the primary drive cage into a holder module for long expansion cards. Installieren Sie Erweiterungskarten. Falls nötig, können Sie den dritten Laufwerkschacht im primären Laufwerkhalter in einen Halter für lange Erweiterungskarten umwandeln. Installez la carte d'extension.
Installation guide (13) With all cables connected, carefully reinstall the primary drive cage back into the case. Bauen Sie den primären Laufwerkhalter mit sämtlichen angeschlossenen Kabeln sorgfältig wieder in das Gehäuse ein. Une fois tous les câbles connectés, réinstallez avec soin la cage du lecteur primaire dans le boîtier. Con todos los cables conectados, reinstale de nuevo la carcasa primaria para dispositivos en la carcasa.
Front I/O connector guide (15) Install drives into the hot-swap trays. Installieren Sie Laufwerke in den Hot Swap-Einschüben. Installez les lecteurs dans les baies hot-swap. Instale los dispositivos en las bandejas para cambio en caliente. Installare le unità nei cassetti hot-swap. Установите жесткие диски в отсеки с возможностью «горячей» замены. 將熱插拔硬碟安裝至硬碟抽取盤。 将热插拔硬盘安装至硬盘抽取盘。 ドライブをホットスワップトレイに装着します。 드라이브를 핫스왑 트레이 안에 설치합니다.
Connector definition (1) Front panel connector installation Power switch and reset switch installation guide: Please refer to the motherboard manuals for the motherboard’s “Front Panel Connector” or “System Panel Connector” pin definitio Power switch and reset switch have no polarity, so they can be connected in any orientation. Bitte suchen Sie in der Motherboard-Dokumentation nach der Pinbelegung der Anschlüsse des Frontbedienfeldes („Front Panel Conne oder „ System Panel Connectors“).
Connector definition LED connector installation guide: Please refer to the motherboard manuals for the motherboard’s “Front Panel Connector ” or “System Panel Connector” pin definition.; the white/black wires are negative while other colors are positive wires. The Power LED wires are separate pins for compatibility with different motherboard pin definition so please make sure they are connected in the right polarity by referring to your motherboard manual.
Front I/O connector guide Below are the front I/O connectors pin definition, please also check your motherboard manual to cross reference with motherboard’s front I/O pin headers. SilverStone’s I/O connectors are in block type to simplify installation. Nachstehend finden Sie die Pinbelegung der vorderen E/A-Anschlüsse; bitte gleichen Sie zudem das Handbuch Ihres Motherboards mit den vorderen E/A-Pinzuweisungen ab. SilverStones E/A-Anschlüsse befinden sich zur Vereinfachung der Installation in Blockart.
Guide to hard drive backplane Insert two 4pin peripheral connectors into the corresponding plugs on the backplane. Insert side case fan connectors into the backplane’s fan headers. For connecting to dual channel SAS drives, also connect to SAS plugs on the left side of the backplane. For connecting to SATA or single channel SAS drives, connect SATA or SAS connectors to the SATA/SAS plugs on the right side of the backplane. 1.
Component Size Limitations DS380 was designed to accommodate oversize components, but we still recommend referring to the following dimension guidelines for future upgrades: (1) CPU cooler limitation The height limit is 57mm and there is 5.7mm of clearance around the motherboard’s edge. Das Höhenlimit beträgt 57 mm, an der Kante des Motherboards verbleiben 5.7 mm Freiraum. La hauteur maximale est de 57mm et il y a une espace de 5.7mm autour du bord de la carte mère.
Component Size Limitations (2) PSU limitation DS380 requires SFX PSU with standard 100mm depth. Das DS380 benötigt SFX-Netzteile mit einer Standardtiefe von 100 mm. Le DS380 a besoin de SFX PSU d'une profondeur standard de 100 mm. La DS380 necesita una FA SFX con una profundidad estándar de 100mm. DS380 richiede una PSU SFX con profondità standard di 100 mm. Для корпуса DS380 требуется блок питания SFX стандартной длины: 100 мм.
Component Size Limitations A.主硬盘架安装8颗热插拔硬盘时 如果主硬盘架要装满八颗硬盘,则显示卡长度限制较为严格。 *标准宽度的显示卡长度限制为6吋。 *如果显示卡宽度小于2.35吋,长度则无限制(Low profile标准是2.73吋)。 A.プライマリドライブケージには8台のホットスワップドライブが装着可能 プライマリドライブケージが全て埋まっている場合、グラフィックスカードには明確な制限が存在します。 *グラフィックスカードの標準の幅として6インチの制限があります。 *カード幅が2.35インチ以内であれば、長さの制限はありません。 A.8개의 핫스왑 드라이브가 설치된 기본 드라이브 케이지 기본 드라이브 케이지가 완전히 채워진 경우 그래픽 카드 길이 제한을 엄격하게 맞춰야 합니다. *그래픽 카드 기본 폭에 대한 제한은 6 인치입니다. *카드 폭이 2.35 인치 미만이면 길이 제한이 없습니다. B.
Component Size Limitations B.如果您的顯示卡超過上列的條件,則需要將硬碟架第三槽的檔片置換為零件包裡的長卡模組。 *此時顯示卡長度限制為11吋。 *顯示卡寬度限制為4.38吋。 *從後端量測6~6.4吋的位置,不允許有任何側向接頭,例如PCIE電源連接線。 *如顯示卡背面有支撐,所有背板元件空間不得超出電路板3.3mm 。 例如:Geforce GTX670這種顯示卡就無法支援。 如果您的显示卡超过上列的条件,则需要将硬盘架第三槽的文件片置换为零件包里的长卡模块。 *此时显示卡长度限制为11吋。 *显示卡宽度限制为4.38吋。 *从后端量测6~6.4吋的位置,不允许有任何侧向接头,例如PCIE电源连接线。 *如显示卡背面有支撑,所有背板组件空间不得超出电路板3.3mm 。 例如:Geforce GTX670这种显示卡就无法支持。 B.
Drive cable recommendation Cables with 180 degree or straight connectors are recommended to avoid interference with components on the backplane. Wir empfehlen Kabel mit um 180 ° gedrehten oder geraden Verbindern, damit keine Komponenten an der Rückwand berührt werden. Les câbles de 180 degrés ou les connecteurs droits sont recommandés pour éviter les interférences avec les composants sur le fond de panier.
Optimal Thermal Performance Layout TD03 (1) There is severe height restriction for CPU cooler. We recommend using all-in-one liquid cooling systems if high performance cooling is required. (2) When choosing a graphics card, we recommend models that have fan blowing exhaust air to the rear slot, this will ensure smooth and efficient airflow within the DS380 for maximum cooling performance. (1) Es gibt eine strikte Höhenbegrenzung des CPU-Kühlers.
Hard drive installation tips (A) (B) (C) A. If you have a system drive installed into one of the hot-swap bays and need to secure it from accidental removal, a screw hole is provided on the right side of the primary cage for this purpose. B. Label stickers are included with hot-swap trays, you can write on them to mark and distinguish the drives from one another. C. If necessary you can convert the third drive slot in the primary drive cage into a holder module for long expansion cards. A.
Upgrade And Maintenance (1) Fan filter removal guide An example of a GPU cooler that is filled with dust and has lost most of its cooling performance DS380’s positive air pressure design is an effective configuration that will reduce dust buildup inside the case. Small air particles or lint will accumulate over time on intake filters instead of on the components inside the case.
Upgrade And Maintenance (A) Remove PSU filter (B) Remove side filter If you accidentally loose/damage filters or need additional ones for backup, please contact your local SilverStone retailers or distributors for purchasing information: http://www.silverstonetek.com/wheretobuy_all.
Upgrade And Maintenance (2) Fan removal guide Remove primary drive cage completely Start with the side panel removed Remove fan filter to access fan screws and remove them If your expansion card is in the way of the fans, please remove it first Left side fans 1. Start with the side panel removed 2. Remove primary drive cage completely 3. If your expansion card is in the way of the fans, please remove it first 4. Remove fan filter to access fan screws and remove them 5.
Upgrade And Maintenance 左侧风扇 1.已于侧板移除后的状态 2.完整移除主硬盘架 3.如果您的适配卡盖住风扇,请先移除。 4.卸下左侧滤网后,将风扇螺丝卸除。 5.装回风扇时,反过来执行以上步骤。 左側ファン 1. 側面パネルの取り外しから始めます。 2. プライマリドライブケージを全部取り外します。 3. 拡張カードがファンの手前にある場合は、まずそれを取り外します。 4. ファンフィルターを外してファンのネジを外し、取り外します。 5. ファンを戻すには、上記の手順を逆にたどります。 왼쪽 팬 1.측면 패널을 분리하고 시작합니다 2.기본 드라이브 케이지를 완전히 분리합니다 3.확장 카드가 팬에 걸리면 먼저 확장 카드를 분리합니다 4.팬 나사에 접근할 수 있도록 팬 필터를 분리하고 나사를 풉니다 5.
Protect your computer Kensington Security Slot Note: Cable security lock is not included with DS380 A lock and cable can be purchased on the market for use with the Kensington security slots located on rear of DS380 to prevent removal of the entire computer or side panels.
Q&A Q. There are lots of capacitors on the backplane, what are they used for? A. They provide additional power stability for hot-swapping hard drives. F. An der Rückwand befinden sich eine Menge Kondensatoren; zu welchem Zweck? A. Diese sorgen für zusätzliche Stromversorgungsstabilität bei Hot Swap-Festplatten. Q. Il y a beaucoup de condensateurs sur le fond de panier, à quoi servent-ils? R. Ils fournissent une stabilité d'énergie supplémentaire pour les disques durs changeables à chaud. P.
Protect your computer Q. Why do you recommend using all-in-one liquid coolers? A. Many Mini-ITX motherboards are currently designed based off of Intel’s reference layout, which means the CPU is likely positioned too close to the PCI Express slot and limits the size of CPU coolers that can be installed. Normally if the same size fan is used, a high-end air cooler is more efficient than liquid cooler.
Q&A Q. なぜオールインワン型の水冷システムが推奨されるのですか? A. 多くのMini-ITXマザーボードは現在Intelの参照レイアウトに基づいて設計されています。つまり、多くの場合CPUはPCI Expressスロットのすぐ傍に位置し ているため、設置できるCPU冷却装置のサイズが制限されます。 同一サイズのファンが使用されている場合、通常はハイエンド空気冷却システムの方が水 冷システムより効果的です。 ただし、Mini-ITXマザーボードでは、その制限により、通常は92mm以下のファンの空冷システムのみ使用が可能です。 DS380ではラジエータがケース底部に設置され、CPU周辺のスペースによる制限を受けないため、水冷システムの方に利点があることになります。 当社ではDS380における代替冷却システムとして水冷システムの使用をお勧めします。内部試験でも、DS380では空冷に比べ水冷システムの方が高い性能 を発揮しています。 Q. all-in-one 액체 쿨러 사용을 권장하는 이유가 무엇입니까? A.
G11220231